
Overland Tech and Travel
Advice from the world's
most experienced overlanders
tests, reviews, opinion, and more
Quality . . .

I learned the hard way that the best equipment—and thus frequently the most expensive—almost invariably costs the least in the long run.
I was eight or nine years old, and desperately craved a fishing rod and reel to use on a three-acre pond that existed improbably barely a mile from our house outside Tucson, Arizona. The pond was fed by Sabino Creek, and boasted a population of sunfish and largemouth bass—a miraculous opportunity for a desert kid addicted to magazines such as Field and Stream and Sports Afield, which seemed to focus almost entirely on bucolic Catskill trout streams and Minnesota lakes.
I had a job sweeping porches and cleaning the yards of empty new houses waiting to be sold in our sprawling rural neighborhood (50 cents per unit if memory serves), and was slowly saving for a beautiful Shakespeare open-face spinning reel and rod set on display at the Save-Co in town. Then my friend Bruce, always above me on the childhood income scale, showed up with a superb matched Mitchell/Garcia set. Rats, as we said then. Next trip to the store, the Shakespeare combination gleamed at me, still out of reach—but another set in a blister pack was priced exactly at the amount of cash I had, and half the figure on the Shakespeare tag. So I brought home a little push-button spincasting reel called a Compac BEARCAT and its five-foot fiberglass rod.
Sigh . . . Big mistake.
While Bruce’s Mitchell/Garcia reel and sturdy six-foot rod immediately went to work hauling in sunfish and bass for our pond-side campfire and Boy Scout frying pan, my pot-metal push-button alternative immediately went to work malfunctioning. A typical session would go like this: I wind up for a cast, flip the rod forward, and release the button to freespool the line. My lure zings away in an elegant arc toward the eagerly waiting fish—but then the spool cover of the reel detaches and flies off on its own tangent trajectory, taking a loop of line with it. This causes the lure to abruptly reverse its elegant arc and come whizzing back to embed itself in the tip guide of the rod with a thwack.
There were other issues with the reel, and within six months the rod had begun to delaminate and shed vicious little fiberglass splinters. I did manage to catch some fish with that miserable bit of equipment, but the fatal flaw in my impatient attempt at thrift jelled into a lesson that has stuck ever since. When I bought my first external-frame backpack a couple years later, I gritted my teeth and waited, ignored the cheapo stuff, and paid—what was it, $19.95?—for a Camp Trails pack and frame combination, which served yoeman’s duty for the next ten years until I switched to an internal-frame Gregory Snow Creek, again the top of the line at the time and again a faithful and durable piece of equipment—in fact I still have it and could easily rotate it back into use.

In the early 1980s I learned about a new outdoor equipment company called Marmot Mountain Works. They were pioneers in manufacturing Gore-Tex outerwear and sleeping bags, and produced only exceptional, U.S.-made gear—at wincingly exceptional prices*. Nevertheless, over the course of a couple of years I managed to invest in a Warm II Gore-Tex down parka, a bantamweight Gore-Tex goose-down sleeping bag called a Grouse, and an utterly bombproof three-hoop mountaineering tent called a Taku.
That was 30 years ago. I still have every one of those items, and still regularly use all but the tent (which is tight for a couple). The sleeping bag retains probably 90 percent of its original loft; the parka is still the warmest piece of clothing I own. (And that last bit brings up the other salient advantage to high-quality equipment: It doesn’t just last longer; it works better too. You don’t gain much even if your cheap gear lasts a long time if you have to put up with substandard performance in the meantime—you might find yourself wishing it would wear out.) My amortized cost for that parka and sleeping bag must be literally pennies per use.

Thus, despite a penurious career as a freelance writer, I’ve remained faithful to the Church of Good Equipment, whether it be fishing rods, vehicles, or anything in between. Very frequently this has meant waiting for things I wanted right now, or buying used when I wanted shiny and new, and it’s always meant choosing priorities rather than buying every expensive item that strikes my fancy like some Robb Report subscriber. I’m reminded of the clueless interviewer who asked fishing writer John Gierach how a guy with a leaky roof and a 20-year-old truck in need of a valve job could afford a collection of vintage split-cane fly rods. Gierach just looked at the guy and said, “Isn’t it obvious?” Whenever anyone hints that I have more money than I let on, I point to our own cottage in the desert, which encloses a full 350 square feet under its (non-leaking) roof. We have more cover for our vehicles and equipment than we do for ourselves. That’s my kind of prioritizing—fortunately I’m blessed with a wife who agrees.
We’re lucky—not everyone can make such clear-cut choices in today’s world. Raising a family, in particular, creates overreaching priorities that push all others to the rear. Nevertheless, no matter what your circumstances, I’ll always maintain that defaulting to higher quality will save you money—and potentially a lot of grief—in the long run.
Especially if you live near a bass pond.

*Sadly, not any more. Like so many other such makers (including Camp Trails and Gregory), Marmot was sold off by its founder and now produces products offshore. Much of it is still good stuff, but . . . not the same.
Proper backup lights for the JATAC - with remote control
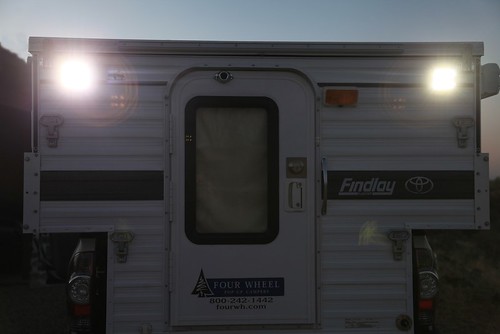 Brilliant 19-watt Grote LED floodlamps are optional on the Four Wheel Camper. Could they serve a dual purpose?
The sealed-beam automotive headlamp was introduced in the U.S. in 1939. In 1940, the government embraced the technology and required every car sold in this country to be equipped with identical 7-inch diameter incandescent headlamps—and for the next four decades, time essentially stood still. Not until 1978 did the U.S. legalize the superior halogen design (which had been used in Europe since the 1960s). Only in the last 15 years have further real advances been made in automotive headlamp technology, first with HID units and now, increasingly, with LED designs.
Rather peculiarly, though, our reversing lamps still appear to be stuck in 1940.
While a few manufacturers have begun installing LED backup bulbs, most remain incandescent. None that I’ve seen of either type matches the output of an average cheap single-AA LED flashlight—and this is with an entire automotive electrical system available to power it.
The situation is bad enough when you’re in a sedan trying to back out of a dark driveway without running over a pedestrian. It’s much, much worse if you find yourself too far down a narrow, rough four-wheel-drive route at night and need to turn around without going into the cactus or, somewhat worse, over the 50-foot cliff on the other side. I’m convinced not one Toyota, Land Rover, Jeep, or Mercedes engineer has ever been out testing a vehicle in the dark and found the need to engage reverse. Time after time in such a situation I’ve found myself trying to ride the brakes while doing so, because the brake lights are significantly brighter than the lights that are supposed to be showing me the way.
On my 1973 FJ40 I addressed the deficiency by installing a 50-watt Cibiè halogen fog lamp on the rear swing-away. Bam—problem solved. I can now reverse confidently out of a dicey situation without fear of making things worse.
 Nice LED brake lights on the Tacoma . . .
Our 2012 Tacoma’s running light and brake bulbs are all efficient, durable, and bright LEDs. (The brake lights add a safety factor: LED’s activate about two-tenths of a second faster than incandescent bulbs. If that doesn’t seem like much, consider that at 40 mph the car following you will travel 12 feet in that time, which could easily mean the difference between a non-event or a neck brace.)
Where was I? Right: The Tacoma’s reversing lights. I knew from experience they were . . . adequate, but didn’t work any better than the ones on our 2000 Tacoma. I couldn’t see what type they were by looking through the faceted lens, so I pulled the lamp assembly and the bulb, and, yep . . . 1940. What gives, Toyota?
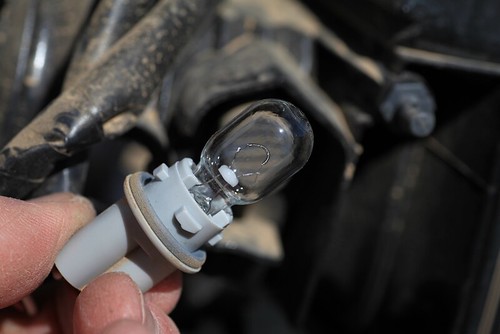 But what's with the cheap reversing bulb?
Ordinarily I would have gone online to look for upgraded bulbs, either a higher-wattage halogen replacement or an an LED conversion, although even this approach is somewhat limited by the stock reflector and lens. Other options include LED strips that mount on the license-plate frame (there are even compact HID reversing-bulb kits available with the potential to melt the plastic housing of the tail-lamp assembly).
However, since we have a Four Wheel Camper on our truck, and since on that camper we ticked the option box for a pair of high-mounted Grote 19-watt LED flood lamps that light up an area behind us most easily measured in acres, an obvious solution presented itself. Thanks to a tip from another FWC owner, Michael Doyle, I ordered a Cyron RC2-12 remote switch kit off Amazon for $25. The kit includes two key-chain remotes and a control box just a couple inches on a side, and advertises a 100-foot range.
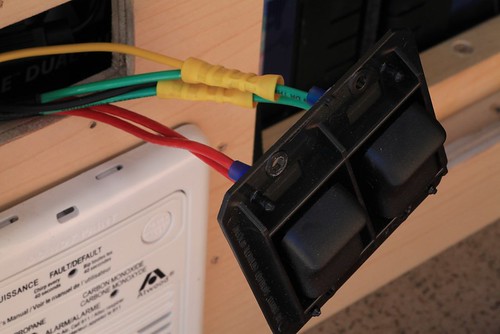 Given the low draw of the LED floodlamps and the protected location, I simply crimped the connections rather than soldering them.
I pulled the switch assembly for the floodlamps and simply Siamesed the power and delivery-side wires of the remote into the existing wires to and from the manual switch. Another wire from the control unit went to an existing ground screw in the battery compartment behind the switches, and the unit itself attached to another existing screw. Voilà—we can now create reversing daylight from the driver’s seat anytime we need it.
(I know what you’re thinking, and yes: This would be a formidable weapon against tailgaters. In fact I fear it would be too formidable. The sudden appearance of lights this blinding could very well send said tailgater off the road—or into oncoming traffic. Tempting though . . .)
The Cyron remote can be used to switch any number of things, and can, for example, obviate the need to run switch wiring into the cab for driving lights. However, for high-amp loads you’d want to connect it through a relay rather than directly.*
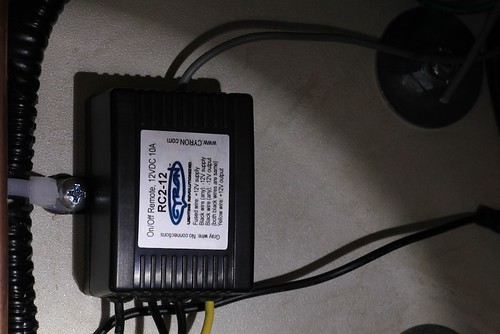 The compact control unit attached to an existing screw inside the camper's battery compartment. Grey wire on top is the antenna.
I’m still envisioning the perfect reversing lamp setup for a four-wheel-drive vehicle. Imagine a two-way system, with a properly bright light for urban driving and a switch that would activate extra-bright LED bulbs for use in the field. Sort of like the old city/country horn switch on the Jensen Interceptor of the 1970s, which activated a polite “toot” for urban use and an “out of my way” air blast for the country.
Of course, it’s unknown whether anyone actually bothered to ever switch to the city horn mode. So c’mon, someone just give us some good stock reversing lamps . . .
*This year at the Overland Expo, Baja Designs will conduct a demonstration on current lighting systems, covering the latest advances in HID and LED technology.
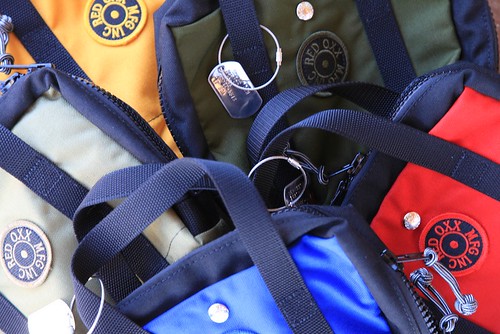
The Red Oxx Lil Roy
Recently Jim Markel, the CEO of Red Oxx (and son of the founder), contacted me to ask if I’d like to review something from his company’s line of heavy-duty luggage.
I was already familiar with their fine, U.S.-made Sherpa duffels, which, unlike many competitors, employ a rectangular box design that maximizes every cubic inch of space in the back of a vehicle or the cargo compartment of a bush plane. I asked what he might have that I hadn’t seen, and he mentioned a small tote called the Lil Roy. It sounded useful, so I asked him to send one.
He sent five. And after casting about to find uses for them, I’m glad he did.
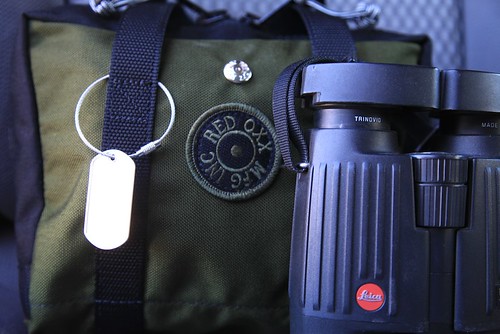
Think of all the small items you typically carry in a vehicle that could use extra protection, organization, or just visibility. A quick glance around our FJ60 before a recent trip to Mexico’s Sierra Madre, where we’re surveying mammal populations using automatic trail cameras, revealed a bunch of potential applications. There was a pair of handheld two-meter radios we use to stay in touch on the area’s mountainous trails; Roseann’s Swarovski and my Leica binoculars—both armored and tough, but worth about a zillion dollars each and thus nice to keep cased when possible—several field guides; the remote for the winch (kept in the center console and always tangling in other stuff); the trail cameras themselves, and several other odds and ends.
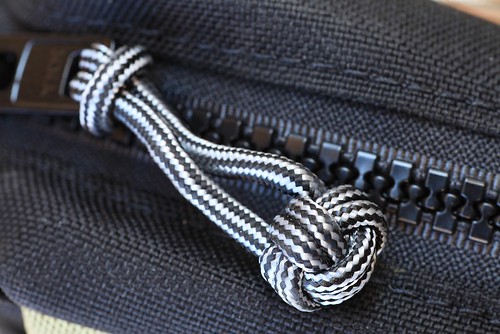
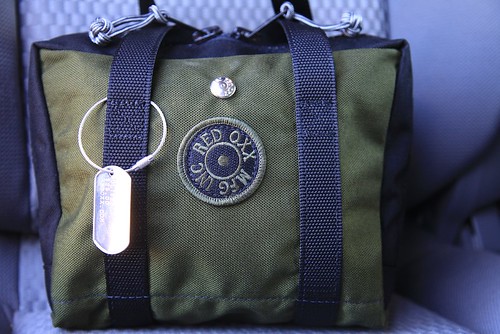
Like all Red Oxx products, the Lil Roy is made in Billings, Montana. You won’t find any fatuous tags reading, “Designed with pride in America.” (Translation: “Assembled by small children in an Asian sweatshop.”) The only items the company has made outside the U.S. are the clever little “monkey fist” zipper pulls, which are tied in a small village in Guatemala, where Red Oxx built a workshop with a bathroom, shower, and cooking facilities, and recently granted a microloan to build a corn-grinding mill. Fair enough.
Although the Lil Roy is a compact nine by three by six inches (175 cubic inches), it’s sewn from the same 1,000-denier Cordura as their largest duffels. The #10 YKK toothed zipper looks comically large on a bag this small, but it’s stronger than an equivalently sized coil zipper, and more resistant to jamming from debris. Inside, there’s not an exposed fabric edge in sight—everything is taped and double-stitched. Flat mesh pockets on each side are useful for incidentals. For example, we have a 911SC with a compact spare you have to inflate in the event of a flat; I’m using one Lil Roy to hold the small compressor I carry for the purpose, plus the non-marring socket designed to prevent scratching the black paint on the Porsche’s fancy aluminum lug nuts. (Aluminum? Yes, really.)
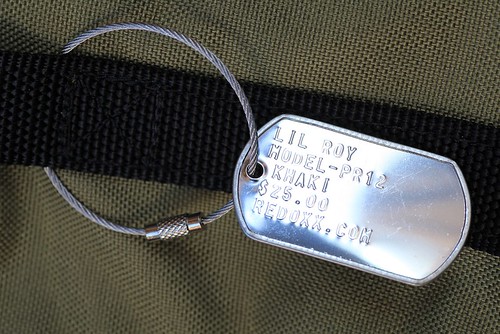
Outside, the Lil Roy’s web handles wrap under the bag and, given the modest volume of this thing, would probably support it filled with material from the core of a neutron star. The self-locking zipper pulls are unlikely to come undone accidentally, but just in case, Red Oxx supplies a little steel cable with a screw fastener to keep them together. The metal dog tag on it, stamped with the company name and product information, could easily be replaced with another tag stamped with personal information. If not needed to lock the zippers it simply hangs off one of the handles.
Criticisms? Frankly, none that I could come up with. I don’t think the bag gains anything by having the zipper wrap so far down the sides, but that’s inconsequential. It’s not remotely waterproof, but it wasn’t intended to be. I’d like to see the Lil Roy offered in an additional version (Big Roy?) the same length and height, but twice the width—I’m thinking tire chains, jumper cables, like that.
The biggest surprise of the Lil Roy is its $25 price. I don’t know how they can produce something of this quality in the U.S. for so little. The Lil Roy is available in 12 colors; I think most of us could find a use for every one.
The Red Oxx website is here.
The one-case tool kit, part 3
 (Part 1 is here, and part 2 is here)
It’s been drilled into us from the first time we picked up a toy hammer to tap a square block into a square hole: Use the right tool for the job.
The tool that most frequently falls afoul of this axiom is without doubt the slotted screwdriver. It’s been drafted into double duty as a paint-can opener, a scraper, a chisel, a punch, a pry bar, and worse by, I’m willing to bet, every single person reading this. Millions of them have been blunted into uselessness for their primary function after years of abuse in secondary roles.
So the hard and fast rule for field repairs is never to risk the function of one’s screwdrivers by employing them for non-approved secondary tasks. The tool kit should incorporate cold chisels for chiseling, punches for punching, and a scraper for scraping.
However—frequently one will come across screws that have seized into place, and which no amount of torque on a standard screwdriver will budge. The normal procedure in a home shop would be to break out the impact driver—a fat grip with an angled anvil inside which, when provided with a bit to fit the stuck screw and given a sharp whack with a hammer, imparts a sharp loosening impact and twist to the fastener. My impact driver has saved me much time and grief when working on older vehicles.
The problem is that an impact driver is a heavy and bulky thing for its single purpose, making it troublesome for a traveling tool kit. But there’s a little-known fact regarding impact drivers: the vertical impact on the fastener has as much to do with freeing it as the twist the driver provides. Therefore, if you simply hold a standard screwdriver against a stuck screw and give it a whack, the odds are good it will be sufficient to do the job.
But there we are abusing the screwdriver again. Furthermore, most screwdrivers have plastic handles, which are not only likely to shatter when struck, they also absorb enough of the hammer’s impact to blunt its effect on the screw.

Enter the Facom Protwist “Shock” screwdriver. Here’s a screwdriver with a specially hardened steel shank that extends all the way through the handle to a cap on its end. The company says the tool is designed to “withstand gentle impact to free stuck fasteners.” That’s right: You’re actually invited to whack this screwdriver with a hammer (within reason, obviously).
Neat feature, but after all the need for it rarely occurs, especially if the average age of the vehicles in your fleet is younger than the three-decade average of ours. Fortunately the Protwist screwdrivers are excellent at normal screwdriving tasks as well. Each one has a fat, ergonomically secure and grippy handle—unlike the frightfully expensive set of Snap-on screwdrivers I invested in 20 years ago, which had miserable, slick, hard plastic handles and wound up relegated to duty as spares within months. The Facom AWCK.J5 set (don’t ask me how they come up with these designations) comprises the five most-used configurations—a number 1 and 2 Phillips and three slotted heads, 8, 6.5, and 4mm. All but the 4mm driver have hex fittings so you can apply a wrench for greater torque, another good method for tackling a recalcitrant screw (as long as the screwdriver fits the screw head properly). The Phillips and slotted tools are differentiated by yellow and red caps and the appropriate icon for easy identification when stored handle-out in a tool roll (and each has a little “wear your safety glasses” silhouette as well—pay attention).

Unfortunately I couldn’t find a U.S. source for the Protwist “Shock” screwdrivers. But a supplier in England, Primetools.co.uk, carries them and has good prices plus fast trans-Atlantic shipping.
Alternatives? If you don’t need the hammerable feature, the standard Sears Craftsman sets such as this one are hard to beat for 20 bucks, although they also lack the wrench-compatible hex fitting, which leaves you no way to augment the torque you can apply to the screw short of clamping a pair of pliers to the handle, which is kinda rude. Better is this Kobalt 12-piece set I found at Lowe’s. These do have the wrench fitting, and the set includes two offset screwdrivers—wretched little tools that will nevertheless sometimes winkle out a screw no other driver can get to.
While we’re on the subject of removing stubborn stuff . . . I consider a hacksaw to be a must-have item in a comprehensive tool kit. And in case you’re thinking by this point I’m a helpless sucker for obscure and expensive tools, the best traveling hacksaw I’ve found cost me $6.99 at Ace Hardware.
I started out with a fancy aluminum-framed item that caught my eye when I was first musing on the idea of a one-case tool kit. Hey, aluminum—lightweight. Perfect, right? Not so much, at least not this one. First, it was bulky and took up way more room than its expected frequency of use justified. It also only accepted a 12-inch blade. Worse, use revealed a serious design flaw I should have noticed at first glance.
 Which is better, the $30 hacksaw or the $6.99 hacksaw?
Any framed hacksaw will only let you cut things as thick as the clearance between the blade and the spine of the saw, unless you can move the saw around and cut from the other side. My aluminum-framed saw had a fine four inches of clearance—but only in one spot thanks to the arched spine. So when cutting through, say, a 3.5-inch-thick tube, by the time I got near the other side my cutting stroke was reduced to about one inch. Stupid.
 Grooves on the left accommodate different blade sizes, and by filing the groove on the right . . .
Then, while browsing at the Ace I found a simple, steel-framed hacksaw, which proved to weigh less than the aluminum one and was far more compact. Grooves on the adjustable half of the spine engage a through-pin on the fixed part to allow the use of different-length blades; furthermore, by filing a third groove near the front of the solid section I can now remove the blade and make the saw collapse to just 13 inches in length, so it fits along the short side of the Pelican case and takes up scant space. I store the blades in the tool roll that holds screwdrivers. It’s single downside is that the blade can only be attached vertically; the aluminum model can also hold the blade at 45 degrees for cutting when overhead clearance is reduced.
 . . . the saw collapses to fit almost unnoticed along the side of the Pelican case.Now—back to obscure and expensive tools.
If you’re ever faced with a major repair in the field—replacing a clutch, halfshaft, differential, or birfield for example—you’ll also be faced with the manufacturer’s torque specifications when it’s time to put everything back together. Sure, you can guess and bodge it, and I’ve done so many times without catastrophic consequences when home and the torque wrench weren’t more than a few hundred miles away. But if you’re in the middle of a major trip you don’t want to risk the repair and perhaps the trip by over- or under-torquing a fastener on a critical component (such as, say, the main bearing caps on a crankshaft . . .).

The problem is, a torque wrench is a long and bulky thing that performs exactly one function—you do not want to use it as a standard ratchet or breaker bar. So how about a palm-sized tool that turns any 1/2-inch ratchet into a torque wrench? That describes the Facom torque adapter—but wait, there’s more. The Facom unit also functions as an angle indicator. Many newer vehicles (Land Rover especially comes to mind as an early adopter) employ “angle-controlled” fasteners, designed to be tightened a certain number of degrees beyond snug. The Facom torque/angle adapter will do both tasks. It comes in a number of ranges; mine functions to 200NM (150 pound-feet, selectable on the readout) of torque, and is accurate to within three percent.

I have to say I found much less expensive torque adapters via a quick Google search, but none that were as compact, or that were capable of both torque and angle measurements. When Roseann asked, “Well, how much did it cost?” I answered:
“What lovely weather we’re having.”
 Next: The rest of the kit: Will it fit? Read part 4 HERE.
Hint: When using “Search,” if nothing comes up, reload the page, this usually works. Also, our “Comment” button is on strike thanks to Squarespace, which is proving to be difficult to use! Please email me with comments!
Overland Tech & Travel brings you in-depth overland equipment tests, reviews, news, travel tips, & stories from the best overlanding experts on the planet. Follow or subscribe (below) to keep up to date.
Have a question for Jonathan? Send him an email [click here].
SUBSCRIBE
CLICK HERE to subscribe to Jonathan’s email list; we send once or twice a month, usually Sunday morning for your weekend reading pleasure.


Overland Tech and Travel is curated by Jonathan Hanson, co-founder and former co-owner of the Overland Expo. Jonathan segued from a misspent youth almost directly into a misspent adulthood, cleverly sidestepping any chance of a normal career track or a secure retirement by becoming a freelance writer, working for Outside, National Geographic Adventure, and nearly two dozen other publications. He co-founded Overland Journal in 2007 and was its executive editor until 2011, when he left and sold his shares in the company. His travels encompass explorations on land and sea on six continents, by foot, bicycle, sea kayak, motorcycle, and four-wheel-drive vehicle. He has published a dozen books, several with his wife, Roseann Hanson, gaining several obscure non-cash awards along the way, and is the co-author of the fourth edition of Tom Sheppard's overlanding bible, the Vehicle-dependent Expedition Guide.