
Overland Tech and Travel
Advice from the world's
most experienced overlanders
tests, reviews, opinion, and more
Irreducible perfection: Vulture Safety Loops

Last year, during a crossing one of Egypt’s great sand seas, I wanted to get some video footage of the Land Cruisers from a camera mounted on the hood and, if possible, the side of the truck. I had a massive Manfrotto suction clamp to secure our Canon 5D MkII, but there was no way I was going to trust $3,500 worth of camera and L lens to a glorified bathroom plunger. So I rigged up a pair of safety lines to the camera’s strap with some 550 paracord, secured with my best bowlines to the roof rack and the base of the windshield wipers.
As it happened, the suction mount performed flawlessly, even on its side with gravity working against it over some firm sand corrugations (sorry about the bathroom plunger remark, Manfrotto). But the camera strap flapped around while the vehicle was in motion, and the paracord lines seemed a bit jury-rigged. I was happy to have them, but mused about fabricating something that would be more readily accessible and a little more elegant as well.
Fast forward to this summer’s Outdoor Retailer show, where Roseann and I had coffee with William Egbert of Vulture Equipment Works. VEW is best known for making the strongest camera straps in the world, designed for rigging systems when the photographer is, say, hanging out of a helicopter door (review to come). But I was intrigued when William produced a couple of lengths of cord no thicker than dress shoelaces, with a loop at each end. And he really got my attention when he said, “You could hang a motorcycle from one of these.” I raised an eyebrow, and he added, “Seven hundred pound load limit.”

The Vulture Safety Loops, William told us, are made from “a proprietary weave of aerospace fibers.” Hmm . . . After being subjected to a short waterboarding session, he admitted the actual material was a para-aramid (Kevlar is the brand name of one such fiber). Kevlar is produced from the reaction of para-phenylenediamine and molten terephthaloyl chloride—and despite having been discovered in the 1960s, chemists are still not certain exactly why it displays such an astounding strength-to-weight ratio. It’s expensive stuff, in part because, I’m told by someone who knows these things, “Manufacturing the para-phenylenediamine component is difficult due to the diazotization and coupling of aniline.” So now you know why too.
 Safety Loop (bottom) compared to 550 paracord
The VEW Safety Loops come two to a package; one 24 inches long and one 38. A woven sheath protects the fiber within from abrasion, but they’re still so slender it’s hard to believe the strength. I didn’t hang any of our motorcycles from one, but I did hang myself from one, and it laughed off my 150 pounds. They display virtually zero stretch, and the material is extremely cut- and flame-resistant.

I can foresee a bunch of uses for these elegant but brutish cords. They’d be perfect as insurance on duffels or Pelican cases strapped to a roof rack, or gear bungeed on the back of a motorcycle. For photography they’d clearly be an excellent replacement for my paracord bodge jobs, or one could use them to secure a tripod in windy conditions, or to keep a camera on a strap from flopping. Beyond that? You could probably employ one in a motorcycle recovery operation.
At $29 a pair they might not seem cheap at first, until you consider both the strength-to-weight ratio and the strength-to-cost ratio. One of them weighs three grams—that’s undoubtedly the lightest insurance you can buy for $3,500 worth of camera and L lens . . .

Vulture Equipment Works will be at Overland Expo 2014. In the meantime you can find them HERE.
Followup - Because I just thought of what might be the best use of all for the Vulture Equipment Works Safety Loops: Anti-theft leashes.
We're about to spend several layovers in airports in Brussels, Geneva, and Nairobi. Connecting my Filson briefcase, or the new Pelican 1510 rolling carryon I'm testing for camera transport, to a chair or table leg with one of these would severely hamper a snatch-and-run thief.
A proper knife
The knife was almost certainly mankind’s first manufactured tool into which we put not just craftsmanship, but artistry. First (after poking around that funny black monolith) we simply grabbed handy tree limbs for clubs, or rocks suitable for smashing things. Then, about 2.5 million years ago, a perceptive hominid noticed a river rock with a naturally chipped edge that proved much superior for cracking open bones or the skull of a rival. Jump ahead a million years, and his Homo erectus descendants had learned how to flake quartzite and basalt into sophisticated and sharp bifaced hand axes. Next came flint and obsidian spear points and arrowheads, with finer and finer workmanship. Somewhere along the line a smart craftsman lashed a bone or antler handle to his skinning blade—and from that point forward the design of the knife strayed not a bit except for the steady evolution of material and the eventual innovation of folding blades. The knife became our single most indispensable personal-carry tool, and stayed that way right up to the advent of the iPhone.
When I was younger, if you went outdoors, whether for hiking, backpacking, canoeing, car camping, hunting—whatever—you carried a fixed-blade sheath knife, the direct descendant of that flint-and-bone progenitor. It was axiomatic that the knife would be your primary tool for dozens of tasks: cutting rope and webbing, field-dressing fish or game, cooking and eating, carving, you name it. It was also axiomatic that a fixed-blade knife would be the best choice for those tasks, given its superior strength and control over a folding knife, and easy one-hand accessibility right there at your belt. I got my first sheath knife when I was seven, as did my best friend, and neither we nor neighbors who saw us carrying them around our rural community thought a thing of it.
Not any more. With the exception of increasingly rarified circumstances and company, wearing a sheath knife today—even if you’re an adult—seems to be considered, at best, ostentatious, and at worst an aggressive “statement” that indicates you might also support private ownership of tactical nuclear weapons. I’ve related before the story of an acquaintance who wore one into a West Coast coffee shop and was accosted by a woman demanding to know what he was doing “with that weapon in here.” He swears he replied, “Lady, you should hear what the voices in my head are telling me to do with it.” A seven-year-old carrying a sheath knife today? He would probably be remanded to Social Services and his parents jailed.
I say we fight back—figuratively speaking, of course. If you own a fixed-blade knife and have ever felt too self-conscious to carry it, and then had to perform some task with a pocket knife clearly too small for the job, strap that thing on next time. Don’t own a fixed-blade knife? Go get one, learn how to sharpen it properly, and carry it proudly.
There are undoubtedly thousands of fixed-blade knife (let’s say FBK from now on) models marketed as suitable for general field work, but you can broadly divide their design philosophy in two: handy designs with plain (i.e. non-serrated) edges and blades between three and five inches in length, and much larger, heavier tools with six, eight, even ten-inch blades (often nearly 1/4-inch thick at the spine), that supposedly can also be used for chopping, hammering, and, if you believe some of the ads, hacking your way out of your downed F16’s cockpit, spearing caribou after securing the handle to a stick with your unraveled paracord bracelet—and, of course, fighting off zombie hordes.
Gee, I guess my prejudice is showing already.
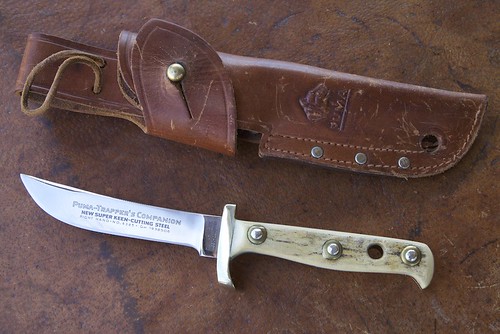
For decades, my FBKs were all the former style, from that first blade in second grade to the Buck Personal that was the first knife I bought myself, to the dream knife I couldn’t afford then but purchased at a usurious collector price decades later: the near-mythical (well, among knife wonks anyway) Puma Trapper’s Companion—$32 in 1970; $400 30 years on.
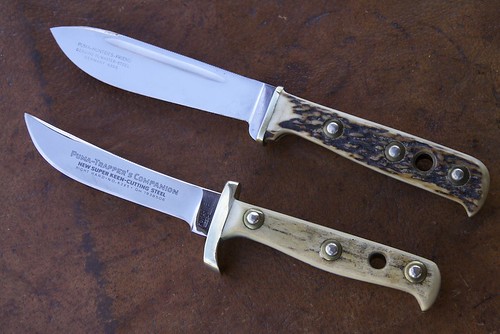 A classic Puma Hunter's Friend, above, and the even more classic Trapper's Companion, below. (Sadly, Puma knives aren't what they used to be; those made prior to 1995 or so are the best) Along the way I discovered perhaps the most versatile style of all: the so-called bushcraft knife, defined by the Woodlore, which was designed by Ray Mears in 1990 and is now copied by knifemakers everywhere. Like Ray himself, the Woodlore is an unassuming thing with a 4.25-inch, spear-point blade. It employs what’s known as a Scandinavian (“Scandi”) grind: The blade holds its thickness from the top (spine) most of the way toward the edge, which has a single bevel extending quite high up each side.
 Knife edge grinds. Courtesy Off the Map custom knives.
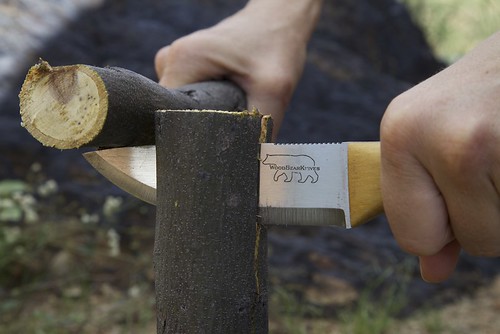
The Scandi grind is immensely robust—bushcrafters use these knives to split two-inch-thick limbs lengthwise by “batoning,” that is, holding the edge of the blade against the end of the limb, and using another length of limb to hammer the knife straight down. The technique even works across the grain. Yet the Scandi grind can be given a razor edge; that broad bevel makes it easy to index the blade on a simple sharpening stone if you don’t have a sophisticated system such as the Edge Pro. If the grind has a weakness, it is for exceptionally fine slicing—that broad bevel acts as a wedge rather than a scalpel. Scandi blades make lousy cheese cutters.
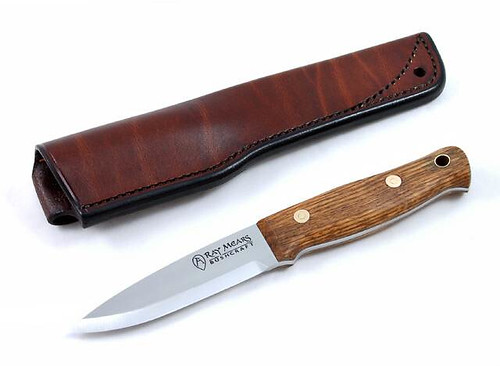 The current Ray Mears knife has a durable English oak handle.
The genuine Woodlore knife rightfully carries a substantial premium given its provenance; high-quality copies are available for less for those who don’t need or can’t afford the Woodlore signature. I have a bushcraft knife nearly as well-known in the community: a stout design called a Skookum Bush Tool, made in Whitefish, Montana by Rod Garcia. Rod enhanced the Woodlore pattern by adding a flat steel back on the handle, which is welded to the full-tang blade and enables the user to hammer this thing point-first into, well, anything that needs a knife hammered into it.
Many other knives parallel the bushcraft style, from the astoundingly underpriced ($18) and overperforming Mora Clipper to custom models made with exotic steels and even more exotic hardwood scales (handles), which can easily top $500. As an all-around field knife the bushcraft design is hard to beat, although flat-ground and hollow-ground blades also work very well for most tasks, and better for some.
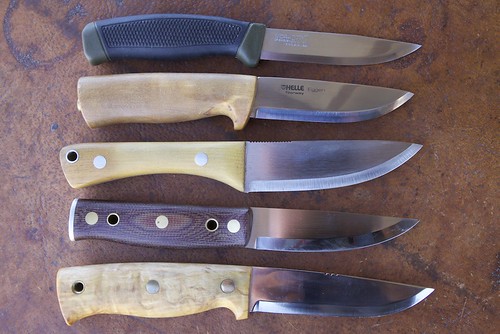 Top to bottom: Mora Clipper, Helle Eggen, Wood Bear, Skookum Bush Tool, Helle Temagami.
In the last few years an entirely different style of FBK has become increasingly popular, especially among the survival community (by which I mean people interested in survival skills, not the guys who hole up in the Idaho mountains with “Bo Gritz for President” posters tacked up in the fallout shelter). The style is frequently referred to even among its proponents as a “sharpened pry bar.” Forget handiness—these knives are massive, and built to withstand laughable abuse—one popular demonstration involves chopping through a concrete block, another, repeatedly stabbing though a car door. The fact that they have a cutting edge seems secondary to the astounding breadth of ancillary destructive purposes to which one is assured they can be directed. The names of these things echo their marketing: Compare the quasi-Elvish “Woodlore” with the “Swamp Rat,” the “Black Legion,” or the “Extreme Survival Bowie.” And, yes, there is an official “Zombie Killer,” with a, not making this up, “Toxic Green” handle.
I picked up one of the early examples of this genre, the Gerber LMF-2, at a trade show some years ago, and immediately put it down. The knife was heavy and unbalanced, and its “tactical” sheath, complete with de rigueur mid-thigh mounting straps, weighed more than the knife. Similar models from other makers impressed me no more, and I dismissed the entire concept as a short-lived fad.
Wrong. The LMF-2 is still around, and has been challenged by even more bloated competitors. So I decided to give the concept a fair chance, and procured an LMF-2 as well as a Ka-Bar/Becker BK-2. I used each for several days around our place and in the surrounding desert, on tasks for which I’ve been using much smaller knives for tens of years.
 Top: the Becker/Ka-Bar BK-2; bottom, the Gerber LMF-2.
And . . . I still don’t get it.
The LMF-2 has that most worthless of blade styles, half plain and half serrated—which leaves neither enough room to do its job. The (reasonably sharp) plain edge is out at the end, is mostly curved, and is barely three inches long despite this knife’s 10.5-inch overall length and three-quarter-pound weight (LMF, perversely, stands for “Lightweight Multi-Function”). The blade on my Swiss Army knife is only a half-inch shorter. The Gerber’s serrated section, as with all such edges, is virtually impossibly to sharpen in the field—although the nifty sharpening slot in the LMF-2’s plastic sheath is okay for touching up the plain edge. By way of comparison, one of the best field knives I own, a Helle Temagami, weighs just 5.4 ounces despite 4.5 inches of usable blade.
The knife is undeniably stout. The pointed pommel, I’m sure, could “egress through the plexiglass of a chopper” as Gerber claims, or be employed for an occiput strike on a sentry—which all of us are sure to need to do at some point in our lives. In fact, as kit for a combat pilot, the LMF-2 might not be a bad tool at all. But for any kind of regular use in the field—including survival—the LMF-2 has all the wrong answers to the questions that are most asked in such situations. It even touts the ultimate lunacy for a survival knife: three holes in the handle so you can “lash it to a stick and make a spear.” Lord spare us from such nonsense.
However. If I thought the Gerber was unwieldy, the Ka-Bar/Becker BK-2 makes it look like a surgeon’s scalpel from Porsche Design.
I’m convinced the designer of the Becker had an LMF-2 for comparison, and simply decided that whatever it had, the BK-2 was going to have more. So the Gerber weighs 12 ounces? This knife is going to weigh a pound. The Gerber’s blade is a fifth of an inch thick? Ha!—we’ll make ours a quarter of an inch thick. And then add a bit.
The result is one of the most cartoonishly overbuilt and comically awkward knives I’ve ever owned.
 Seriously? The monstrous BK-2 next to the far more practical Temagami.
The makers tout the Becker’s chopping ability—the supposed payoff for the weight and bulk—but in fact it’s a lousy chopper. Despite the massive blade, it’s still handle-heavy, and the edge is not long enough to gain the speed and momentum even a lightweight machete can achieve. There is no reason—not one—to make a knife blade a quarter of an inch thick, except to one-up someone else’s blade. No user could ever put enough leverage on this knife to bend, much less break it. It is simply dead weight. Its sole positive feature is that it blessedly dispenses with serrations (or, worse, saw teeth), but the spine is so thick and the knife so heavy that normal cutting operations—the kind you need to do 99 percent of the time even if you are a combat pilot—become ham-fisted struggles, like tapping in finish nails with a three-pound sledge.
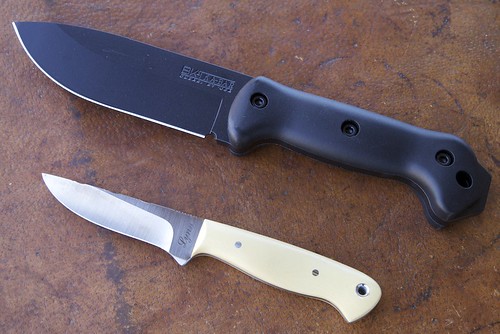 The Becker dwarfs a lovely model from knifemaker Lynn Dawson, with a hollow-ground blade just three inches long. Yet I field-dressed a whitetail deer with the Lynn knife . . .
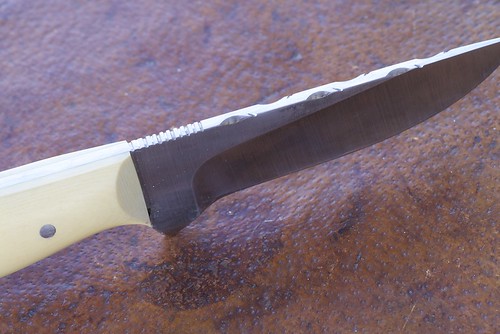 . . . and the Lynn sports some nice file work on the spine. Tough doesn't have to be ugly.
Believe it or not, the LMF-2 and BK-2, with mere five-inch blades, are on the small end of their phylum. The ESEE Junglas (pronounced hoonglas) sports a 9.75-inch blade—actually almost long enough to be credible as a chopping tool, but with a concurrent reduction in practicality to near zero for any normal cutting tasks (To be fair, ESEE makes some entirely practical smaller models as well).
Let’s put together some numbers here. For the weight of a BK-2 one could carry a Helle Temagami, or a Woodlore clone, or any number of other fine, compact, well-balanced—and, dare I say, beautiful—cutting instruments, plus a Gerber folding saw, plus a lightweight sharpener. You’d have a vastly superior knife and a better, safer way to cut through larger limbs than hacking away with that “sharpened prybar.”
Ah, but what about the scenario the armchair experts like to debate ad nauseum: You’ve somehow been stupid enough to be caught out in the wilderness with nothing but a single knife. No saw, no machete, no matches, no tent, no iPhone. You need to survive with that one tool.
Give me the bushcraft knife any day.
Most of the tasks you’ll need to do to stay alive in such situations—building a shelter, making fire, perhaps constructing snares or deadfalls—are far more easily accomplished with a modestly sized blade. You won’t need branches larger than two inches in diameter for a lean-to, and those are easily cut with a bushcraft knife and, if needed, a baton. (Batoning is also infinitely safer than chopping; need I mention that severing a major artery would be inconvenient at this point?)
The rest—hearths and drills for a friction fire, snares, field-dressing game—require a deft touch with a blade. You’ll operate more quickly, surely, and with less energy expenditure if you have a knife as deft as the task.
And back in the real world? No contest. I got annoyed just carrying the BK-2, much less using it. It was a major relief to get back to my normal knives.
If you’re traveling by 4WD vehicle, or even by motorcycle where weight is much more of a concern, there’s simply no reason to consider dragging along an awkward, heavy knife that tries to take the place of two or three tools, even if the concept worked. Buy a good, sensibly sized FBK, and carry a folding saw, hatchet, or small axe for larger cutting tasks (for a really nice combination look HERE). You’ll be more effective and safer.
Besides, I hear axes work better on zombies anyway.
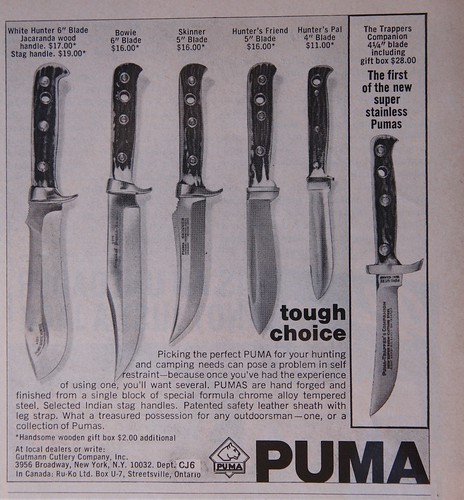 Edit: Found an old ad. The Trapper's Companion originally listed for $28, not $32. I should have got a second job and bought 20 of them then.
Another edit: Found this on a scouting site in an article about knives. I'm speechless:
I am a scout leader (aka Scout master) with Scouts Australia. Here in Western Australia this is a copy of our Policy and Rule regarding knives
K1. KNIVES. K1.1 Statement.
The Scout Association of Australia, Western Australian Branch (“the Association”) strongly recommends that all members be aware of, and exercise all possible care in, the use of knives.
K1.2 A sheath knife should not be worn by any member on, or participating in, Scouting activities.
K1.2.1 The wearing of a sheath knife is considered being contrary to State Law, particularly where the knife is displayed in a public place such as a street or a point of gathering.
K1.3 The use of a good quality pocket knife is strongly recommended and the use of such is encouraged under circumstances by all members on, or participating in, Scouting activities.
I'm going to go strap on every sheath knife I own and find a coffee shop . . .
Links:
Woodlore, Helle, Mora, Wood Bear, Skookum Bush Tool, Off the Map, Ka-Bar, Gerber
For interesting Puma lore, and occasional knives for sale, go HERE.
A follow-up: Patrick York Ma of Motus and I apparently had a bit of a mind meld a few weeks ago. Read his piece on knives here.
Tire pressure
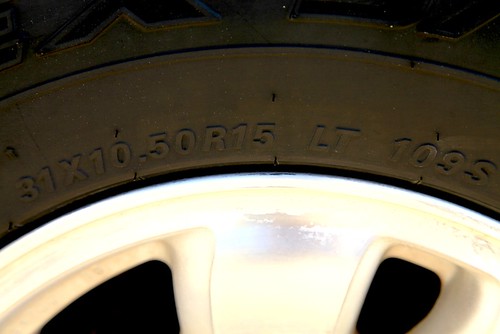 The load index 109, on the right, is used with the load range to calculate optimum pressure.
A reader, Christian, sent in this comment to my recent post The physics of tires and lifts:
I have a related question that might warrant its own post. Is there a formula for finding your optimum tire pressure? Sounds simple enough. Most “experts” just say to check the owner’s manual. I’m skeptical because my new F150 has a front/rear weight ratio of 60/40, yet Ford recommends a higher pressure in the rear (60 rear, 55 front). I'm assuming this is in anticipation of a full payload but it seems to me that the correct pressures should be based on actual axle loads and tire volumes (i.e. a larger, wider tire will need lower pressures but the front/rear ratio should remain the same). Off-road pressures will be much lower (and highly variable) but again should utilize the same front/rear ratio. Does this sound right?
Christian, common sense is leading you in the right direction.
Tire pressures recommended by vehicle (and tire) manufacturers have varied significantly over time, often depending more on what they perceived as their customers’ priorities than on efficiency or even safety. In the days of Ford Galaxies and Buick Rivieras (and 32 cents-per-gallon gas), it was all about ride comfort, and recommended tire pressures hovered in the 20s. Today, fuel efficiency is the name of the game, and pressures are much higher, as you found on your F150. However, as you noted, the manufacturer invariably lists only a single figure. Especially in the case of a pickup, loads are likely to vary tremendously. Proper pressure for a light load will be inadequate for a heavy load, and proper pressure for a heavy load will be excessive for a light load and will cause premature tread wear in addition to a bouncy ride.
There are a couple of good ways to determine proper tire pressures for your vehicle to compensate for varying loads. First is an inflation/load chart. Why these aren’t front and center on all tire company websites I have no idea—most specification charts list only maximum load—but if you search deeply enough you can find them. We’ve posted one used by Discount Tire HERE.
An inflation/load chart uses the load index listed on the tire’s sidewall (after the sizing information), and the load range (C, D, E, etc.) to determine an optimum pressure. Much better than a single figure, obviously. To exploit this information fully, however, you need to know how much weight is on each tire. You can calculate that closely by finding a commercial scale the weighing each end of your vehicle, then dividing each by two. If you have a slide-in camper you remove for commuting in between trips, you can either make two trips to the scale or calculate the added mass of the camper if you know its dry weight. With that information in hand, you can cross-reference the chart to arrive at a very useful figure.
A simpler way to determine optimum tire pressure (as well as to double-check the chart method) is by “chalking.” Use a piece of bright chalk to mark a thick line directly across the tread of each tire. Drive a few hundred yards on pavement (preferably in a straight line) and look at the line. If it is wearing off evenly, your tires are correctly inflated, as the tread is bearing the load uniformly across its width. If the center of the line wears off more quickly the tire is overinflated, and if the edges wear off first it is underinflated. You might have to use paint rather than chalk to ensure the line doesn’t wear off too quickly.
Both these methods are designed to calculate road pressures. Once you have them figured, you can use them to arrive at starting points for airing down on off-pavement routes. A 30 to 40-percent reduction in pressure is usually enough to lengthen the tire’s footprint effectively, increasing traction and reducing impact on the trail as well as attenuating bounce over washboard and rocks. For deep sand one would drop quite a bit more than that, of course.
This might seem like more trouble than it’s worth to some. But you only need to do the weighing once per vehicle, and then recalculate if you buy different tires. But maintaining ideal tire pressures—as opposed even to just adequate—will significantly increase tread life, in addition to enhancing every aspect of tire performance.
Hint: When using “Search,” if nothing comes up, reload the page, this usually works. Also, our “Comment” button is on strike thanks to Squarespace, which is proving to be difficult to use! Please email me with comments!
Overland Tech & Travel brings you in-depth overland equipment tests, reviews, news, travel tips, & stories from the best overlanding experts on the planet. Follow or subscribe (below) to keep up to date.
Have a question for Jonathan? Send him an email [click here].
SUBSCRIBE
CLICK HERE to subscribe to Jonathan’s email list; we send once or twice a month, usually Sunday morning for your weekend reading pleasure.


Overland Tech and Travel is curated by Jonathan Hanson, co-founder and former co-owner of the Overland Expo. Jonathan segued from a misspent youth almost directly into a misspent adulthood, cleverly sidestepping any chance of a normal career track or a secure retirement by becoming a freelance writer, working for Outside, National Geographic Adventure, and nearly two dozen other publications. He co-founded Overland Journal in 2007 and was its executive editor until 2011, when he left and sold his shares in the company. His travels encompass explorations on land and sea on six continents, by foot, bicycle, sea kayak, motorcycle, and four-wheel-drive vehicle. He has published a dozen books, several with his wife, Roseann Hanson, gaining several obscure non-cash awards along the way, and is the co-author of the fourth edition of Tom Sheppard's overlanding bible, the Vehicle-dependent Expedition Guide.