
Overland Tech and Travel
Advice from the world's
most experienced overlanders
tests, reviews, opinion, and more
The saga of JUE 477

JUE 477 before . . .
The world almost lost this thing.
The very first production Land Rover, chassis number 860001, was earmarked to be presented to HM King George VI after it rolled off the assembly line in 1948. At the last minute, Rover Company officials decided it would be better to give him a later model, after any initial teething problems had been worked out. Instead, 860001 was handed over to a Mr. Searle within the company, probably to be used as a specimen for the first factory repair manual.
After this duty, 860001 was unceremoniously sold to a civilian, Professor Ewan McEwan, in 1950, registered JUE 477, after which it faded into obscurity and passed through several owners until, in 1970, a fellow named David Fairless noted in his pocket diary, “Bought Land Rover, £15.” Not a misprint.
Fairless used the Land Rover on his farm in Hexam, but at some point parked it in a field next to a stone wall due to mechanical issues.
And there it sat, exposed to the wet summers and harsh winters of northern England.
For 25 years.
The story of what follows is told—and superbly photographed—by Martin Port, in JUE 477—The Remarkable History & Restoration of the World’s First Production Land Rover, a copy of which is now in my bookcase.

In a supremely ironic twist of fate, JUE 477 was eventually purchased by Sir James Ratcliffe, the billionare CEO of the INEOS chemicals group, who has recently been making big waves with his Ineos Grenadier—a project unapologetically designed to envision what the next generation Defender might have been if its design had not constrained by corporate fealty to shareholders and the need to, above all else, be attractive to a wide range of customers.
From the hulk of what even to a Land Rover expert would have appeared a total loss, Ratcliffe’s team tackled what is without doubt the most intensive—and sensitive—restoration I’ve ever followed.
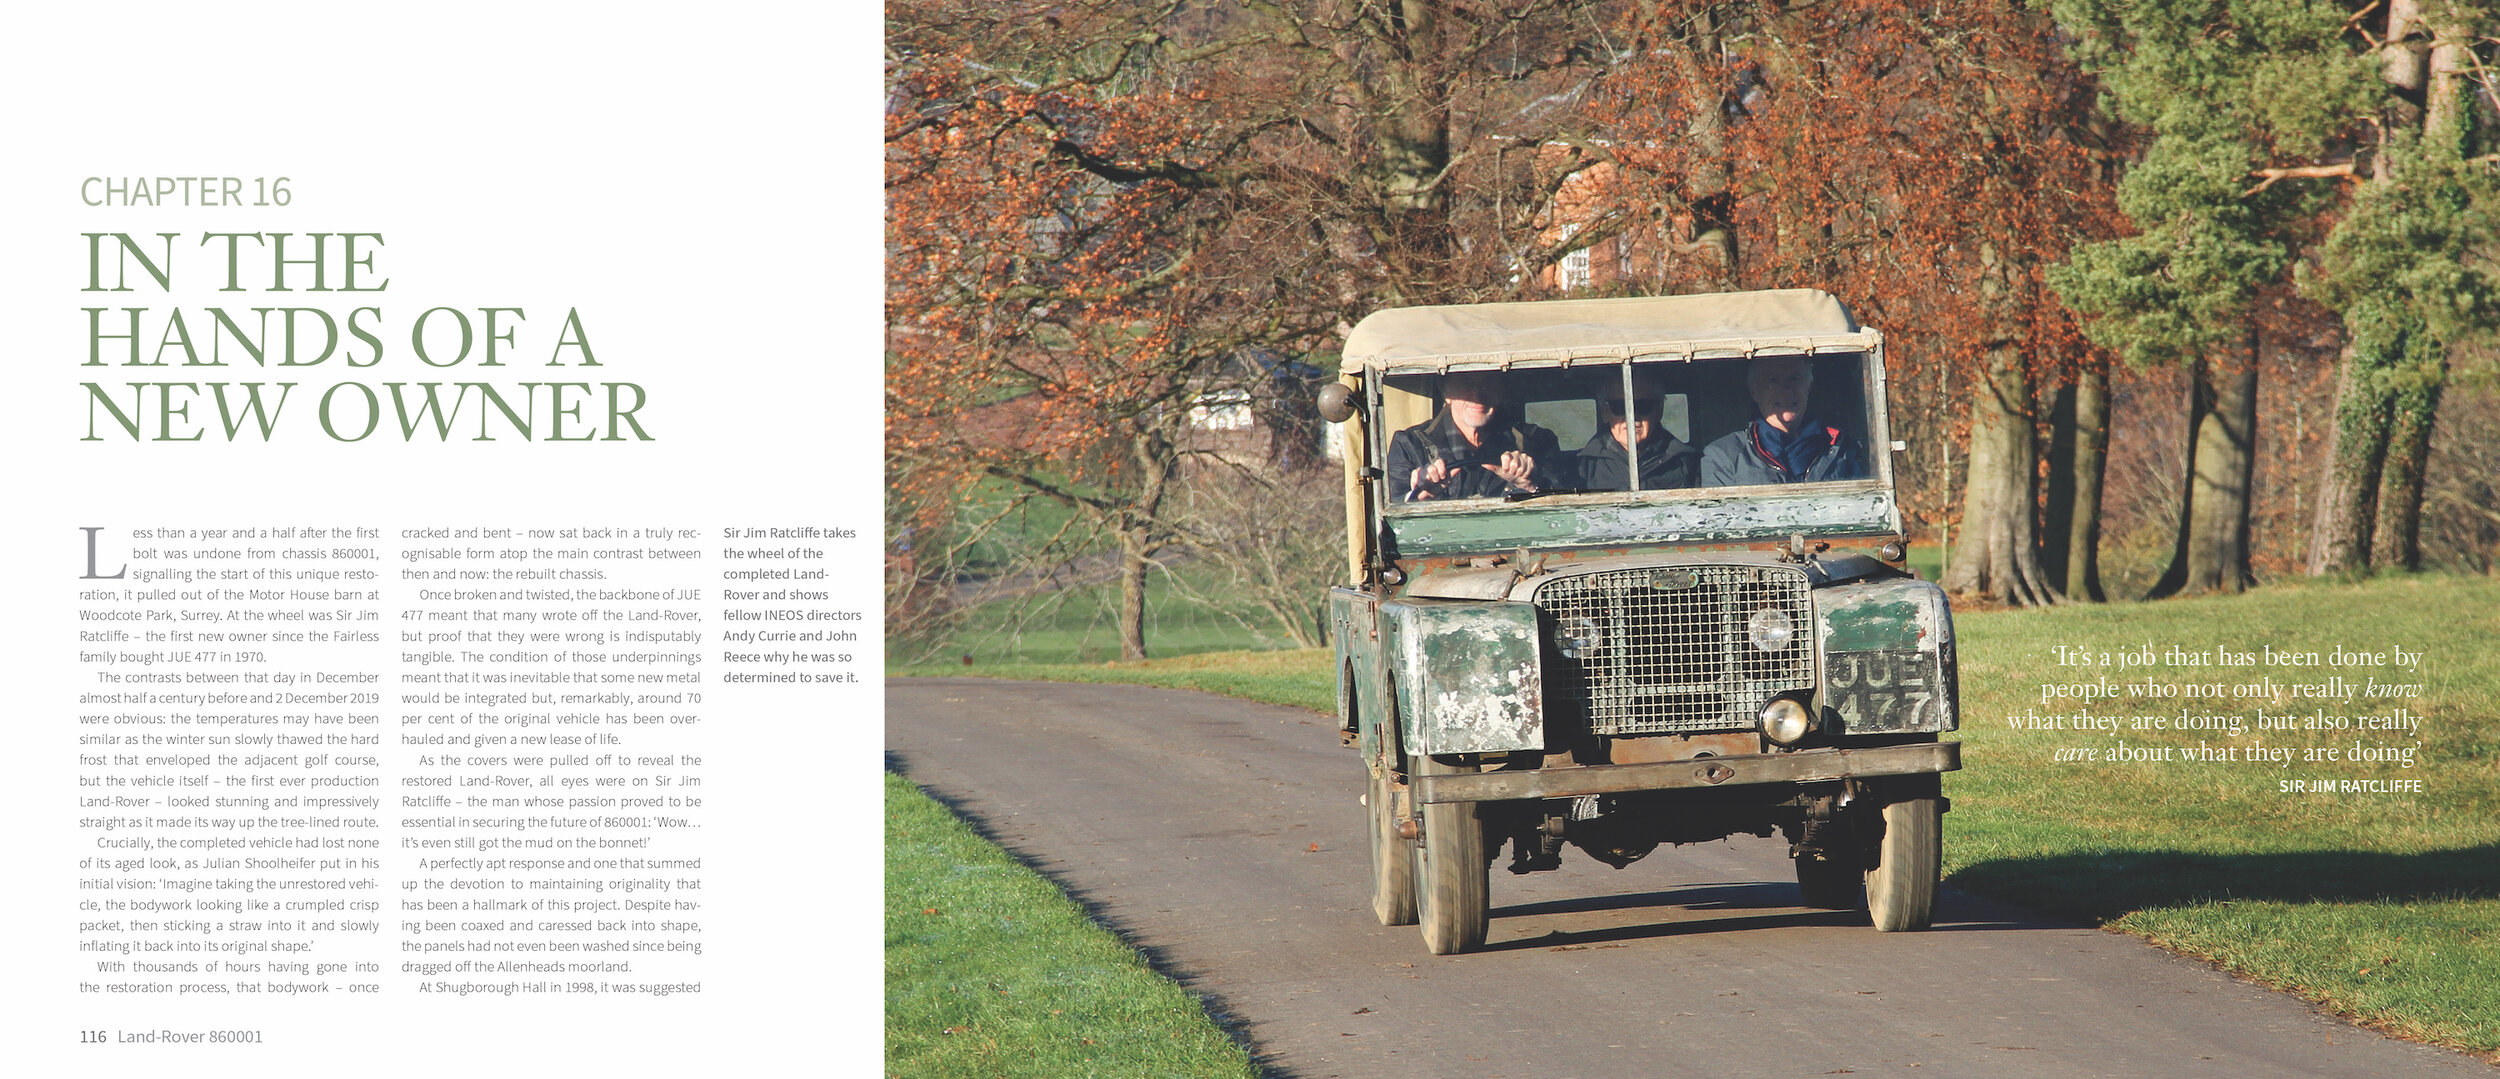
. . . and—yes—after restoration. Simply glorious.
It would have been easy to throw a new chassis, new panels and shiny paint, and mostly new parts on JUE 477, bolt in a few of the original bits, and call it a “restoration.” Instead the team went to extraordinary lengths to keep and repair as much of the original as possible. Eighteen months later, the result is, as the title of the book suggests, remarkable.
While JUE 477’s mechanicals were treated to a thorough rebuild to render it mechanically perfect, the team made the laudable decision to keep the Land Rover’s appearance as one might have expected had it been properly maintained but constantly used throughout its 72 years of life.
Astonishingly, despite the fact that the vehicle’s chassis had been sunk in acidic Northumberland soil for a quarter century, head restorer Julian Shoolheifer and workshop manager Richard Spikins were able to use at least some of every crossmember, main rail, and outrigger while welding in replacement bits. They straightened and reinforced the original Birmabright body panels—then left them exactly as they were, with splotches of the original Light Green paint showing through later splotches of Deep Bronze Green.
The finished JUE 477 is, simply put, perfect—infinitely more evocative and appropriate than a concours restoration would have been.
The book does suitable justice to the work of the team. Martin Port’s studio photographs could be framed and hung as art—or used as a detailed template for one’s own restoration. The description of the mechanical work, as well, could be a guide for what to look for and what to do if contemplating tackling an old Land Rover engine and running gear.
I like old vehicles of all types, and I’ve read and owned many articles and books covering restorations of classic Porsches, Triumphs, and other makes. I can’t remember one that achieved the same combination of description and illustration as Martin Port’s work. If you have the slightest practical or emotional interest in old Land Rovers, I recommend it most highly.

Porter Press is here. Also available on Amazon.
The turbodiesel Jeep Gladiator Rubicon in brief

It’s well-known I’m a huge fan of Jeep’s Wrangler Unlimited and, more recently, the long-anticipated Gladiator. I recently spent a week with a Gladiator Rubicon equipped with the 3.0-liter V6 turbodiesel, and I can say it’s made me even more of a fan.
The diesel is a significantly updated version of the engine that’s been available in the Ram pickup for several years. Among other tweaks, the block has been modified to reduce weight by 15 pounds while increasing stiffness. Power in the Gladiator is 260 hp and 442 lb.-ft., the latter available virtually full-fat from 1400rpm past 2800. Now that is a proper truck engine—none of this 4500rpm torque peak silliness common to so many gasoline V6 “truck” engines these days. It’s mated with one transmission, a superb ZF eight speed, honestly the only transmission it needs (I know, I know).
Besides effortless off-idle power in traffic and on 35-degree climbs alike, the turbodiesel returns excellent fuel economy. First I calibrated the computer’s fuel economy estimates the old-fashioned analog way and found them to be accurate within three percent. In a week of mostly around-town driving, plus a strenuous day of low-range use, the Gladiator turned a tick over 23 mpg. On the level stretch of 65mph highway out to our desert place, the computer bounced back and forth between 29 and 30mpg. That’s outstanding in a 5,000-poundish (with the 270-pound-heavier diesel) truck on 33-inch all-terrain tires.
Cynics point out how many hundreds of thousand of miles one needs with that economy to make up for the $4,000 premium of the diesel. They’re missing the point, which is that a high-torque turbodiesel is simply a better engine for a 4x4 truck, fuel economy notwithstanding. And once the pain of the initial price is gone, you’re still left with the long-term satisfaction of mid-size sedan frugality and a 500-mile freeway range.
Accepting the inevitable compromise in breakover angle of its 19-inch longer wheelbase (compared to a Wrangler Unlimited), the Gladiator diesel proved totally unflappable on a well-known four-wheel-drive circuit in Redington Pass east of Tucson. It even took the challenging Three Feathers rock face in stride, helped by excellent marshalling from my friend Brian DeArmon. Elsewhere, despite the wheelbase, I only made solid rock contact twice—and those were both on the front radius arm mount—user error as I came down off boulders too quickly. The center skid plate (which desperately needs a stouter aftermarket solution) only scraped lightly a couple of times.
The only downside to the truck I drove—and it is significant—is payload. The highest payload available in a gasoline-engined Gladiator is an okay 1700 pounds. The diesel in the Gladiator Sport drops that to 1,325 pounds, and the diesel/Rubicon option cuts it even further to a measly 1,075 pounds—not very much for a pickup. Subtract the weight of four occupants and you’re left with less than 500 pounds of actual cargo.
Personal opinion, not suggesting this, do not attempt at home: Given that the Sport and Rubicon share virtually everything load-capacity-oriented except springs and shocks, if I were lucky enough to own my test Gladiator and wanted to put something like an Alu-Cab shell on it, I’d have no hesitation in simply uprating the rear springs and shocks to handle the load.
In a world where proper body-on-boxed-frame, solid-axle, expedition-worthy 4x4s are disappearing, FCA continues to work magic on the Wrangler line, bringing it up to modern safety and comfort standards while retaining its capability, durability, and, last but not least, damn good looks.

Installing an external water tap

The camper conversion in our Toyota Land Cruiser Troop Carrier had one significant disadvantage: The closed roof covered the sink and water tap in the galley counter; to use it we had to raise the pop top. The Expedition Centre in Sydney had installed an extra water line from the chassis-mounted 95-liter tank to the rear of the vehicle, fitted with a simple twist valve, from which we could get water via gravity feed. However, it was extremely slow, and its parked position tucked up into the chassis was a pain to access and guaranteed it would be filthy—no help when you wanted to wash your hands. Also, a raised bend in the line meant that once the level in the tank dropped below half, we could get nothing out of it.
On our last trip across Australia, jealously watching Graham Jackson and Connie Rodman access pressurized water through a convenient tap at the back of their Troopy, we knew we needed a similar arrangement. With our Land Cruiser back home in Arizona I was able to tackle the task.

I bought a solid brass Wadeo rain barrel ball valve tap with a bulkhead fitting. Using this meant I would have a semi-permanent fitting in the bumper and an easily replaceable tap. I selected a spot on our Kaymar bumper where the tap would be well-protected by one of the swingaway latches from accidental impacts, then drilled through the (thick!) bumper and installed the bulkhead fitting and tap.

We’ve used Shurflo 12VDC pumps for the water system out at our desert property for years, with excellent results, so I ordered a model 4009-101-E65 on-demand pump. This is a fairly bulky unit, but I found a good mounting spot behind the Land Cruiser’s right rear wheel well, tucked up inside the fender area. There is flat sheet metal here, a void behind it where wiring runs for the vehicle’s tail lamps and rear window wiper, then the exterior body panel. With a right-angle drill I was able to make four holes to bolt the pump’s flexible bracket securely to the fender. Since the Shrflo pump is an on-demand unit and is self-priming, I was able to use the gravity-feed line to supply the pump, since it can draw water over the loop in the line to access water all the way to the bottom of the tank. A half-inch line runs from the outflow through the back of the Kaymar bumper to the tap.

A future addition might be a sheet-metal guard underneath the pump
Graham and Connie’s water pump had a master switch inside the vehicle, to prevent a mischevious passer-by from turning on the tap and draining the tank—an excellent idea. Our Blue Sea auxiliary power fuse block is in a recess in the cabinetry behind the (right side) driver’s seat. I grounded the water pump to the wheel-well sheet metal, and ran its hot line into the interior, behind the cabinetry up to the fuse center, and through a 20-amp-capacity toggle switch. Every point on the fuse block is utilized, so I simply siamesed the new pump onto the fuse for the sink pump, knowing that we’d never be using them simultaneously.

Interior switch prevents water theft. Fuse doubles for both inside and outside H2O pumps.
It’s a luxury to have on-demand pressure water outside, not only for washing hands and filling bottles, but rinsing dishes as well.

Brass cap keeps grit out of the tap.
EDIT: Reader Bill Ruttan kindly pointed out that on the Amazon ad he found for this tap, there was a warning that it was “not for potable water” as there is lead content. I looked back at the page from where I bought ours and found no such warning. Nevertheless, I found similar products that were certified lead-free, such as this one, so look for those rather than the one I got if you’re concerned about it. Will I bother to switch ours? Hmm . . .
One-Case Tool Kit – Episode 2 – Wrenches and torque wrenches (online workshop)
Part two in Jonathan’s series on his legendary One-Case Toolkit.
Don’t even think about using pliers on that nut. Aside from a socket, a wrench is the only proper way to fasten or remove a nut of bolt without damaging it. But what wrenches should you carry? How big should you go? What about ratcheting wrenches and box wrenches? We’ll also discuss torque “wrenches,” and why you should have and use one regularly.

RESOURCES FROM THE WORKSHOP:

OVERVIEW: THE CONTENTS OF THE ONE-CASE TOOL KIT
From the workshop chat, some of the products and tips mentioned by viewers:
Knipex pliers wrench solves most of the stated issues with adjustable size.
The original style beam torque wrenches weren't (aren't) ratcheting. That's probably where the name got set.
With a beam torque wrentch , one can measure the torque as one removes the fastener, in case the torque specifications are not available. I use it to measure torque while removing head bolts on a engine with a blown head gasket to pinpoint which head bolts are less tight and /or which cylinder could have issues.
I learned today to get a torque adaptor in order to save space. Thank you. Axle nuts may go up to 250 ft. lbs.
Okay, on a R1200GS the Rear wheel drive to swinging arm, M12 x 1.5 is 100 Nm (74 ft-lbs)
In aircraft accident investigation the torque to remove fasteners is routinely measured
Engine crankshaft pulleys will approach 250 ft-lbs also.
I believe break away torque when loosening a nut is typically higher than the original tightening torque. So I’d be careful trying to determine appropriate torque that way.
Tech engineer here, a good factory torque spec will assume a level of cleanliness and thread treatment. more friction in the threads mean you need more torque to achieve a given tension. most anti seize will lower friction and thus torque required compared to dry. but if manual says to anti seize and torque to x, hopefully the engineer already accounted for it and you don’t need to adjust.
http://www.torque-rod.com/
My experience with the torque rod is they are not very accurate. I was tested them on a machine in my lab, I would not trust them.
For fasteners without factory specs available, there are tables of standard torques that have different values for different thread lubrication conditions. Bossard has a good fastener handbook PDF you can find online for metric ones.
I love my Knipex pliers, very durable and user friendly. Always get More tools.
I've seen some tables where based on fastener size there are (typical) applicable torque specifications. There's a DIN standard, if my memory's not wrong.
‘Load indicating washer’ are the ones that squirt at right torque. Hardish to find in metric sizes in small QTYs in US

Hint: When using “Search,” if nothing comes up, reload the page, this usually works. Also, our “Comment” button is on strike thanks to Squarespace, which is proving to be difficult to use! Please email me with comments!
Overland Tech & Travel brings you in-depth overland equipment tests, reviews, news, travel tips, & stories from the best overlanding experts on the planet. Follow or subscribe (below) to keep up to date.
Have a question for Jonathan? Send him an email [click here].
SUBSCRIBE
CLICK HERE to subscribe to Jonathan’s email list; we send once or twice a month, usually Sunday morning for your weekend reading pleasure.


Overland Tech and Travel is curated by Jonathan Hanson, co-founder and former co-owner of the Overland Expo. Jonathan segued from a misspent youth almost directly into a misspent adulthood, cleverly sidestepping any chance of a normal career track or a secure retirement by becoming a freelance writer, working for Outside, National Geographic Adventure, and nearly two dozen other publications. He co-founded Overland Journal in 2007 and was its executive editor until 2011, when he left and sold his shares in the company. His travels encompass explorations on land and sea on six continents, by foot, bicycle, sea kayak, motorcycle, and four-wheel-drive vehicle. He has published a dozen books, several with his wife, Roseann Hanson, gaining several obscure non-cash awards along the way, and is the co-author of the fourth edition of Tom Sheppard's overlanding bible, the Vehicle-dependent Expedition Guide.