
Overland Tech and Travel
Advice from the world's
most experienced overlanders
tests, reviews, opinion, and more
A dual-band radio for the JATAC

If you do any overlanding with a group, especially in remote areas and on routes where the vehicles might be out of sight of each other for periods, it’s smart to have some means of intra-group communication. Cell phones are okay for person-to-person talking, but cell coverage is still far from universal (more so where many of us like to explore), and in any case a phone is worthless for broadcasting a quick message to multiple vehicles at once. For that you need a radio.
Handheld UHF (Ultra High Frequency) FRS (Family Radio Service) transceivers are okay for very short-range work, as are the CB (Citizen’s Band) radios made famous by the 55mph speed limit, Smokey and the Bandit, and several bad country songs. But if you want some real range you’ll need to go the pro route and install a two-meter transceiver.
Two-meter communication uses the 144 to 148 MHz band of the spectrum. Due to the frequency allocation, and the power allowed to the units, range is significantly greater than possible with FRS or CB units—and it can be extended even farther by using repeaters. You need an FCC Technician Class amateur radio license to operate a two-meter radio, but the test is easy to pass after a review of the associated technology and rules available several places online, such as here. I’ll never live down my test, when I missed one question out of 35 while Roseann at the next desk aced hers. I should have cheated. (If you are attending the Overland Expo, you can study on your own, then pay the nominal fee and take the test at the Expo on Sunday between 8:00 and 10:00 a.m.)
For some reason I kept putting off installing a two-meter radio in the JATAC—we used a handheld throughout the entire Continental Divide trip last year, which is pretty lame for the trip leaders. So I rectified the situation for this year’s upcoming CD journey.
On the advice of ham-radio guru Bob McNamara (a frequent instructor at the Overland Expo), I ordered a Yaesu FT-8800R/E dual-band transceiver. Operating either in the two-meter or 70cm bands, the FT-8800R/E can put out 50 watts of transmitting power on the former (compared to five for most handhelds), and has a bunch of additional features that will take me years to master. If you’re faced with a difficult installation scenario (common in modern trucks with crowded dashes and even more crowded wiring harnesses behind them), the faceplate can be mounted on its own, connected to the remotely positioned main module with an included cord. It turned out in our case (2012 Tacoma), that a pocket in the center console just in front of the (manual transmission) gear shift seemed almost deep enough for the entire unit. I needed to pull everything out to determine if that was the case.
Modern truck interiors are a bit of a jigsaw puzzle. Taking one apart can be an hours-long struggle or—if you know the sequence—a matter of minutes. A call to our friend and master Toyota mechanic Bill Lee (who, annoyingly, keeps moving farther and farther away—first 250 miles, now 400 and counting*), and I had the secret to the center console. The cup holder assembly is held in by clips; pop it straight up and a couple of bolts and screws underneath release the rest of the assembly.
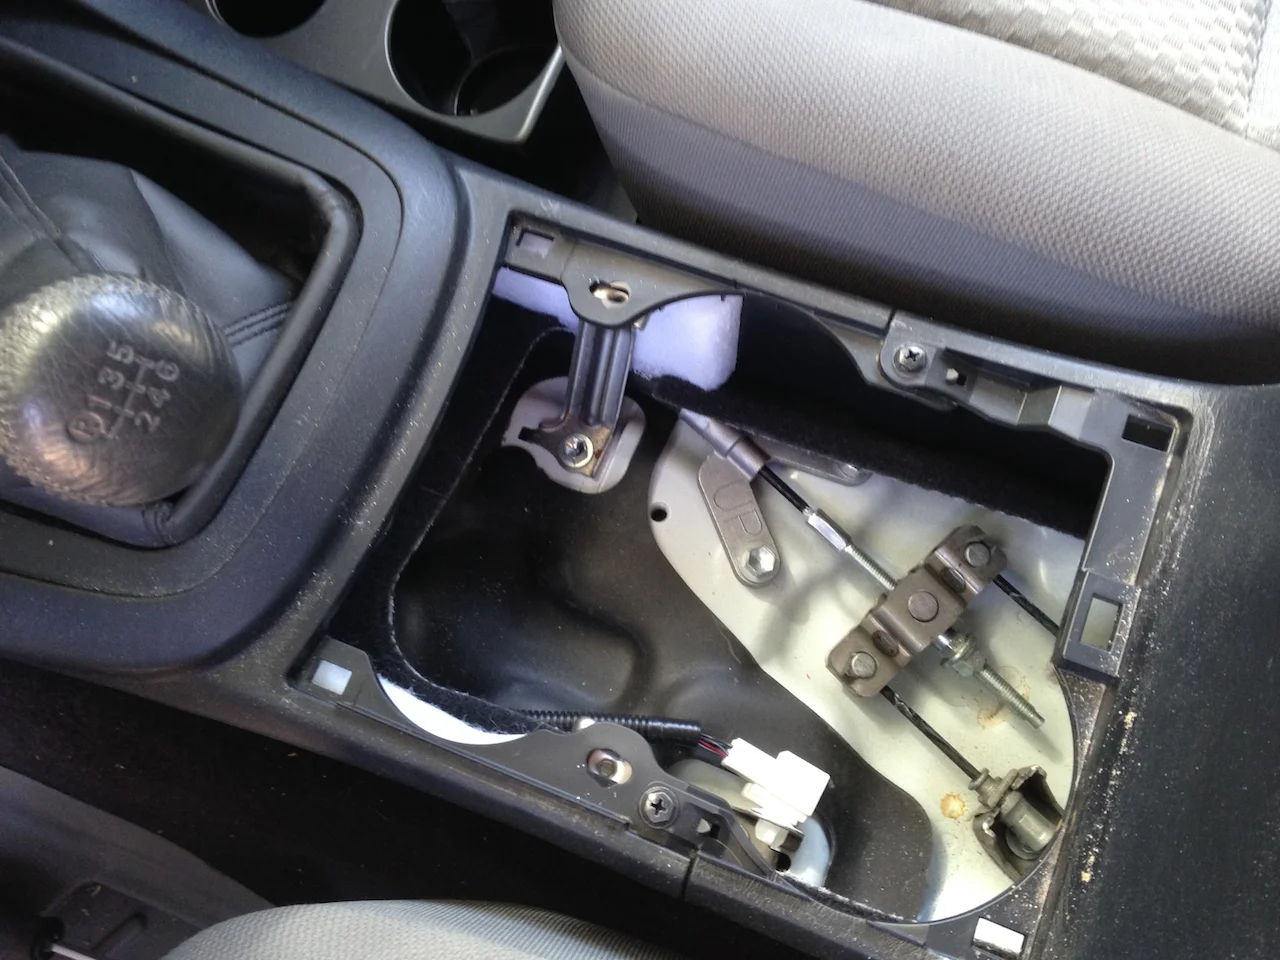
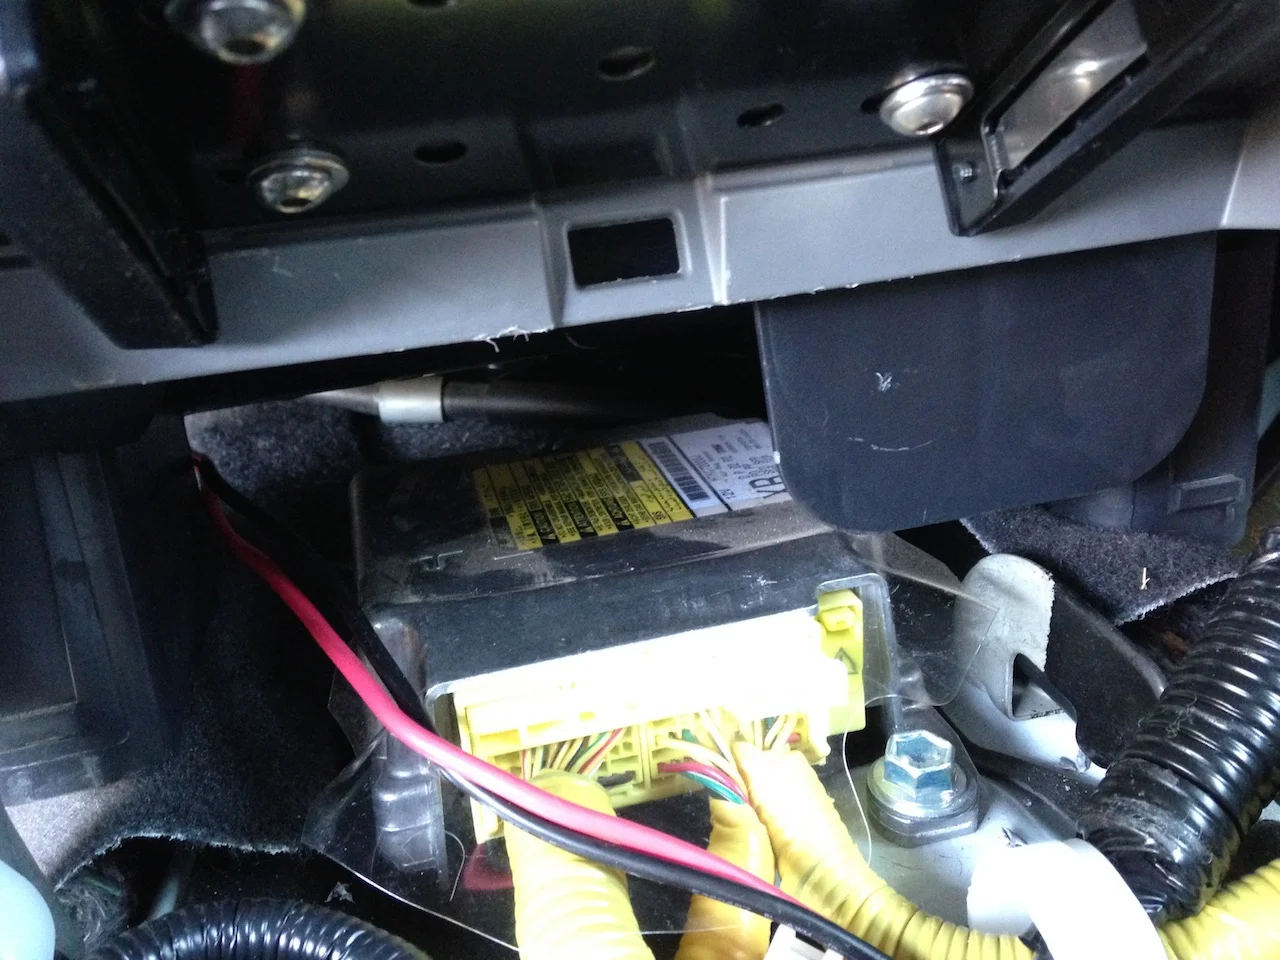
I cut a hole in the back of the pocket large enough to accept the back of the radio and allow access to the power cord, antenna, and remote speaker jack. However, a trial fit revealed something else in the way: a large, bolstered plastic tab extending vertically downward from the dash structure itself. Even Bill had no clue as to its function. Its position directly above the air bag computer implied a relationship—some sort of protection? In any case it was barely but indubitably in the way of the antenna jack, so I unceremoniously took a hacksaw blade to it and cut off just enought to create a path for the antenna cable. Wit that accomplished, another trial showed the radio to sit nicely, clear of all movements of the shift lever.
Note the grey mystery tab on the right. Relieving a notch out of the left side allowed clearance for the antenna lead.
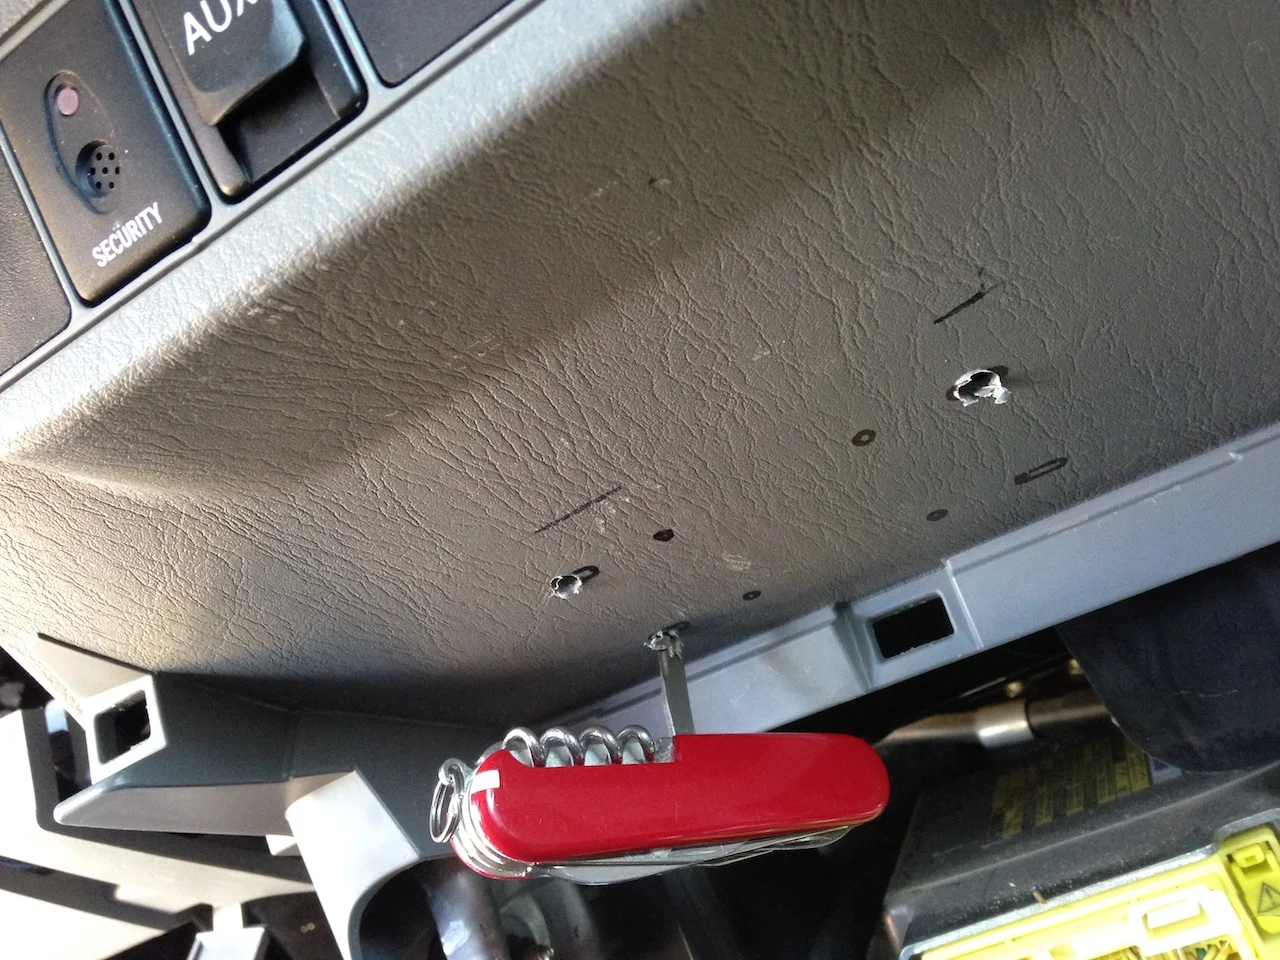
I’d bought a quick-release bracket for the radio; removing the console and loosening a few bolts on the bottom dash section gave me barely enough room to get my hand in behind and above the support piece to install stainless 10/24 locknuts and washers on the bolts holding the bracket. Amusingly, the perfect tool to drill the holes for those bolts through the plastic, with little maneuvering room, proved to be the awl attachment on my Swiss Army knife.
With the radio in place, it was time to run the positive and negative leads of the power wires through the firewall. In my old FJ40 such a task is easy: Find a blank spot on the steel firewall, drill a hole, run the wires through it and shove in a rubber grommet. Done. Today’s trucks are different. There are multiple layers of plastic, carpet, and soundproofing to get through—and masses of wiring to avoid—before you even reach the firewall. Fortunately, on the driver’s side of the Tacoma is a very large rubber seal through which a bunch of wiring connects the engine and battery to the dash. I found a phillips screwdriver with a long shaft, taped the end of each radio lead to it, and poked through the seal into the engine compartment. The Yaesu positive and negative leads are each equipped with inline fuse holder, and I wanted to be able to use the radio even with everything else in the truck turned off, so I ran the leads directly to the battery. (This is a good idea anyway, as a transceiver requires full voltage to function properly, and wiring from the vehicle's fuse box can introduce spurious electrical noise. The FT-8800 has an adjustable auto shut-down function to prevent draining the battery.)
For the antenna lead I found an existing hole in the passenger footwell, up behind the vent fan assembly. After removing the rubber plug in it, I had to file a slot in the hole to get the antenna lead through it, but it went through easily afterwards with the glove box assembly removed for access.
I had several options for mounting the antenna, but decided on a hood lip mount—a Comet RS-840 with a PL-259 connector—and a Comet CSB-750A dual-band antenna. The mount adjusts to enable a vertical stance for the antenna—I can’t stand tilted antennas—and in addition to clamping to the lip of the hood with four hex-head screws, has a brace that extends to the fender to enhance rigidity. On our truck the brace didn’t rest against the fender lip, resulting in an obnoxious side-to-side wobble in the antenna, so I glued a thin piece of rubber to it. That made a solid connection. Once mounted thusly, you don’t want to close the hood as so many people do, by dropping it from a foot or so high. Since I’ve always loathed this habit, and instead close all hoods by lowering them gently over the safety latch, then pushing down, this is not an issue for me.
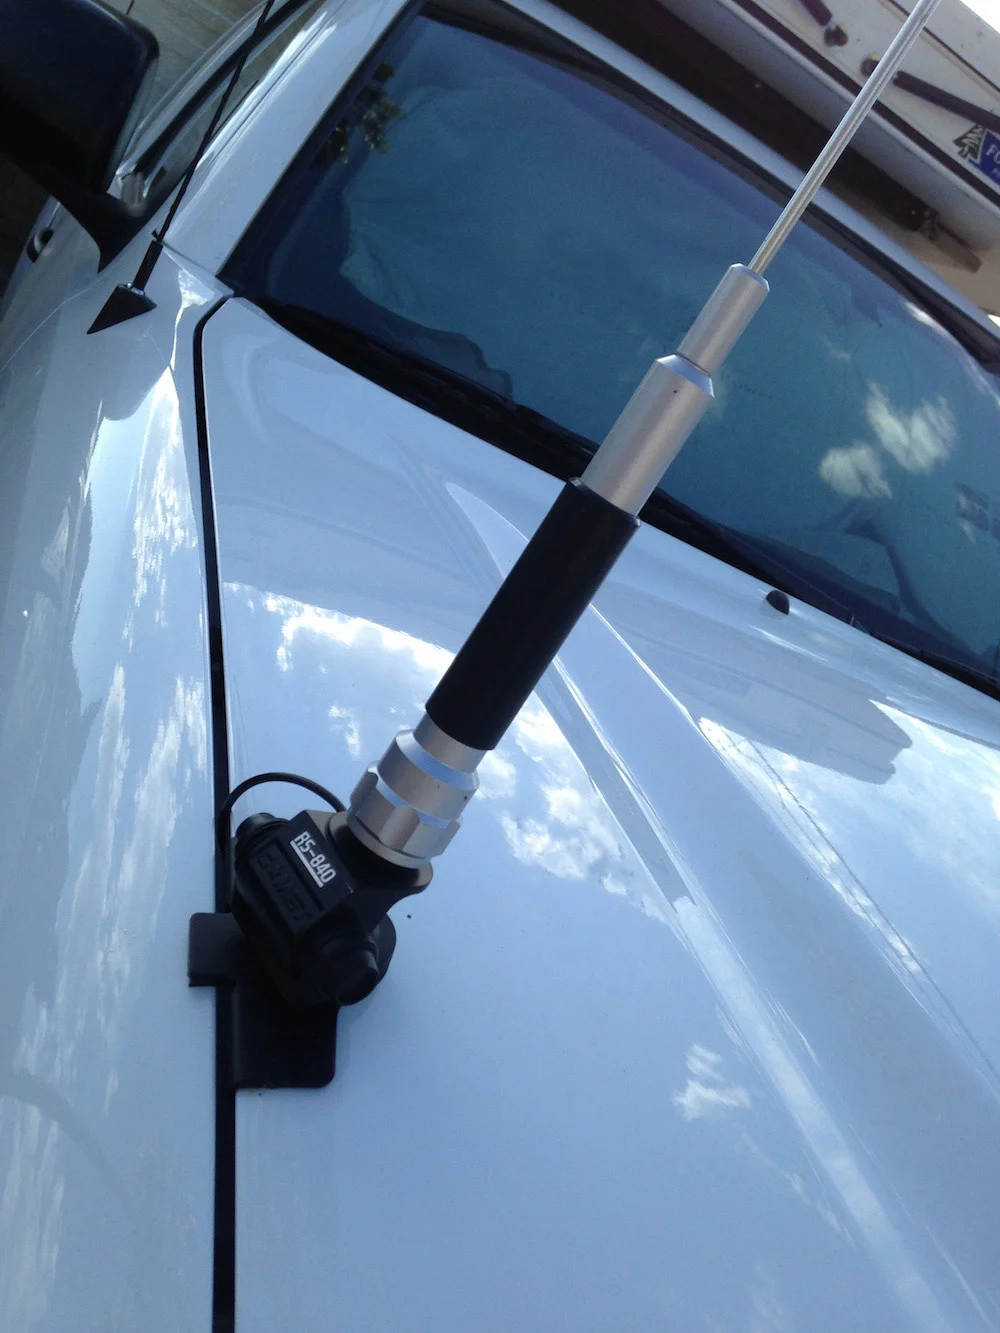
One other note here: The antenna needs to ground to the hood via the four hex-head clamping screws. On the Tacoma hood, the edge underneath is trimmed with a thin strip of rubber, so you need to be sure the screws get through the rubber to the bares steel. I used a very small flat-head screwdriver to twist through the rubber strip.
And . . . finished, aside from mounting the microphone holder to the side of the transmission tunnel, and ordering a Yaesu external speaker. At last we’ll have a radio suitable for our responsibilities as trip leaders, and great for simply sharing interesting sights along the spine of North America and elsewhere.
*If you own a Toyota or Lexus and live within, say, 400 miles of Farmington, New Mexico, Bill's Toy Shop is worth the trip for major work. He'll also be teaching several mechanics classes at the Overland Expo. billstoyshop.com
Hint: When using “Search,” if nothing comes up, reload the page, this usually works. Also, our “Comment” button is on strike thanks to Squarespace, which is proving to be difficult to use! Please email me with comments!
Overland Tech & Travel brings you in-depth overland equipment tests, reviews, news, travel tips, & stories from the best overlanding experts on the planet. Follow or subscribe (below) to keep up to date.
Have a question for Jonathan? Send him an email [click here].
SUBSCRIBE
CLICK HERE to subscribe to Jonathan’s email list; we send once or twice a month, usually Sunday morning for your weekend reading pleasure.


Overland Tech and Travel is curated by Jonathan Hanson, co-founder and former co-owner of the Overland Expo. Jonathan segued from a misspent youth almost directly into a misspent adulthood, cleverly sidestepping any chance of a normal career track or a secure retirement by becoming a freelance writer, working for Outside, National Geographic Adventure, and nearly two dozen other publications. He co-founded Overland Journal in 2007 and was its executive editor until 2011, when he left and sold his shares in the company. His travels encompass explorations on land and sea on six continents, by foot, bicycle, sea kayak, motorcycle, and four-wheel-drive vehicle. He has published a dozen books, several with his wife, Roseann Hanson, gaining several obscure non-cash awards along the way, and is the co-author of the fourth edition of Tom Sheppard's overlanding bible, the Vehicle-dependent Expedition Guide.