
Overland Tech and Travel
Advice from the world's
most experienced overlanders
tests, reviews, opinion, and more
A dual-band radio for the JATAC

If you do any overlanding with a group, especially in remote areas and on routes where the vehicles might be out of sight of each other for periods, it’s smart to have some means of intra-group communication. Cell phones are okay for person-to-person talking, but cell coverage is still far from universal (more so where many of us like to explore), and in any case a phone is worthless for broadcasting a quick message to multiple vehicles at once. For that you need a radio.
Handheld UHF (Ultra High Frequency) FRS (Family Radio Service) transceivers are okay for very short-range work, as are the CB (Citizen’s Band) radios made famous by the 55mph speed limit, Smokey and the Bandit, and several bad country songs. But if you want some real range you’ll need to go the pro route and install a two-meter transceiver.
Two-meter communication uses the 144 to 148 MHz band of the spectrum. Due to the frequency allocation, and the power allowed to the units, range is significantly greater than possible with FRS or CB units—and it can be extended even farther by using repeaters. You need an FCC Technician Class amateur radio license to operate a two-meter radio, but the test is easy to pass after a review of the associated technology and rules available several places online, such as here. I’ll never live down my test, when I missed one question out of 35 while Roseann at the next desk aced hers. I should have cheated. (If you are attending the Overland Expo, you can study on your own, then pay the nominal fee and take the test at the Expo on Sunday between 8:00 and 10:00 a.m.)
For some reason I kept putting off installing a two-meter radio in the JATAC—we used a handheld throughout the entire Continental Divide trip last year, which is pretty lame for the trip leaders. So I rectified the situation for this year’s upcoming CD journey.
On the advice of ham-radio guru Bob McNamara (a frequent instructor at the Overland Expo), I ordered a Yaesu FT-8800R/E dual-band transceiver. Operating either in the two-meter or 70cm bands, the FT-8800R/E can put out 50 watts of transmitting power on the former (compared to five for most handhelds), and has a bunch of additional features that will take me years to master. If you’re faced with a difficult installation scenario (common in modern trucks with crowded dashes and even more crowded wiring harnesses behind them), the faceplate can be mounted on its own, connected to the remotely positioned main module with an included cord. It turned out in our case (2012 Tacoma), that a pocket in the center console just in front of the (manual transmission) gear shift seemed almost deep enough for the entire unit. I needed to pull everything out to determine if that was the case.
Modern truck interiors are a bit of a jigsaw puzzle. Taking one apart can be an hours-long struggle or—if you know the sequence—a matter of minutes. A call to our friend and master Toyota mechanic Bill Lee (who, annoyingly, keeps moving farther and farther away—first 250 miles, now 400 and counting*), and I had the secret to the center console. The cup holder assembly is held in by clips; pop it straight up and a couple of bolts and screws underneath release the rest of the assembly.
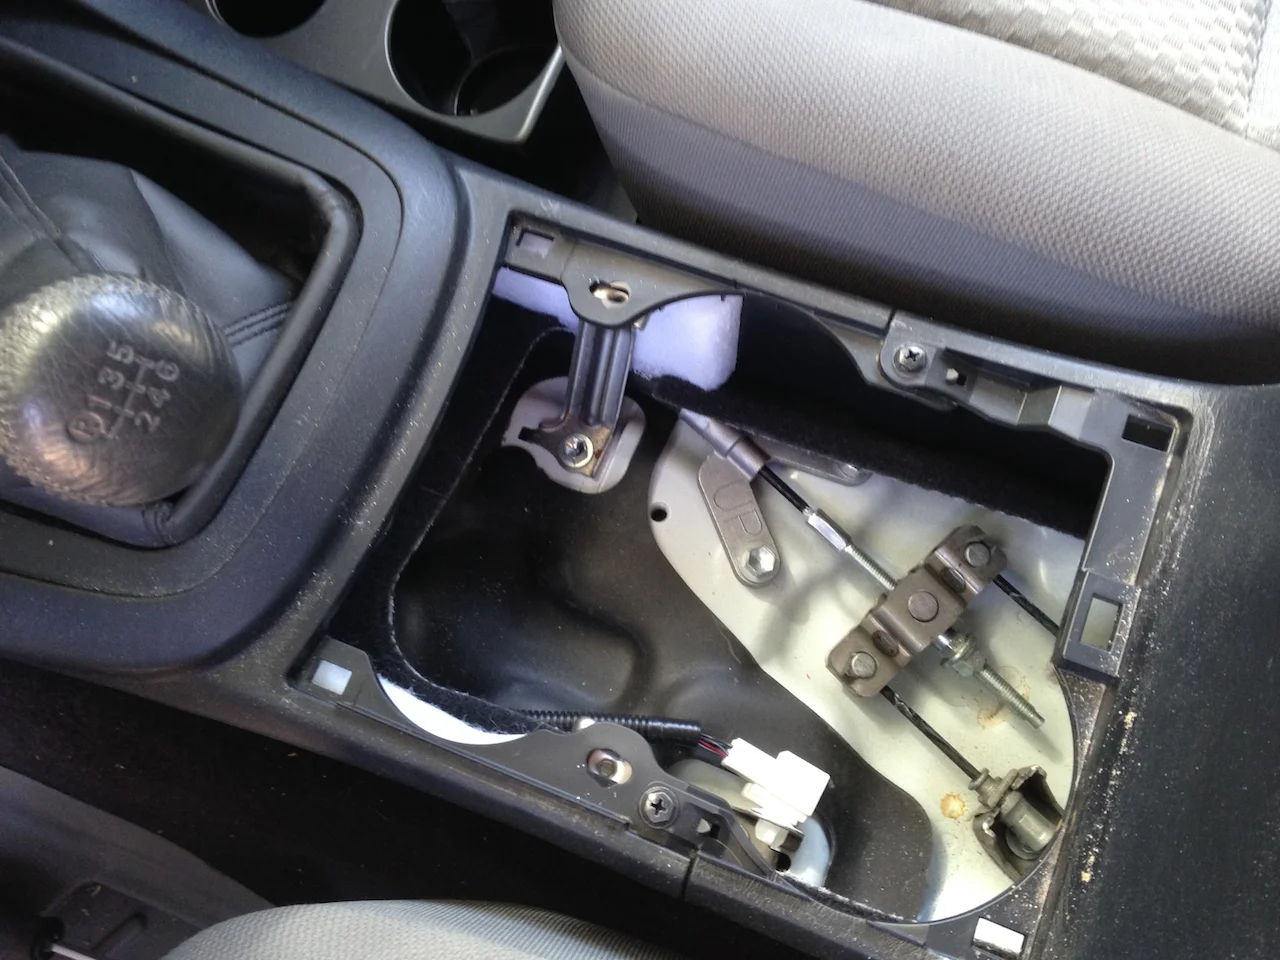
I cut a hole in the back of the pocket large enough to accept the back of the radio and allow access to the power cord, antenna, and remote speaker jack. However, a trial fit revealed something else in the way: a large, bolstered plastic tab extending vertically downward from the dash structure itself. Even Bill had no clue as to its function. Its position directly above the air bag computer implied a relationship—some sort of protection? In any case it was barely but indubitably in the way of the antenna jack, so I unceremoniously took a hacksaw blade to it and cut off just enought to create a path for the antenna cable. Wit that accomplished, another trial showed the radio to sit nicely, clear of all movements of the shift lever.
Note the grey mystery tab on the right. Relieving a notch out of the left side allowed clearance for the antenna lead.
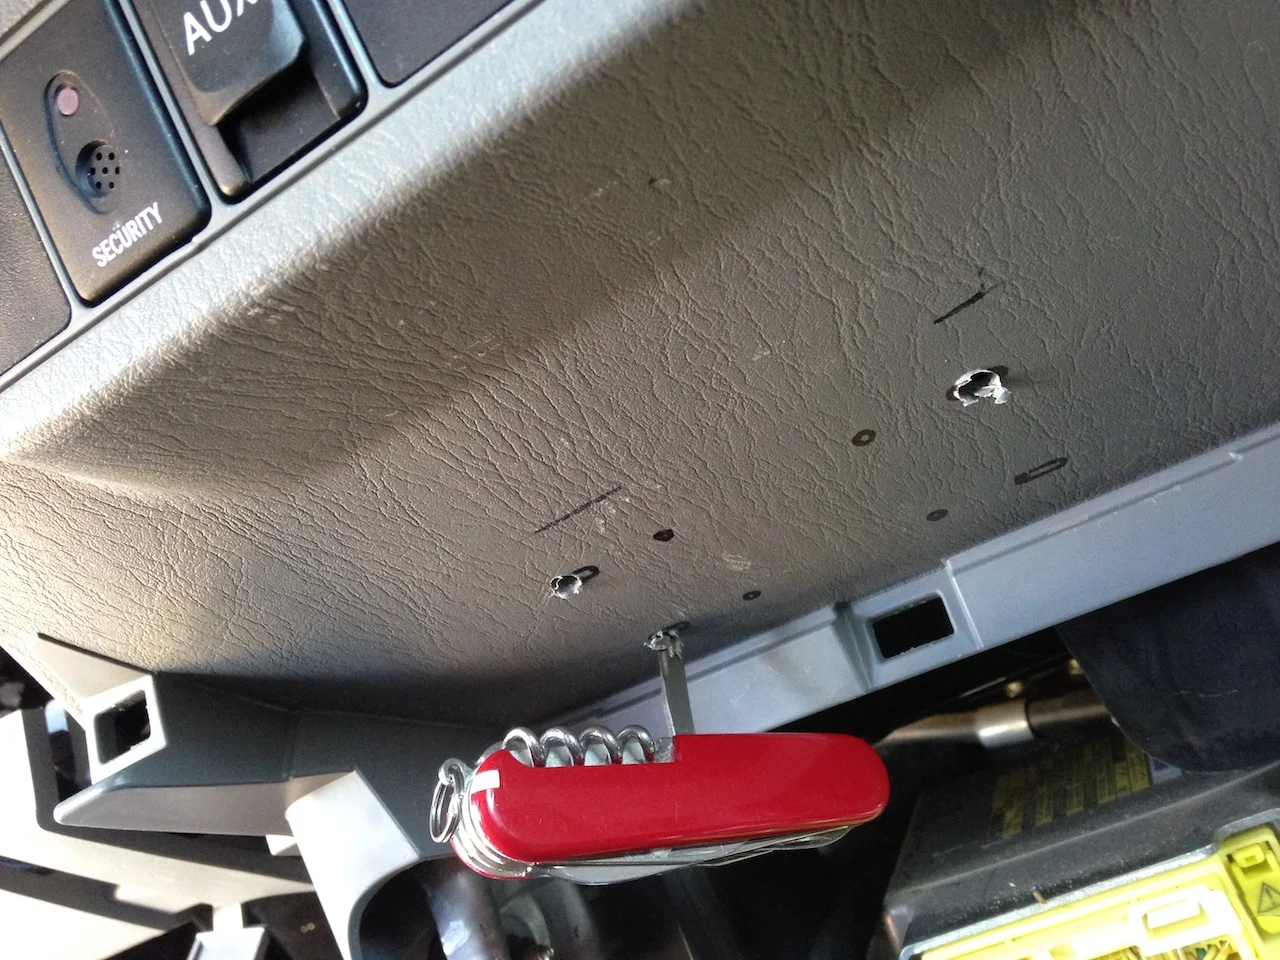
I’d bought a quick-release bracket for the radio; removing the console and loosening a few bolts on the bottom dash section gave me barely enough room to get my hand in behind and above the support piece to install stainless 10/24 locknuts and washers on the bolts holding the bracket. Amusingly, the perfect tool to drill the holes for those bolts through the plastic, with little maneuvering room, proved to be the awl attachment on my Swiss Army knife.
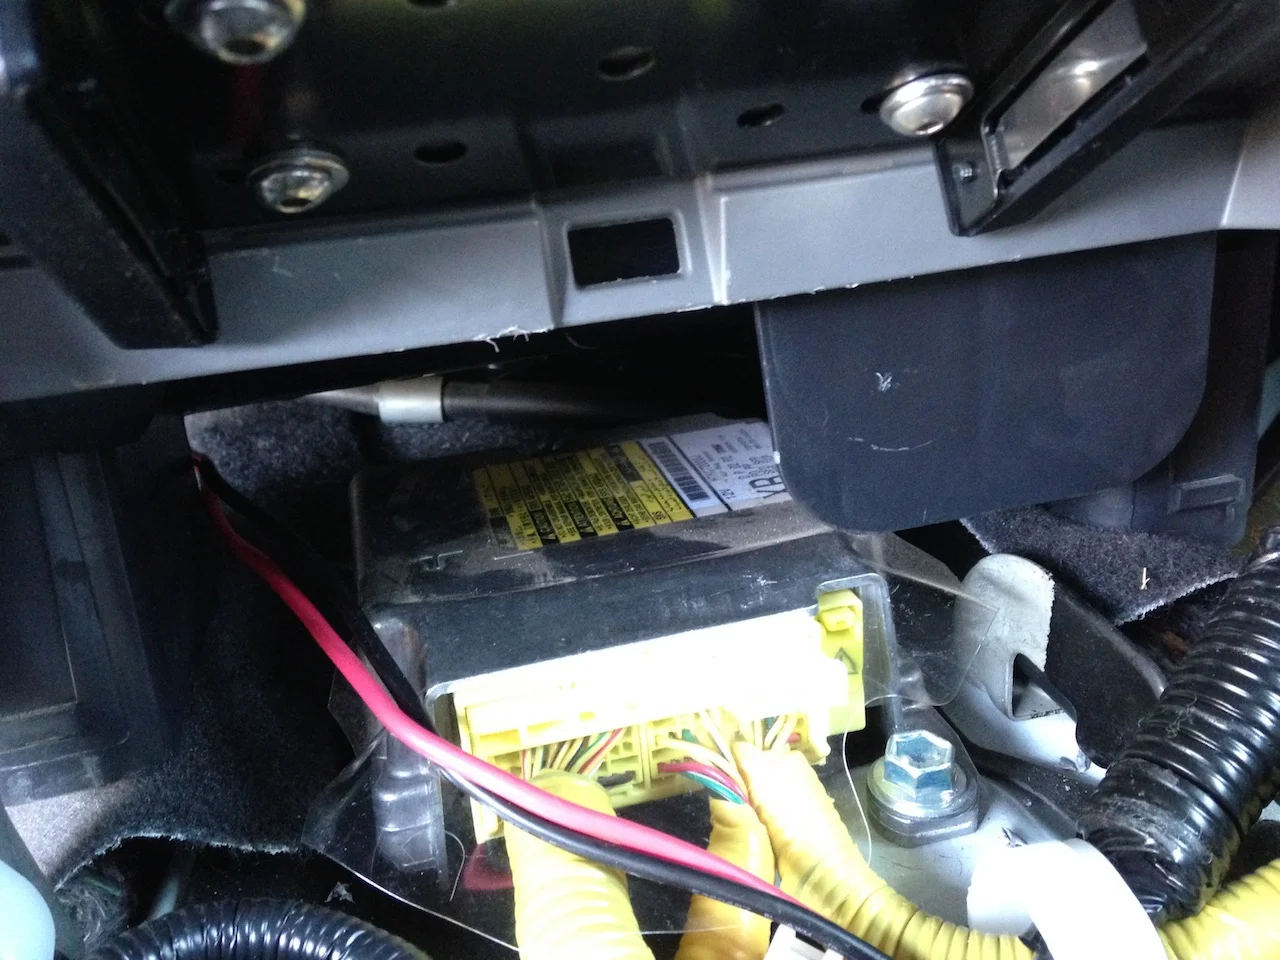
With the radio in place, it was time to run the positive and negative leads of the power wires through the firewall. In my old FJ40 such a task is easy: Find a blank spot on the steel firewall, drill a hole, run the wires through it and shove in a rubber grommet. Done. Today’s trucks are different. There are multiple layers of plastic, carpet, and soundproofing to get through—and masses of wiring to avoid—before you even reach the firewall. Fortunately, on the driver’s side of the Tacoma is a very large rubber seal through which a bunch of wiring connects the engine and battery to the dash. I found a phillips screwdriver with a long shaft, taped the end of each radio lead to it, and poked through the seal into the engine compartment. The Yaesu positive and negative leads are each equipped with inline fuse holder, and I wanted to be able to use the radio even with everything else in the truck turned off, so I ran the leads directly to the battery. (This is a good idea anyway, as a transceiver requires full voltage to function properly, and wiring from the vehicle's fuse box can introduce spurious electrical noise. The FT-8800 has an adjustable auto shut-down function to prevent draining the battery.)
For the antenna lead I found an existing hole in the passenger footwell, up behind the vent fan assembly. After removing the rubber plug in it, I had to file a slot in the hole to get the antenna lead through it, but it went through easily afterwards with the glove box assembly removed for access.
I had several options for mounting the antenna, but decided on a hood lip mount—a Comet RS-840 with a PL-259 connector—and a Comet CSB-750A dual-band antenna. The mount adjusts to enable a vertical stance for the antenna—I can’t stand tilted antennas—and in addition to clamping to the lip of the hood with four hex-head screws, has a brace that extends to the fender to enhance rigidity. On our truck the brace didn’t rest against the fender lip, resulting in an obnoxious side-to-side wobble in the antenna, so I glued a thin piece of rubber to it. That made a solid connection. Once mounted thusly, you don’t want to close the hood as so many people do, by dropping it from a foot or so high. Since I’ve always loathed this habit, and instead close all hoods by lowering them gently over the safety latch, then pushing down, this is not an issue for me.
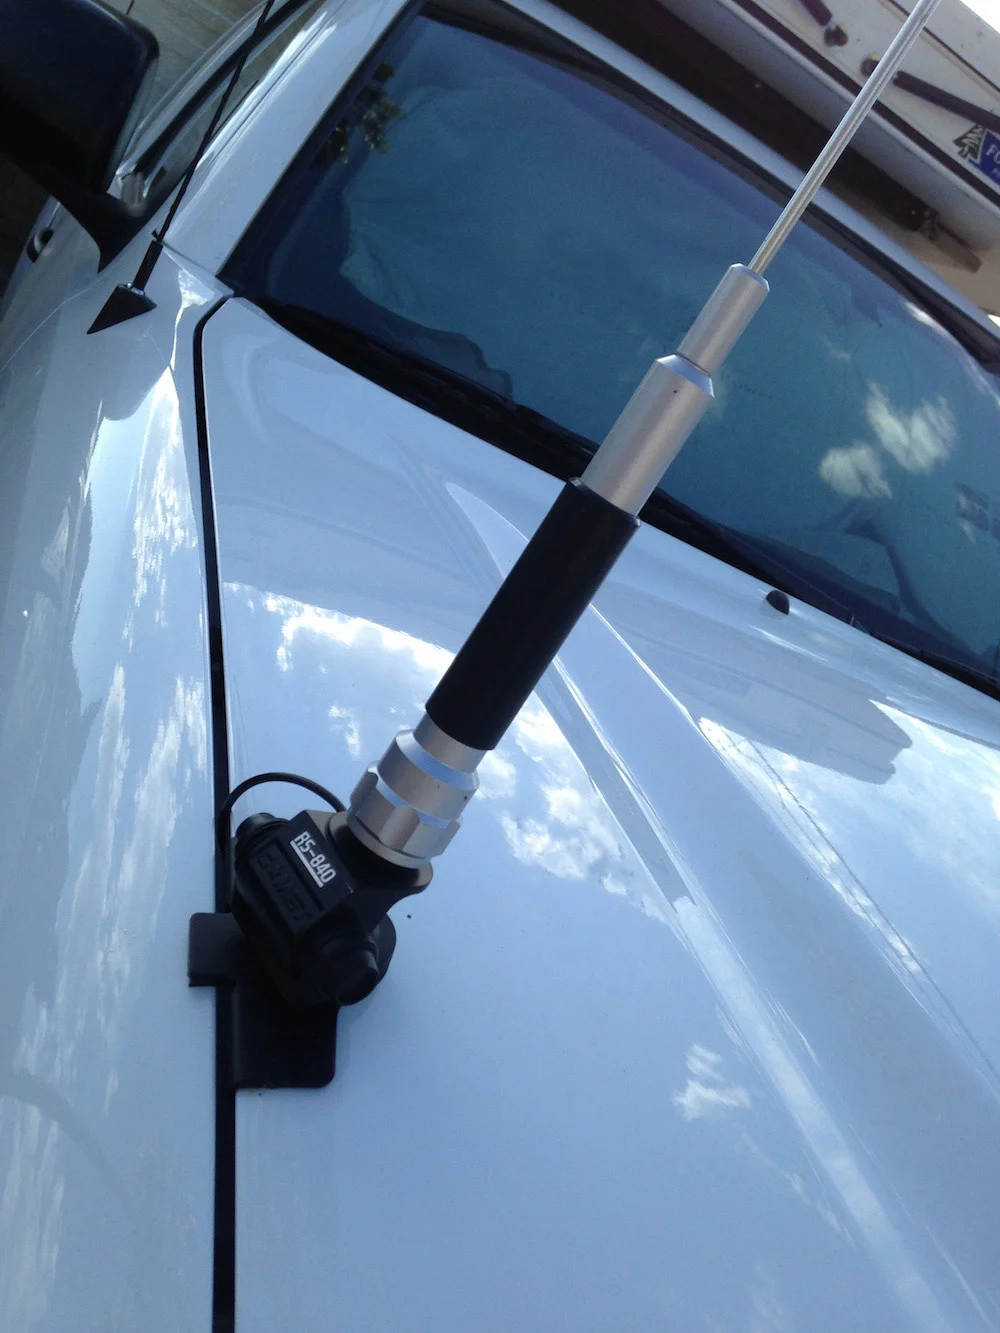
One other note here: The antenna needs to ground to the hood via the four hex-head clamping screws. On the Tacoma hood, the edge underneath is trimmed with a thin strip of rubber, so you need to be sure the screws get through the rubber to the bares steel. I used a very small flat-head screwdriver to twist through the rubber strip.
And . . . finished, aside from mounting the microphone holder to the side of the transmission tunnel, and ordering a Yaesu external speaker. At last we’ll have a radio suitable for our responsibilities as trip leaders, and great for simply sharing interesting sights along the spine of North America and elsewhere.
*If you own a Toyota or Lexus and live within, say, 400 miles of Farmington, New Mexico, Bill's Toy Shop is worth the trip for major work. He'll also be teaching several mechanics classes at the Overland Expo. billstoyshop.com
JATAC update: After a near-death experience
One afternoon early last year I was driving the JATAC, our Tacoma/Four Wheel Camper combination, west on Arizona’s Highway 86—a two-lane, 65mph road flanked with emergency lanes. As I approached a side road coming in from the north, I saw a Subaru sedan waiting at the stop to turn east, across my lane. Meanwhile, an SUV in front of me put on its signal and pulled into the turn lane to turn north. As I passed the SUV, the driver of the Subaru, who had apparently missed seeing the white pickup and cabover camper headed his way, accelerated, pulled out in front of me—and then stopped as he saw what he’d done. This left me heading toward his door at 60mph-plus, about 50 feet away.
In one of those slowed-down time-warp instants I saw with utter clarity the driver’s face, looking at me with the open-mouthed certainty that he had just committed suicide. There was scant chance I could avoid hitting him. Braking would have been laughably futile. The only possible alternatives were the desert on the right or, across the oncoming lane, the desert on the left. I saw there was no opposing traffic, so I violently yanked the steering wheel left, clearing the front of the Subaru by what could only have been inches. On the edge of either sliding or rolling—I wasn’t sure which—I yanked the wheel the other way, corrected a violent yaw, and managed to keep the truck on the pavement in the oncoming emergency lane, where I slowed, checked traffic (the Subaru had fled—you're welcome, pal), and pulled across again to stop off the road and restart my heart.
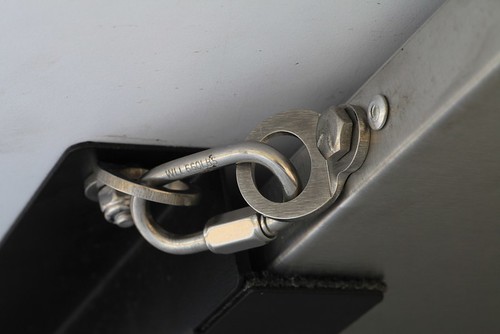
I got out and checked the truck and camper. Everything seemed okay, so I continued home. But on the last rough dirt section I heard a faint but obvious rattle coming from the camper area. At home I investigated and found that one of the four turnbuckles securing the camper to the truck had split at the open hook. I’d been meaning to replace the stock, aluminum-bodied turnbuckles anyway, and took the opportunity to install forged steel replacements.
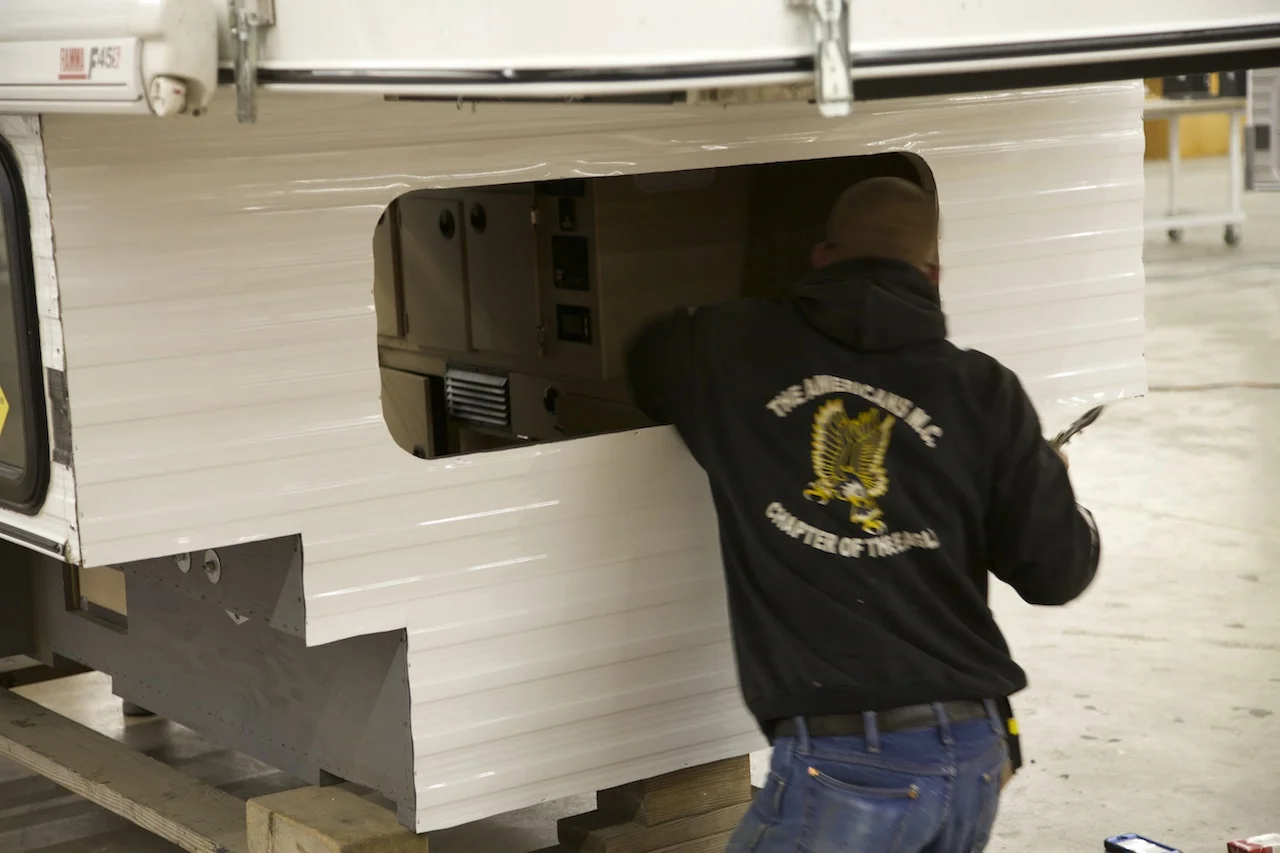
That seemed to be the end of the matter. However, several months later while washing the truck I noticed a split about two inches long in the camper’s aluminum skin, extending from the upper right corner of the front window, behind the truck’s rear window. Investigation revealed a similar split on the opposite side. Could the near miss have been the genesis of the splits? Difficult if not impossible to say, but it was a worrisome development.
I showed the splits to Tom Hanagan of FWC at Overland Expo EAST, who urged a factory visit to remove the skin and investigate the possibility of a cracked frame member or weld. So this Christmas we combined visit to see family on Coarsegold, California, with a trip to the Four Wheel Camper factory in Woodland. We took the opportunity to have a couple of upgrades done to the camper—the company is constantly evaluating current systems and components, looking for ways to improve the product.
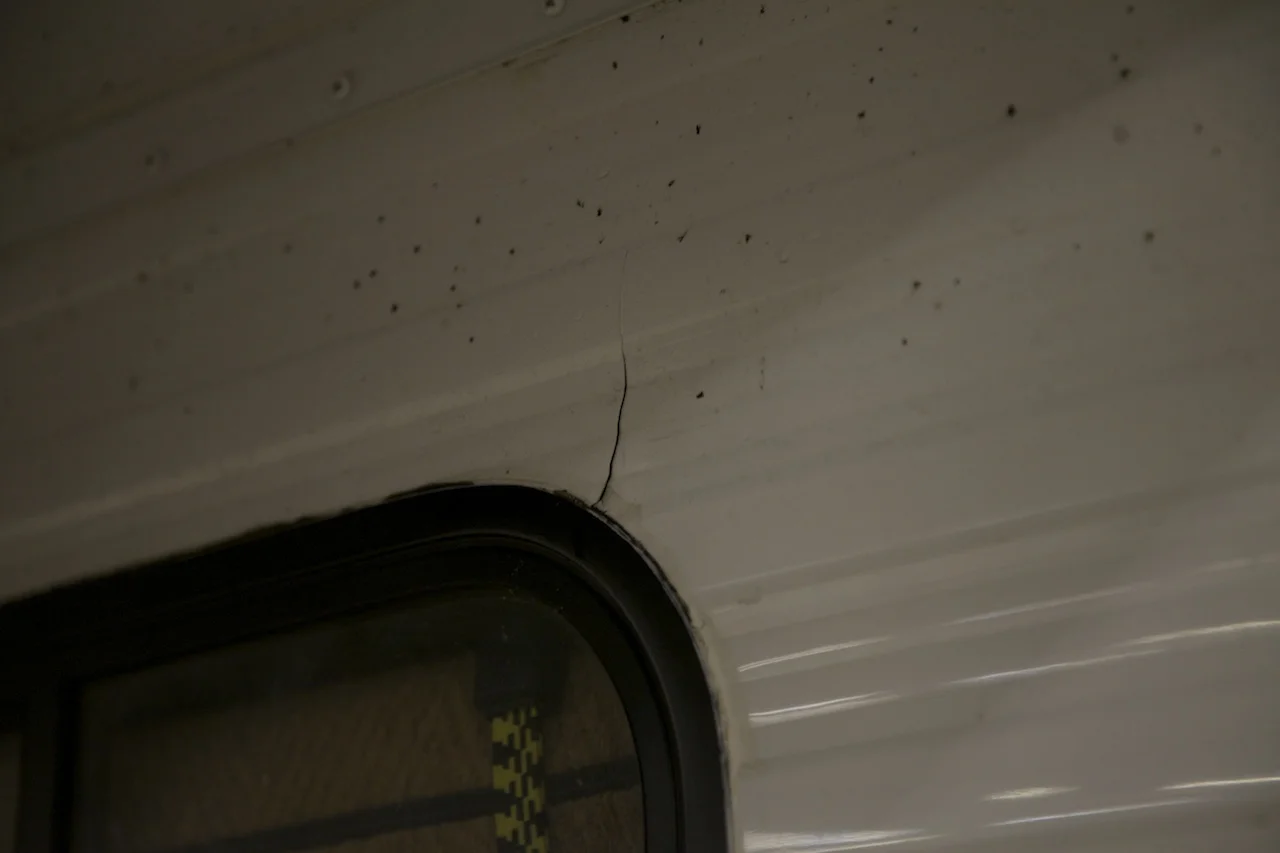
As you can see, the splits would be easy to miss if you weren't paying attention. Between the time I noticed them and the time we got to FWC, they seemed to have remained more or less stable.
With the front skin removed, Tom Hanagan inspected the frame, but found no cracked welds or any other damage. He had only seen this issue a couple times previously, but nevertheless decided that further structural engineering might be worth investigating. So I went upstairs with Robin Pritchard, FWC's new engineer, and watched while she created a CAD image of the Four Wheel Camper's front frame structure.
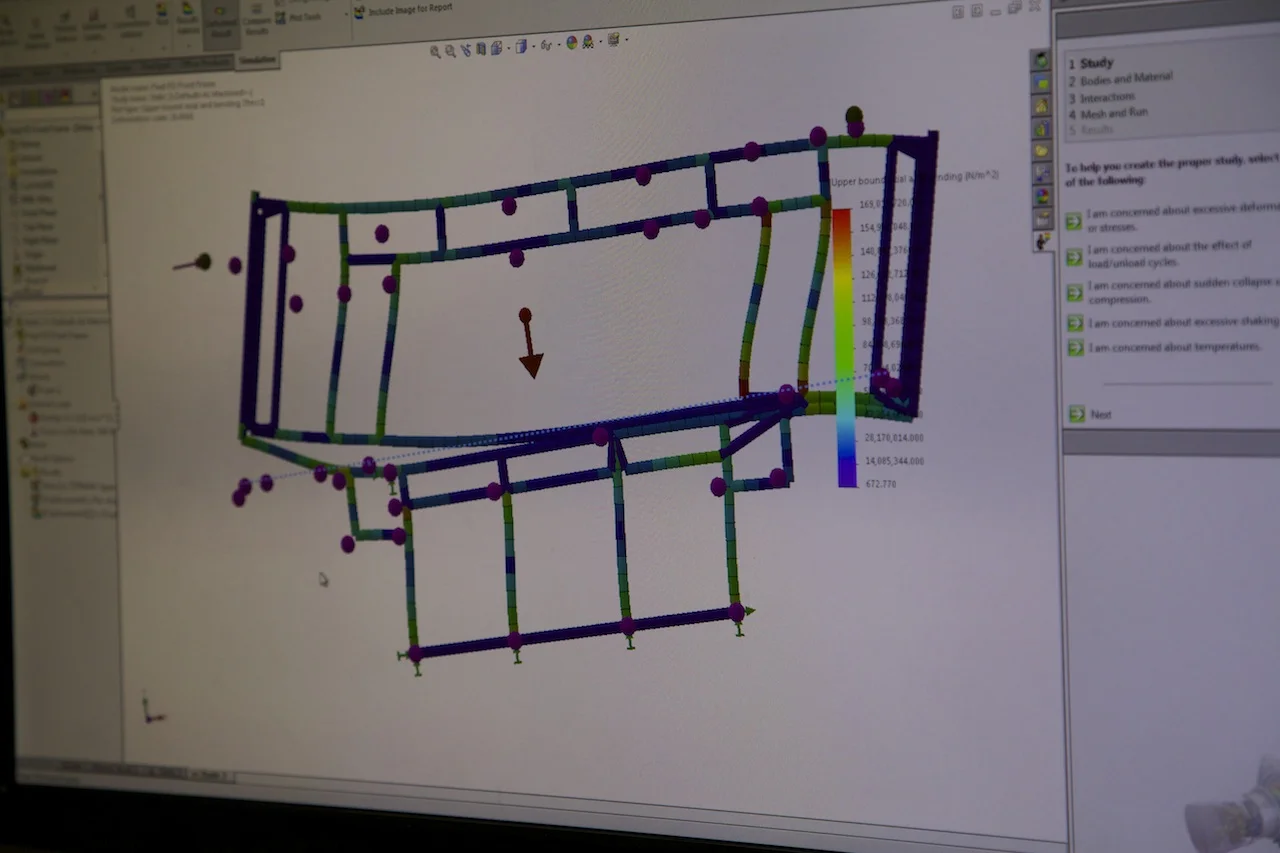
Once the virtual frame was assembled on screen, Robin applied a significant simulated side load. With no other structure or skin to reinforce the isolated frame, and the distortion effect magnified hundreds of times by the program, the graphic showed that the area of highest stress occurred . . . at the top corners of the window opening.
Robin studied the image for a minute, then applied a simple boxed reinforcement on either side of the window opening with a few clicks of her mouse. Immediately the distortion was attenuated, and the angry red color that highlighted stresspoints cooled off to a benign yellow. Tom looked at the result, and rolled our camper over the the welding area of FWC's huge factory, where the fabricators welded in two channeled aluminum pieces on our frame. The entire process added perhaps six ounces to the weight of the camper.
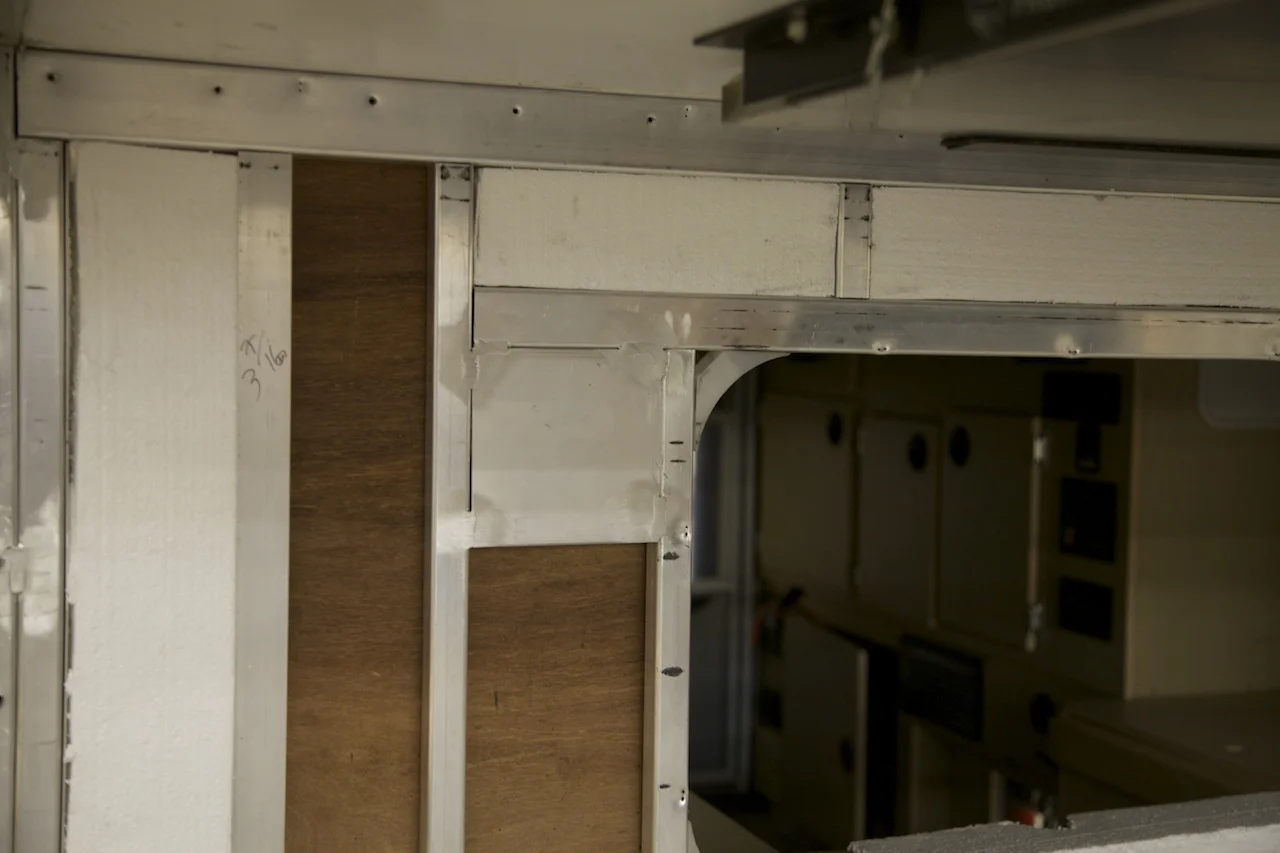
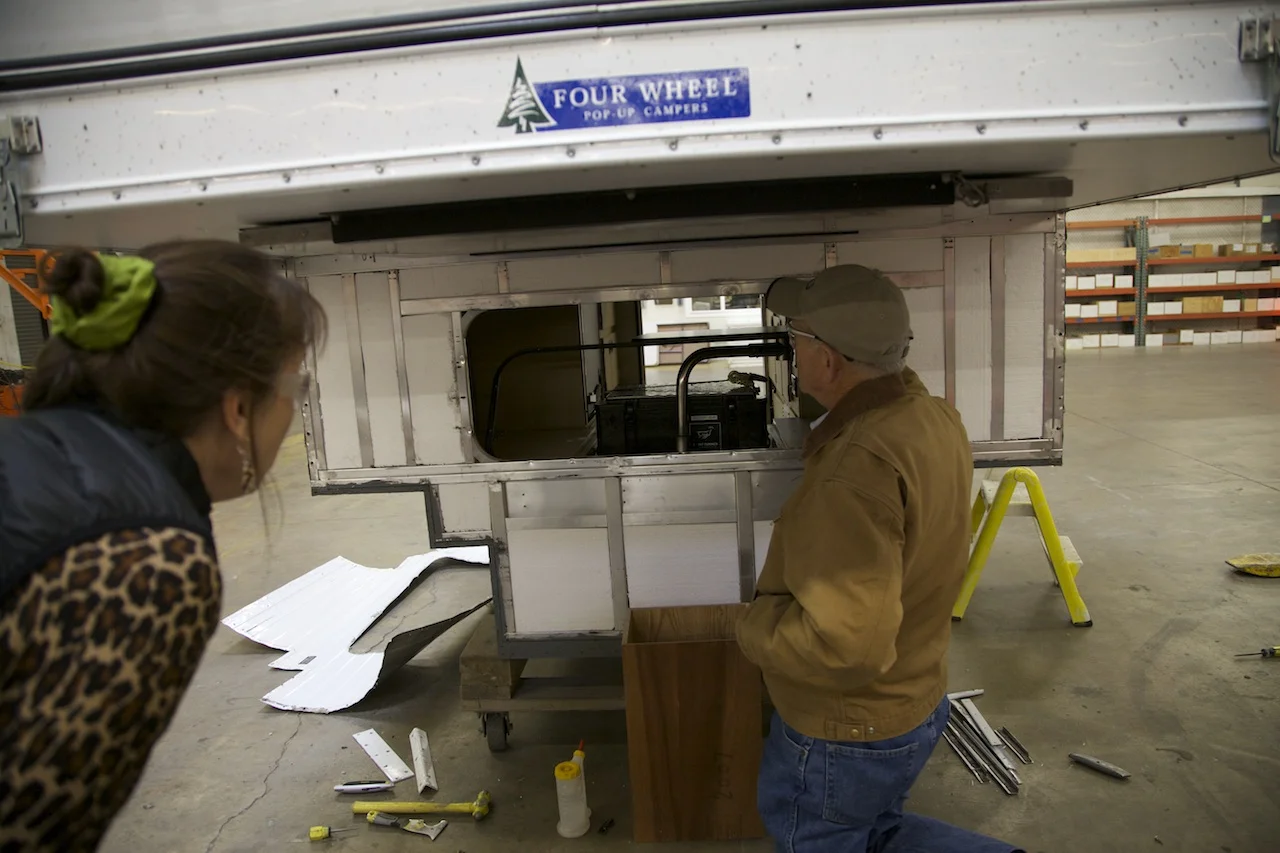
With the reinforcements in place, Jay Bailey re-positioned the rigid foam insulation, and installed a new front skin.
Very soon the front of the camper looked new again. Despite the uncommon nature of this issue, Tom has incorporated the reinforcement into all new campers that have the forward dinette. He is also currently testing a new, forged turnbuckle that I think will be a significant improvement in the anchoring system.
Repairs completed, we had FWC install external roof-lifting struts on the front and rear of the camper. With only the single internal pair of struts, Roseann had trouble lifting the back of the roof when we set up the camper. She has no trouble with the external struts, and eliminating the internal pair cleaned up the interior appearance and added room on the bed. FWC also installed a new style table in the front dinette; with a simpler, stronger, and more elegant swivel.
Soon the camper was back on the Tacoma, looking visibly chuffed after its little spa facelift treatment. And I was chuffed after learning so much about the engineering that goes into a Four Wheel Camper.
Postscript. It's always fun to wander around the back wall of the FWC factory:
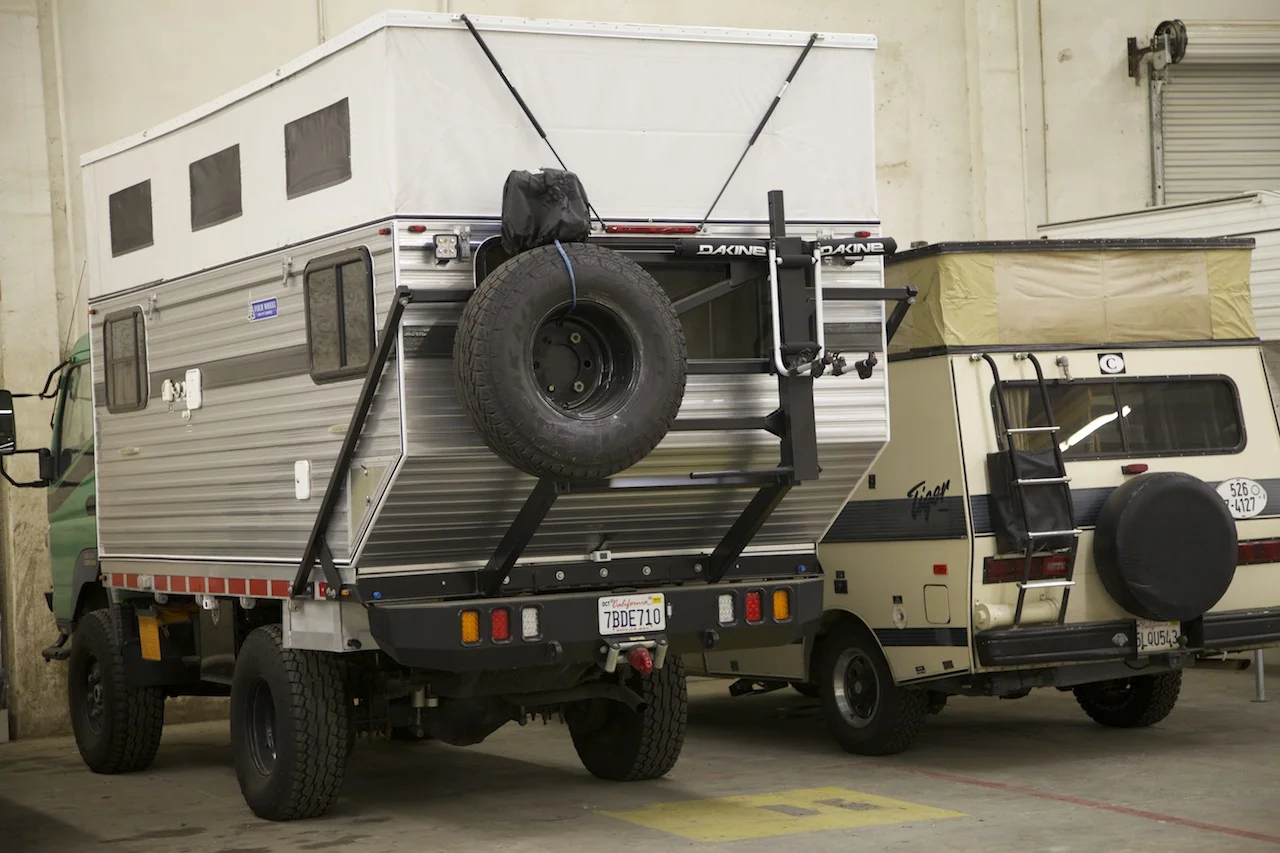
A custom Four Wheel Camper on a turbodiesel Mitsubishi Fuso chassis.
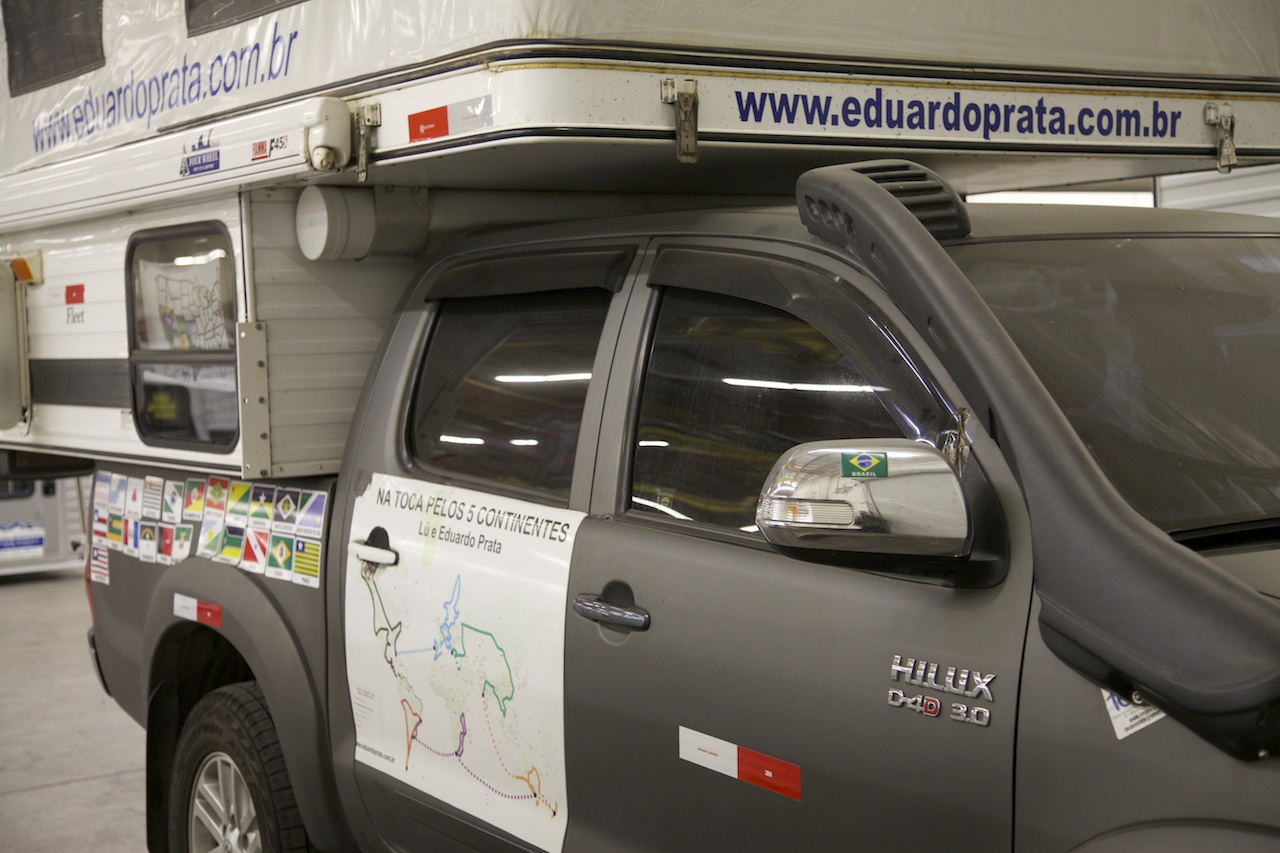
Hilux turbodiesel. 'Nuff said.
They don't make 'em like they used to
It’s futile to compare modern vehicles with those manufactured 40 years ago. A good ole boy can look at, say, a current Ford F150, with its plastic front bumper, compare it to the steel counterpart on his 1970 predecessor, and drawl, “They don’t make ‘em like they used to.” And he’s correct—but not in the way he thinks. That modern truck will protect its passengers in a wreck that would have left the occupants of the earlier one dead.
Credit a Mercedes Benz engineer named Béla Barényi, who in the 1950s first questioned the prevailing wisdom that a vehicle had to be rigid to be safe. He realized what now seems obvious: that the forces in a collision have to be absorbed somewhere, and if they are not absorbed by the vehicle they will be absorbed by its occupants. This led to the development of front and rear crumple zones, which sacrificed part of the vehicle’s integrity to safeguard the rigid cell containing the driver and passengers. With the further advent of, first, lap and then shoulder belts, and then air bags, injury and fatality rates in collisions plummeted.
(If you’re still not convinced, take a look at this revealing video of a test collision between a 2009 Chevy Malibu and a 1959 Chevy Belair, then tell me which car you’d pick to crash in.)
But. Still . . .
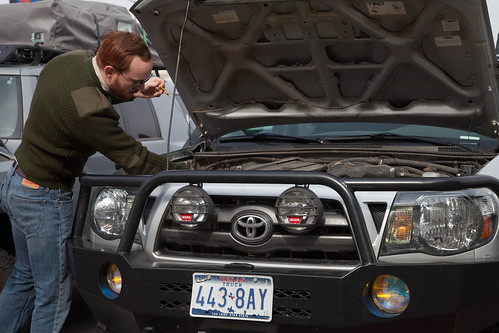
The photo above shows me holding up the entire outer “bumper” assembly of our 2012 Toyota Tacoma—including fog lights—with one finger.
Trust me that I have zero doubt as to whether I’d rather be in the Tacoma or my solid-steel 1973 FJ40 in any kind of collision. I remember a tiny misapplication of throttle in the latter that once sent me into a concrete parking bollard at perhaps two miles per hour. I felt the result right down into my spine. The 40 was of course unscratched.
Nevertheless, it seems to me the thing I’m holding has lost the right to even be called a “bumper.” I’m convinced a two-mile-per-hour tap on a parking bollard would necessitate replacing the entire assembly. Imagine the result if you innocently stuck the tongue of a Hi-Lift jack into that front opening and started cranking. This “bumper” is really nothing more than a bumper-like facade.
I realize that wishful thinking along these lines will have as much effect as hoping Toyota will start importing Hiluxes equipped with three-liter turbodiesels, but wouldn’t it be nice if manufacturers offered a front bumper in their “off-road” packages that was stout enough to withstand jacking (and perhaps even bumping), while still conforming to crash standards?
Continental Divide vehicle report
What sort of mischief can 1,600 uninterrupted miles of mixed corrugations, rocks, potholes, mud, and even some pavement wreak on a diverse group of four-wheel-drive vehicles? We found out on the recent Continental Divide trip organized by Rawhyde Adventures and us.
Our lineup on the ten-day journey included two Toyota Tacomas (one mounted with a Four Wheel Camper), two Ford Raptor pickups (one also mounted with a FWC), two Sportsmobiles (nine years apart in age), two Toyota FJ Cruisers (one towing an Adventure Trailer), two four-door Jeep Wranglers, one nicely maintained 1990 Ford Bronco, one newly restored and modified FJ60 Land Cruiser, a four-wheel drive Chevy Van conversion, and, occasionally, a Ford F250 pickup belonging to the Rawhyde staff’s self-taught 21-year-old mechanic/welder/marshmallow toaster (more on that later), Phil. Sadly, a Land Rover Defender 90 powered by a 200TDi diesel failed to make the start, after a blown head gasket and several other issues finally sidelined it despite valiant attempts by its owners to rectify things and meet us partway along the route.
We knew we were pushing the weather envelope on the trip, as it was scheduled right after the Overland Expo WEST, in late May. Additionally, the Rockies had experienced heavy snow fall just prior to our journey, so it was clear in advance some of the high passes would be . . . impassible. However, our group seemed to take this in stride as a more enjoyable challenge than cruising over the same passes might have been later in the year. One attempt, at a high pass above Lake de Nolda and the Alamosa River, involved first pulling a large fallen tree off the trail, then blasting through several drifts until the lead Ford Raptor found itself high-centered, all four wheels rotating uselessly, in a snow bank too deep to shoulder aside. In this case, everyone agreed that trying and failing was more fun than easy success.
Mostly, though, the miles we drove comprised easy to moderate backcountry routes with miles and miles of hammering from corrugations (or washboard if you prefer), and low-speed bouncing over freeze-induced potholes. The effects became apparent early on.
Both Sportsmobile owners glanced back into their living areas during a day’s trek to find their carpets soaked. The rough roads had caused (yet-to-be-determined) leaks in the vehicles’ plumbing systems, resulting in complete loss of water in the main tanks. Despite this, everyone was impressed with the Sportsmobiles’ utility and capability, especially considering their imposing size and 10,000-pound-plus GVW.
The FJ60 had just been the subject of a near-complete rebuild, including the installation of a factory 1HZ six-cylinder diesel engine with a turbo kit, plus a five-speed transmission, along with an extensive array of cargo-containment slides and suspension modifications. In fact, its owner, Adolfo Rapaport, only laid eyes on the vehicle a few days before joining us on the trip.
Among its accessories, the Land Cruiser had a full-length Eezi-Awn “K9” roof rack supporting an Autohome Columbus roof tent. Adolfo was delighted with the effortless setup of the clamshell tent (undo latch, climb in, go to sleep); however, an ominous development hinted at future issues: One of the six brackets supporting the rack failed on the third day of the trip. The aluminum base of the bracket cracked completely through where three holes are drilled in a horizontal line for connection to the steel upper bracket—an obvious potential failure point. Soon another bracket failed, then another. Each time the brackets were shuffled to retain support at the corners, but finally we simply ran out of brackets.
On the second to last day of the trip the mounts gave way altogether, and we pulled the rack and tent off the Land Cruiser and strapped it to the massive construction rack of the Rawhyde F450 support truck that rendezvoused with us each night. Adolfo and his son Josh enjoyed a penthouse apartment from that point on; they just had to avoid an assortment of welding tanks and generators when clambering up and down.
Post-trip investigation by both the chagrined builder of the vehicle and the importer of the rack revealed that the brackets had been completely redesigned sometime after the last container left South Africa, indicating that Eezi-Awn had become aware of the essentially guaranteed failure rate of the original. New brackets (four for each side rather than three) are on the way to Adolfo as I write.
One other issue surfaced on the Land Cruiser: The dual battery mounts in the front of the engine compartment had been engineered so only the rear of each battery was securely clamped, and they quickly worked loose. Folded cardboard provided a temporary but less-than-stylish fix.
The two Jeep Wranglers performed very well, as I expected, although a plastic fitting for the transfer case linkage on one of them failed, and Phil had to secure it temporarily with a zip tie. After a long, slow climb, the automatic transmission oil temperature warning light came on in the other, but it never happened again. And Chrysler still has not solved the problem of mud thrown up from the front tires, which packed the front door handles of both Wranglers with goop. We had this issue with the long-term Wrangler Rubicon we had four years ago. C’mon Jeep—a simple set of abbreviated mud flaps in front would at least keep the arc of the flung mud below the handles.

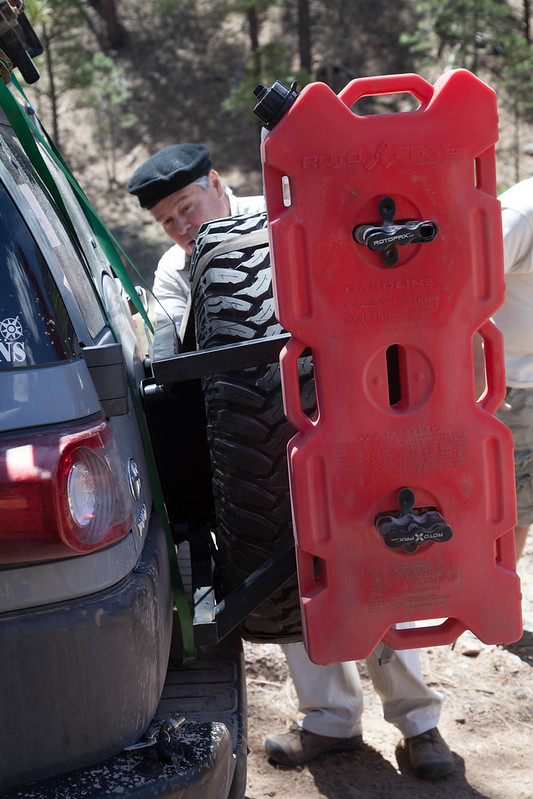
One of the FJ Cruisers sported a custom combination tire carrier and mount for two four-gallon Roto-Pax fuel containers. The assembly was welded to the stock tire carrier base on the rear door, and early on the four welds began to fail one by one. Fortunately Phil was able to re-weld the mount sufficiently to keep it intact for the remainder of the trip. The location of the Roto-Pax significantly increased the leverage on the mount; I think the fabricator should rethink the design.
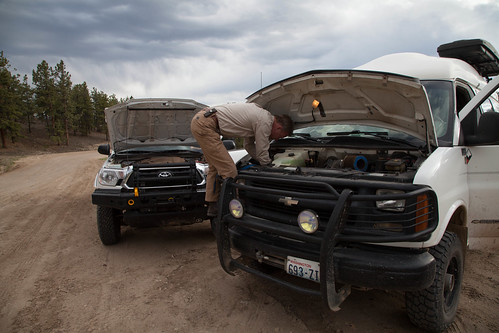
Sterling Noren’s clever Chevrolet conversion kept up effortlessly with all the more technologically advanced and prepared four-wheel-drive vehicles, and survived numerous blasts of speed as he raced ahead of the main group to film. But late in the trip, and late each day, the vehicle began dying at random and refusing to move more than a few feet unless it was allowed to cool for an hour or so. No codes showed on the OBD reader, and standard diagnostic investigation was futile, so Sterling simply let the van have a nap when needed.
Both Raptors performed flawlessly, as did both Tacomas. Ross Blair's Tacoma benefitted from conscientious daily checks.
And that 1990 Bronco? It survived the trip in style as well.

On a related note, both Four Wheel Campers performed as they always do, providing a home away from home with a two-minute setup time, and scarcely affecting the backcountry abilities of the vehicles to which they're attached. With that said, the turnbuckle attachment system continues to require frequent checking; I'm determined to come up with a way to solidly anchor them. And, for the second time on ours, a silly strip of rubber trim around the front overhang came loose on a windy stretch of interstate, making a noise all out of proportion to its importance. Quibbles on a superb product, but needing attention.
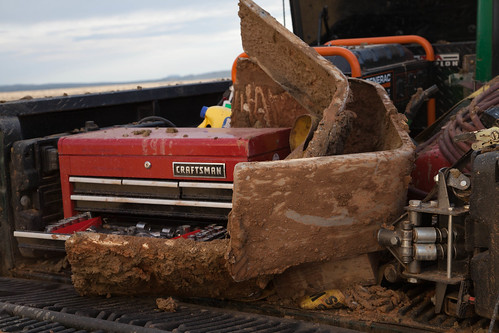
Other tidbits: Phil, who was towing an enclosed cargo trailer along a very muddy track in our wake on one of the easy sections, looked in his mirrors to note both fenders so loaded with sludge that they were ripping free of the trailer. He unbolted both and tossed them in the bed.
At one point I took over driving a two-wheel-drive support van shod with street tires along a level but treacherously slick muddy section, amusing the following drivers with the yaw angles I achieved while trying to keep the thing on the road. Luck was with me and I avoided ditching it. Total number of vehicle recoveries was remarkably low at three.
Oh, and, regarding Phil and the marshmallows? He proved remarkably apt at toasting them for s'mores with his oxy-acetylene torch.

Update
on 2014-06-12 00:52 by Jonathan Hanson
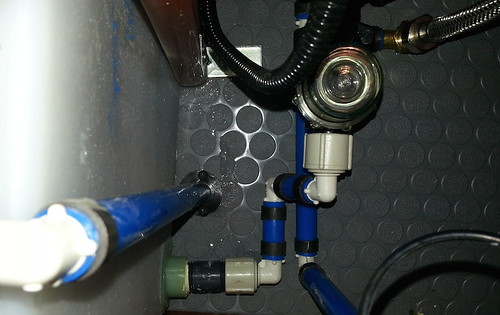
An update: Michael Collier, the owner of one of the Sportsmobiles that suffered a water leak, reports that the source in his was a connection between the water pump and the lower water tank. These connections have large knurled fittings that are designed to be hand-tightened. Once snugged, Michael says, the system has remained secure. The long-term solution seems to be regular checks while attending to basic daily maintenance.
JATAC gets an outdoor kitchen
by Roseann Hanson (co-director, Overland Expo)
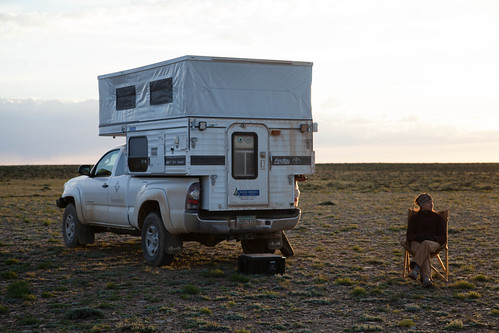
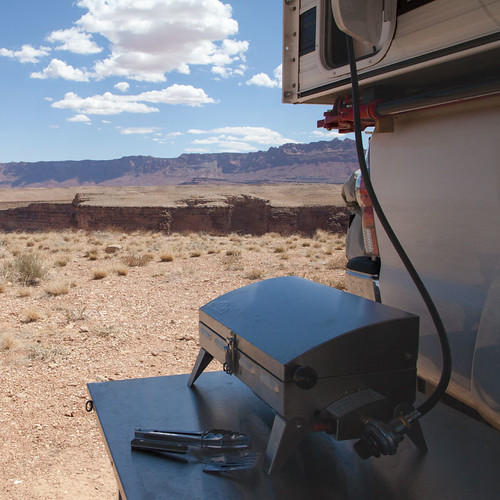
There's a lot I love about having a stove, sink, and fridge inside a truck camper—all-weather cooking, protection from mosquitoes, and the convenience of a full kitchen (see this article, about our "Just a Tacoma and Camper" setup). But I miss cooking outside. It's more social, and enjoying the views is why we explore and camp. Nothing like sipping a cool drink, tending some thick pork chops, and gazing out over the Grand Canyon while a condor soars overhead . . .
To facilitate outdoor cooking, we sorted out a camp table and awning. Jonathan rigged us a sleek and easy mount for the sturdy stainless steel table from Frontrunner Outfitters (see story here). And although it was initially a tough decision ($800), we invested in a high-quality, quick-deploying Fiamma awning for the starboard side. Importantly, this is also the side for access to the Four Wheel Camper's dual 10-pound propane tanks, since I settled on a propane grill, for convenience and when local fire restrictions or wood availability obviates our Snow Peak portable fireplace grill. My idea was to leave one tank hooked up to the inside stove and hot water heater, and the second tank rigged with a portable grill hose so all we had to do was hook it up and start cooking.
Now all I needed was a portable propane grill that was powerful, not too bulky, high-quality, and functional.
Easier said than done. I looked at many name brands, including Coleman, Char-Broil, Weber, and NexGrill (a sister brand of Jenn-Air). Some had great BTU ratings (the NexGrill boasts 20,000 and has 2 burners with separate controls). Some were clever (the Coleman Road Trip has an integrated stand that scissors down, so you don't need to use up valuable table space). Some were cheap (the Char-Broil at $30 via Amazon—with the savings you could buy a lot of top sirloin . . .). Some were compact (the Fuego Element closes like a sleek clamshell and is just 9x12).
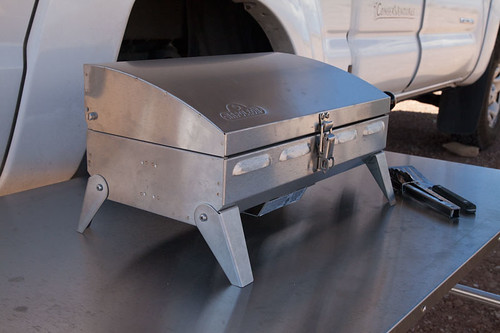
But in the end my eye was caught by the Napoleon PTSS165P portable grill ($189 MSRP), built for the demanding marine environment (you can order very pricey sailboat cockpit mounts for it). Runner up was the NexGrill (model 820-0015, $180 at Home Depot) but reviews on Amazon indicated the finish quality was poor, with some users claiming not all parts are stainless, or were flimsy with sharp edges. The quality of the Napoleon looked so good, I decided to take a gamble on its 9,000 BTUs (compared to twice that for the NexGrill) and single burner control.
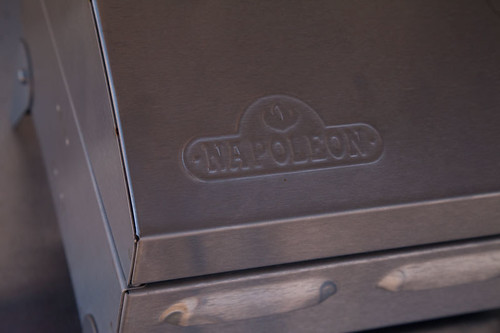
The finish quality of the Napoleon is beyond reproach: folded and riveted corners, smoothly finished vent holes, and sturdy (not at all "tinny") 304 stainless throughout.
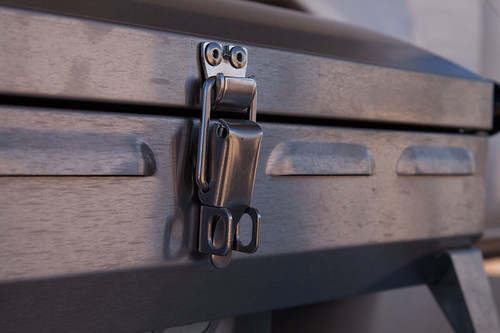
Details like the high-quality latch and rivets won me over.
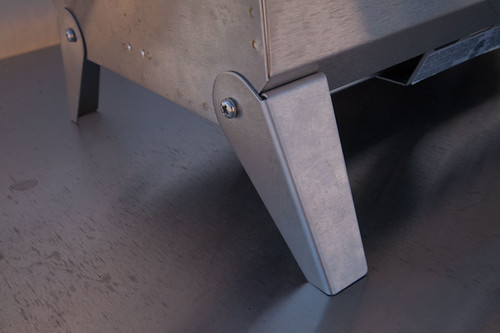
The four-inch legs are anchored with stainless bolts, and pivot flush to the bottom for storage. Only complaint: they do scratch the tabletop, so we're going to coat the bases in Plasti-Dip.

The handle stays cool even after long periods of cooking. However, it's on the wrong side for a right-handed person (when grilling, you usually hold a utensil in your right hand and would use your left to open the grill to check cooking progress). The pietzo-igniter stopped working after the first night. The propane regulator is also on this side. The Napoleon only comes with a mount for small 1-pound canisters; we had to buy a 5-foot hose to connect it to our 10-pound tank.
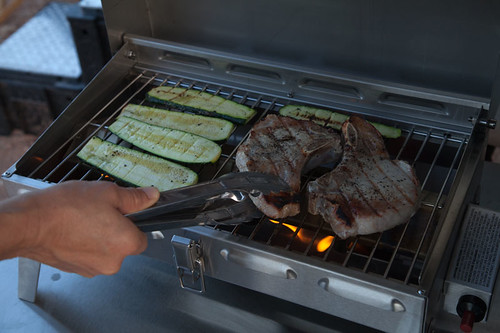
Cooking area is 17.25 x 9.25 and just about perfect for two people. For more food than that, cooking in shifts would be recommended. To get searing temperatures, the instructions recommend lighting the grill and pre-heating for 10 minutes. This did produce temperatueres just right for searing the pork chops. I do wish it had two burners so I could turn one off to create a cooler location for finishing things like vegetables.
The slightly domed lid is vented but very windproof (we cooked two dinners in 10-15 MPH gusts), and its height would allow cooking a small whole chicken or something in a deep-dish pan; you could even bake a cake or low-top bread. There is a slide-out grease trap tray on the bottom, which made clean-up super easy.
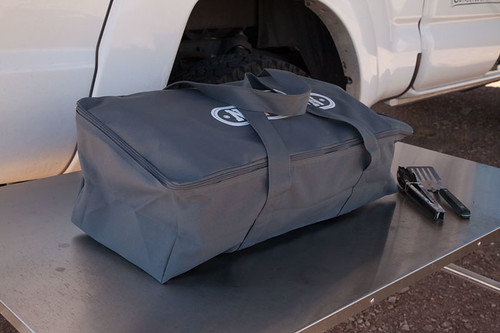
The carrying case fits well but its quality is not commensurate to the grill: the fabric is thin Cordura and is poorly sewn (on ours, the inside pocket for the gas regulator pulled out at the bottom), so I'm not expecting it to last as long as the high-quality grill.
We've now used the Napoleon half a dozen times on a 2,800 mile trip, and are overall extremely pleased with the quality. It's also transformed our camping by doubling our "living area" to include a spacious, convenient, shaded outdoor kitchen where we can easily grill salmon steaks, cook lasagna, bake a cake, or turn out bacon and pancakes on a griddle for a small group.
(Awning: Fiamma.com; table: FrontrunnerOutfitters.com or a similar version from K9 racks and Equipt Expedition Outfitters, available in three sizes)
The blue vinyl table is dead!
A few years ago on a long road trip, Roseann and I opted for convenience over our usual preference for solitude, and stopped for the night in a developed campground: picnic tables, barbecues, flat sites, perfectly symmetrical pine trees—actually quite nice as such places go. That evening an enormous motorhome inched carefully into a nearby slot. The driver emerged just long enough to open a side panel and pull out a remarkably colon-like corrugated hose, which he plugged into his deluxe site’s sewage receptacle. Another umbilical fed electricity to the behemoth. The man then scurried back inside, and soon I heard the sound of some TV program on what I assumed had to be at least a 40-inch flatscreen. And that was the last we saw of either him or his wife.
I try not to judge fellow travelers on the size or splendor of their vehicles. After all, to someone in a CJ5 with a Eureka A-frame tent our Four Wheel Camper must seem pretty posh. But, while the camper provides us a cozy, stormproof home away from home, holing up inside is not the goal when we’re traveling—even in Jellystone Park. In good weather we like to be outside as much as possible. With the camper’s excellent Fiamma awning deployed, and a table and chairs set up, we can lay out snacks and drinks, then tackle some weighty biological issue like seeing how many bird species we can document while sitting down. “Nine species in one martini!” Roseann is likely to announce (although identification skills wane somewhat after the second, and we're likely to record birds never seen in this hemisphere . . .).
Where was I? Right: Until recently we relied for our outdoor table on one of those ubiquitous roll-up blue-vinyl-covered things with the screw-in aluminum legs. It was ugly and wobbly, but perversely durable despite my best attempts to “accidentally” destroy it. A Maasai shuka used as a tablecloth improved its looks immeasurably, but I still knew what was underneath . . .
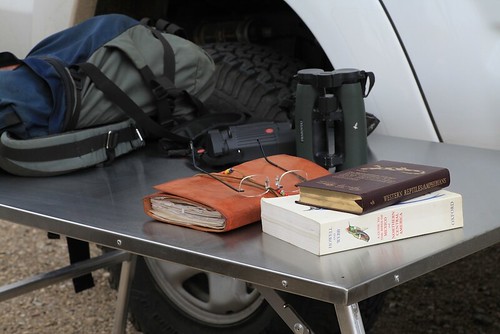
Then, a few months ago, Roseann emailed me (from across the room) a link to the Front Runner camp table, designed to slot under the company’s roof rack. We'd used a version of it in Tanzania and Kenya several times and had been very impressed. Here was a proper outdoor table: welded and braced aluminum legs that folded flat under a top formed and welded from a single sheet of stainless steel. At 29 by 45 inches, the table was large enough for food prep, eating (it seats four snugly), or work, and it weighed a reasonable 23 pounds. She also linked to the Z brackets designed to attach to the Front Runner rack—and then asked, “Could we mount this under the front overhang of the camper?”
I emailed back, “Great idea,” then did some measuring on the camper—plenty of room. Tom at FWC said no problem drilling the composite sheet that forms the bed area of the camper as long as I sealed it well, and certainly no problem with the extra weight: the FWC’s overhang is tested to 1,100 pounds (or, as he and I quipped at the exact same time, “Two average Americans.”).
 The table's top is formed, welded at the corners, and riveted to the aluminum frame.
When the table arrived it met my expectations and then some. Compared to its cheesy roll-up predecessor it was the Rock of Gibraltar. All the hardware was cadmium-plated and secured with nylocks. The stainless top would be impervious to spills or heat. True, at $285 such features should be taken for granted. Nevertheless it was a relief to consign the blue vinyl table to the Cemetery of Obsolete but Kept Around Forever Camping Gear down in the storeroom.
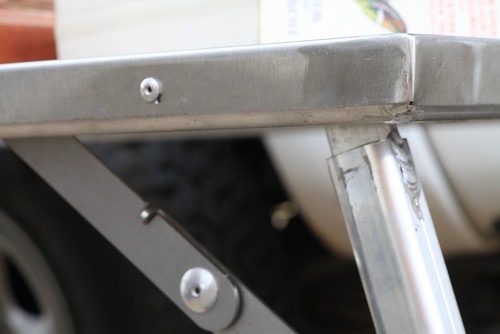
Exercising due measure-thrice-cut-once caution, I marked and drilled, then veeery carefully countersunk (so the bed’s top section could slide over the bolt heads) three holes for each of the Front Runner Z-brackets from inside the camper. They are designed to hold the table on its narrow ends, but I needed them to hold it on the longer sides, meaning the table would protrude about a half a foot each way.
 The bolt heads are countersunk just enough to allow the bed extender to slide over them.
The latch mechanism included with the brackets wouldn’t work in our application, so I used a 24-inch-long piece of 1.25-inch aluminum angle iron as an end stop on the passenger side of the truck. I drilled two holes sideways through the frame and top of the table, and inserted a pair of two-inch-long 1/4-inch-diameter clevis pins through them. A pair of hairpin clips holds the pins to the table:
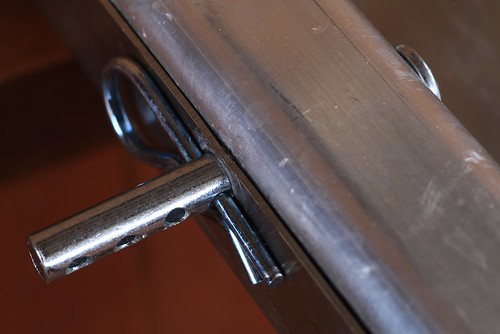
The pins extend through two holes in the end bracket and are secured with two more hairpin clips backed by a rubber washer and a metal washer. I also glued a couple of furniture bumpers on the back of the end bracket, and two flat pieces of rubber gasket on the insides of the Z brackets where the table slides in from the driver’s side of the truck.
The Z brackets came with carpet strips glued along the bottom, so I hoped all the rubber and carpet would minimize any rattling directly over our heads. My last step was to install a backup latch at the other end, using two of the cunning little Expeditionware Transport Loops sold by Expedition Exchange, plus a Quicklink. (My plan is to try to find a small padlock that will fit through these loops.)
Twelve hours after I finished up, the installation got a good test when we left for a biological survey in the Sierra Aconchi in Mexico, which involved a 230-mile paved approach, then a rough ten-mile climb up a four-wheel-drive trail. On the highway the table created no noise at all. On rough slow pavement with the windows open we could very infrequently hear a barely perceptible oilcan effect over sharp bumps as the table top flexed. On the trail there was zero sound from the table or mount, at least none we could hear over the tire and drivetrain noise.
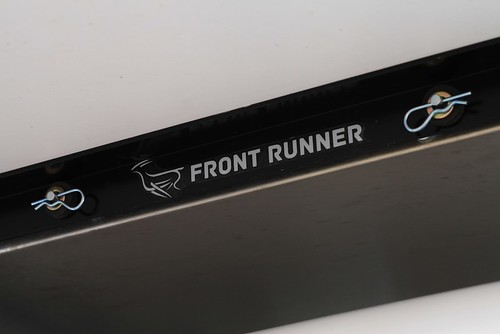
 The completed bracket assembly.
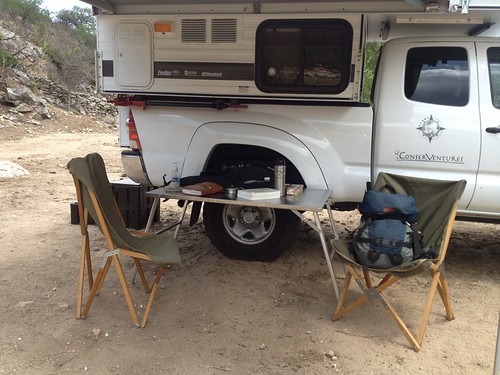
Once in camp the table proved just about perfect. There was plenty of room to spread out plant samples, notebooks, bird guides, and binoculars; at a group dinner we covered it with chips and salsa and vegetables, then served the outstanding pizzas Roseann somehow managed to make on the camper’s stove top. One night delivered a torrential rain which bothered the table’s aluminum and stainless steel not at all. Total time to set it up on the first day and stow it on our last morning: about two minutes each.
So, not only did we gain a big upgrade in the quality of our outdoor table, we also gained storage space inside the truck. If you have an overhead camper—or a roof rack—I can recommend the Front Runner approach.
On the other hand, if you have a fondness for blue vinyl, email me.
Addendum: A forum member on Wander the West suggested that the Front Runner brackets could be set up to carry a solar panel in the same spot. Brilliant.
Equipt Expedition Outfitters also carries similar tables from K9 racks, in three sizes.
Front Runner Outfitters is here.
The Transport Loops are available here.
A compressor for the Boss air bags
 The bottom switch adds air to both bags simultaneously. The two buttons above bleed air individually to level side to side.
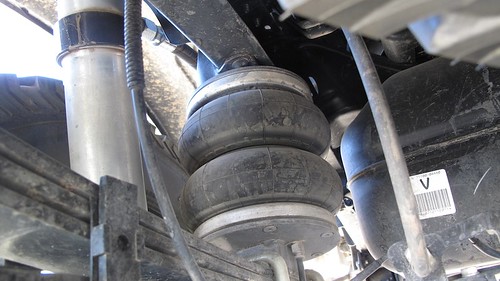
The Boss air bags I installed to level the JATAC (see HERE) have been working perfectly so far. We recently drove into Mexico’s Sierra Madre to retrieve some trail cameras we had set up to survey mammal populations on a remote property owned by the Catholic Church. The last 12 miles requires four wheel drive, and several sections flexed the suspension past its limit so we wound up with one wheel in the air. The Boss bags took it in stride.
When I installed the bags I temporarily hooked up a simple manual-fill arrangement. But the kit came with a very fine compressor and a remote switch and gauge, so last week I installed the complete system to give us push-button control of the bags.
We decided to install the switches and gauge in the camper rather than the cab of the truck, since it’s easier to check the level back there. It also gives us the capability to quickly tweak both the fore and aft and side to side level of the camper when parked. The question was, where to mount the gauge/switches, as well as the fairly bulky compressor. I located what seemed to be a perfect spot for the controls just inside the camper’s door on the left, above the two switches that control the LED interior footlights and the exterior floodlamps. Since the battery compartment is right behind this spot, that would simplify wiring.
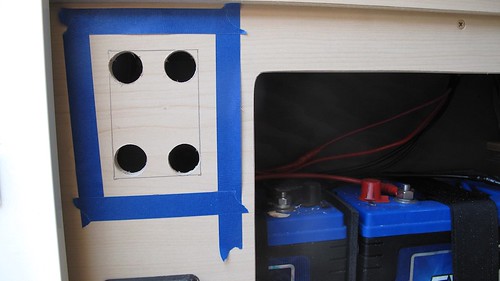 Pilot holes prior to cutting the opening. Painter's tape prevents scratching.
The compressor was more problematic, but eventually I located a spot I thought would work, inside the access port for the left rear turnbuckle that secures the camper to the truck. At the back, inside the hatch, the compressor barely fit vertically against the outside wall of the battery compartment—again minimizing the wiring run.
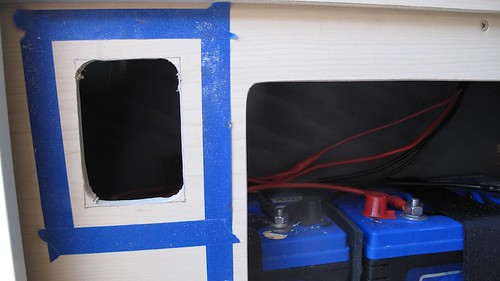
The Boss controls come mounted in a steel panel designed to be attached to the underside of a dash, and that wouldn’t work for this application. I had some 1/4-inch-thick high-density plastic sheet lying around, so I cut a panel from that, drilled it for the gauge and switches, and painted it black with Krylon formulated for plastic. Then I trepidatiously took a jigsaw to the camper’s cabinet and opened a spot for the assembly. The result looked decent and is effortless to access for adjustment.
The compressor took much more winkling, especially because I wanted it secured properly so we’d never have to worry about it vibrating loose. With the help of a sidewinder drill and a bit of blood loss I was able to mount it to the plywood battery compartment wall with stainless bolts and fender washers. I ran the air lines down through a hole I drilled in the bed inside one of the stock little storage compartments. (Doing so confirmed that the fiber-reinforced material Toyota uses on their composite beds is tough stuff indeed; it felt and smelled like drilling through thick fiberglass.)
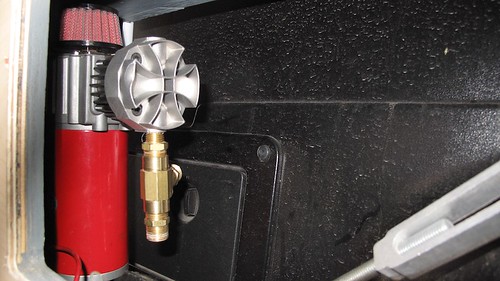
With everything hooked up, adjusting the level on the truck is as simple as pushing a switch. The way the system is designed, both bags fill at once, and you then use individual buttons to deflate one or the other bags to even them side to side. The clever gauge has two needles, one red and one green. You hook them up so nautical running-light rules apply: red for port (left) and green for starboard.
I won't say having to climb under the truck with a compressor to fill the Boss bags manually was exactly . . . hell . . . but the complete system sure makes it easy.
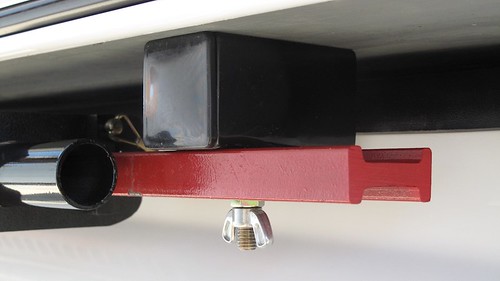
A Hi-Lift jack mount for the JATAC
The Hi-Lift jack is a useful tool, but it’s also a pain to carry securely on a vehicle, especially if you want to keep it reasonably accessible. I’ve seen many mounts that achieved one but not the other—and too often, safety loses out to convenience. Sadly I had neither a camera nor a cell phone with me a few years ago when I spotted a Hi-Lift mounted horizontally on top of a bull bar on a truck, just above hood level—and secured with a pair of tightly wrapped bungee cords. The imagery of what could happen if that truck were smartly rear-ended was . . . colorful, not to mention what could happen to an innocent person if Mr. Thatoughttaholdit rear-ended someone else. For reference, a 30-pound Hi-Lift mounted on a vehicle that comes to an abrupt halt from 30 mph exerts a force of 903 foot-pounds of energy on whatever is holding it to that vehicle.
I see a lot of Hi-Lifts bolted to roof racks—secure, safe but for the modest impact on CG, and more likely to stay free of road grime, which can quickly foul the Hi-Lift’s mechanism. It’s not a bad spot if you can access it without climbing. Also good are dedicated mounts on rear tire carriers (as opposed to the ones that bolt behind the spare tire, which are a pain). I suppose a properly engineered mount atop a bull bar is okay; it’s certainly handy there. But I’ve never seen one that didn’t impede forward vision and access to the engine compartment. And on a strictly personal note, it looks just a little too, well, Moaby, if I may coin a word.
Mounting a Hi-Lift on the JATAC presented its own challenges. The roof is out of reach and devoted to solar panels. We’ll be installing a Hi-Lift-compatible winch bumper up front soon, but that was rejected for the reasons stated above. And we’ve also decided not to install a rear bumper with big swingaways, to hold down mass at the back of the vehicle. What did that leave us?
I asked Tom Hanagan at Four Wheel Campers about fabricating a mount that would bolt to the rear wall of the camper, directly through the vertical aluminum frame members, to hold the jack vertically to the right of the door. He thought it could work, but was hesitant to sanction the idea unequivocally. And that location would still hang the mass off the back of the vehicle.
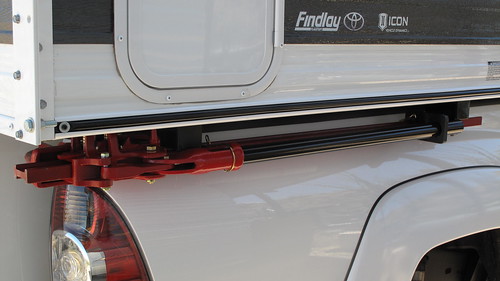
Then, while walking around the truck stroking my chin and pondering, I noticed the area where the camper overhangs the truck’s bed on each side. I held up a Hi-Lift to the spot, and it tucked in as though designed to ride there. The location would be completely out of the way yet quickly accessed, and while the weight would still be toward the back, it was significantly forward of a rear wall mount. I decided to mount it on the passenger side, to compensate for the weight of the truck’s fuel tank and the camper’s water heater, both of which are on the driver’s side.
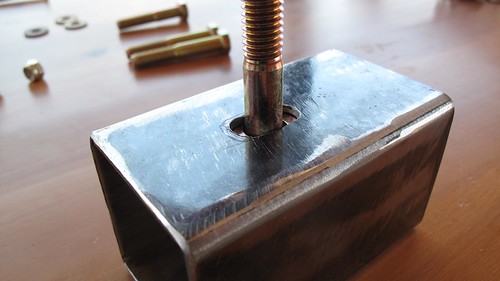
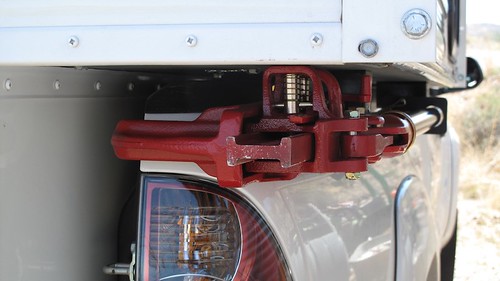
I used two short lengths of two-inch-square steel tube for the brackets. First I located the spots I’d drill through to hang the brackets—one in the propane tank compartment, one behind the fridge inside the camper. I used two 1/4-inch grade 8 bolts with fender washers to anchor each bracket through the plywood (which fortuitously is double thickness in the propane compartment, where the heaviest part of the jack would be). To secure the jack to the brackets, I used a 3/8ths-inch grade 8 bolt on each one. The bolt was too long to slide into the tube and down through the hole I drilled, so I drilled an adjacent hole and made a slot to get the bolt through. I tack-welded each bolt in place, and welded a short piece of thicker steel under each bolt as reinforcement. On the rear mount I extended the reinforcing strip forward and drilled a hole through it, to secure a padlock through the mount and the standard of the jack.
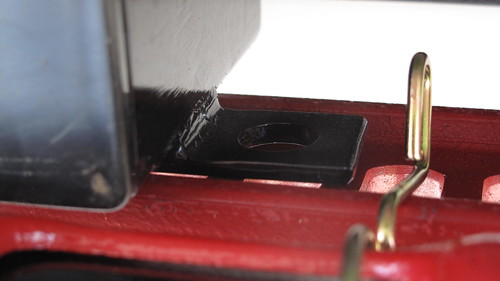
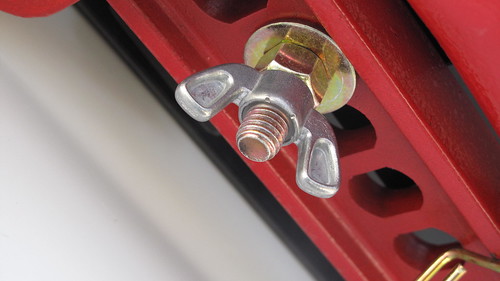
Positioning the mounts laterally was tricky. I wanted the jack tucked all the way under the camper, but needed clearance to drop it free of the mounting bolts without scraping the sheet metal of the truck’s bed. With a bit of winkling, I got them just about right. One needs to be cautious and not just yank the jack free; it must be twisted slightly to get in or out without hitting the lifting mechanism on the back of the bed, but it’s easy to do single-handed. To secure the jack to the bracket I use a grade 8 nut to hold the weight, and a nylock wingnut to keep it snug.
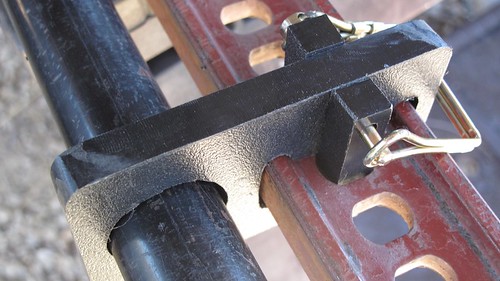
 The next issue was to ensure the jack’s operating handle stayed secure while driving. I have a stock rubber handle keeper, which slides over the handle and the standard, but it can migrate when subjected to vibration. So I fabricated a modified version from some half-inch-thick polyethylene I had around, and cut two polyethylene pieces that lock the keeper in place via a spring clevis pin. Done.
With the jack’s base plate in place, the right turn signal is just slightly obscured from above and behind the truck. It would only be an issue if someone in a semi was close behind us, but we’ll keep the base plate in our recovery kit anyway, and thus avoid potential legal issues as well. With that gone, one needs to be absolutely certain that the selecting lever of the jack is in the “lift” position, otherwise the entire lifting mechanism could migrate off the back of the standard while driving (or be propelled off it in an accident). Not good. I’ll use some sort of secondary arrangement as backup, likely a short bolt and wing nut. (Note here: A Hi-Lift should always be stored with the lever in the lift position anyway.)
So far the arrangement works perfectly. The jack is totally out of the way, yet easy to retrieve. In terms of safety, the mount should be secure through any but the most catastrophic impact: The force applied by the brackets to the floor of the camper would be in sheer; with four grade 8 bolts securing the assembly I’m sanguine.
Next task: to mount a front bumper on the JATAC that will properly accept a Hi-Lift jack for recovery purposes.
Hint: When using “Search,” if nothing comes up, reload the page, this usually works. Also, our “Comment” button is on strike thanks to Squarespace, which is proving to be difficult to use! Please email me with comments!
Overland Tech & Travel brings you in-depth overland equipment tests, reviews, news, travel tips, & stories from the best overlanding experts on the planet. Follow or subscribe (below) to keep up to date.
Have a question for Jonathan? Send him an email [click here].
SUBSCRIBE
CLICK HERE to subscribe to Jonathan’s email list; we send once or twice a month, usually Sunday morning for your weekend reading pleasure.


Overland Tech and Travel is curated by Jonathan Hanson, co-founder and former co-owner of the Overland Expo. Jonathan segued from a misspent youth almost directly into a misspent adulthood, cleverly sidestepping any chance of a normal career track or a secure retirement by becoming a freelance writer, working for Outside, National Geographic Adventure, and nearly two dozen other publications. He co-founded Overland Journal in 2007 and was its executive editor until 2011, when he left and sold his shares in the company. His travels encompass explorations on land and sea on six continents, by foot, bicycle, sea kayak, motorcycle, and four-wheel-drive vehicle. He has published a dozen books, several with his wife, Roseann Hanson, gaining several obscure non-cash awards along the way, and is the co-author of the fourth edition of Tom Sheppard's overlanding bible, the Vehicle-dependent Expedition Guide.