
Overland Tech and Travel
Advice from the world's
most experienced overlanders
tests, reviews, opinion, and more
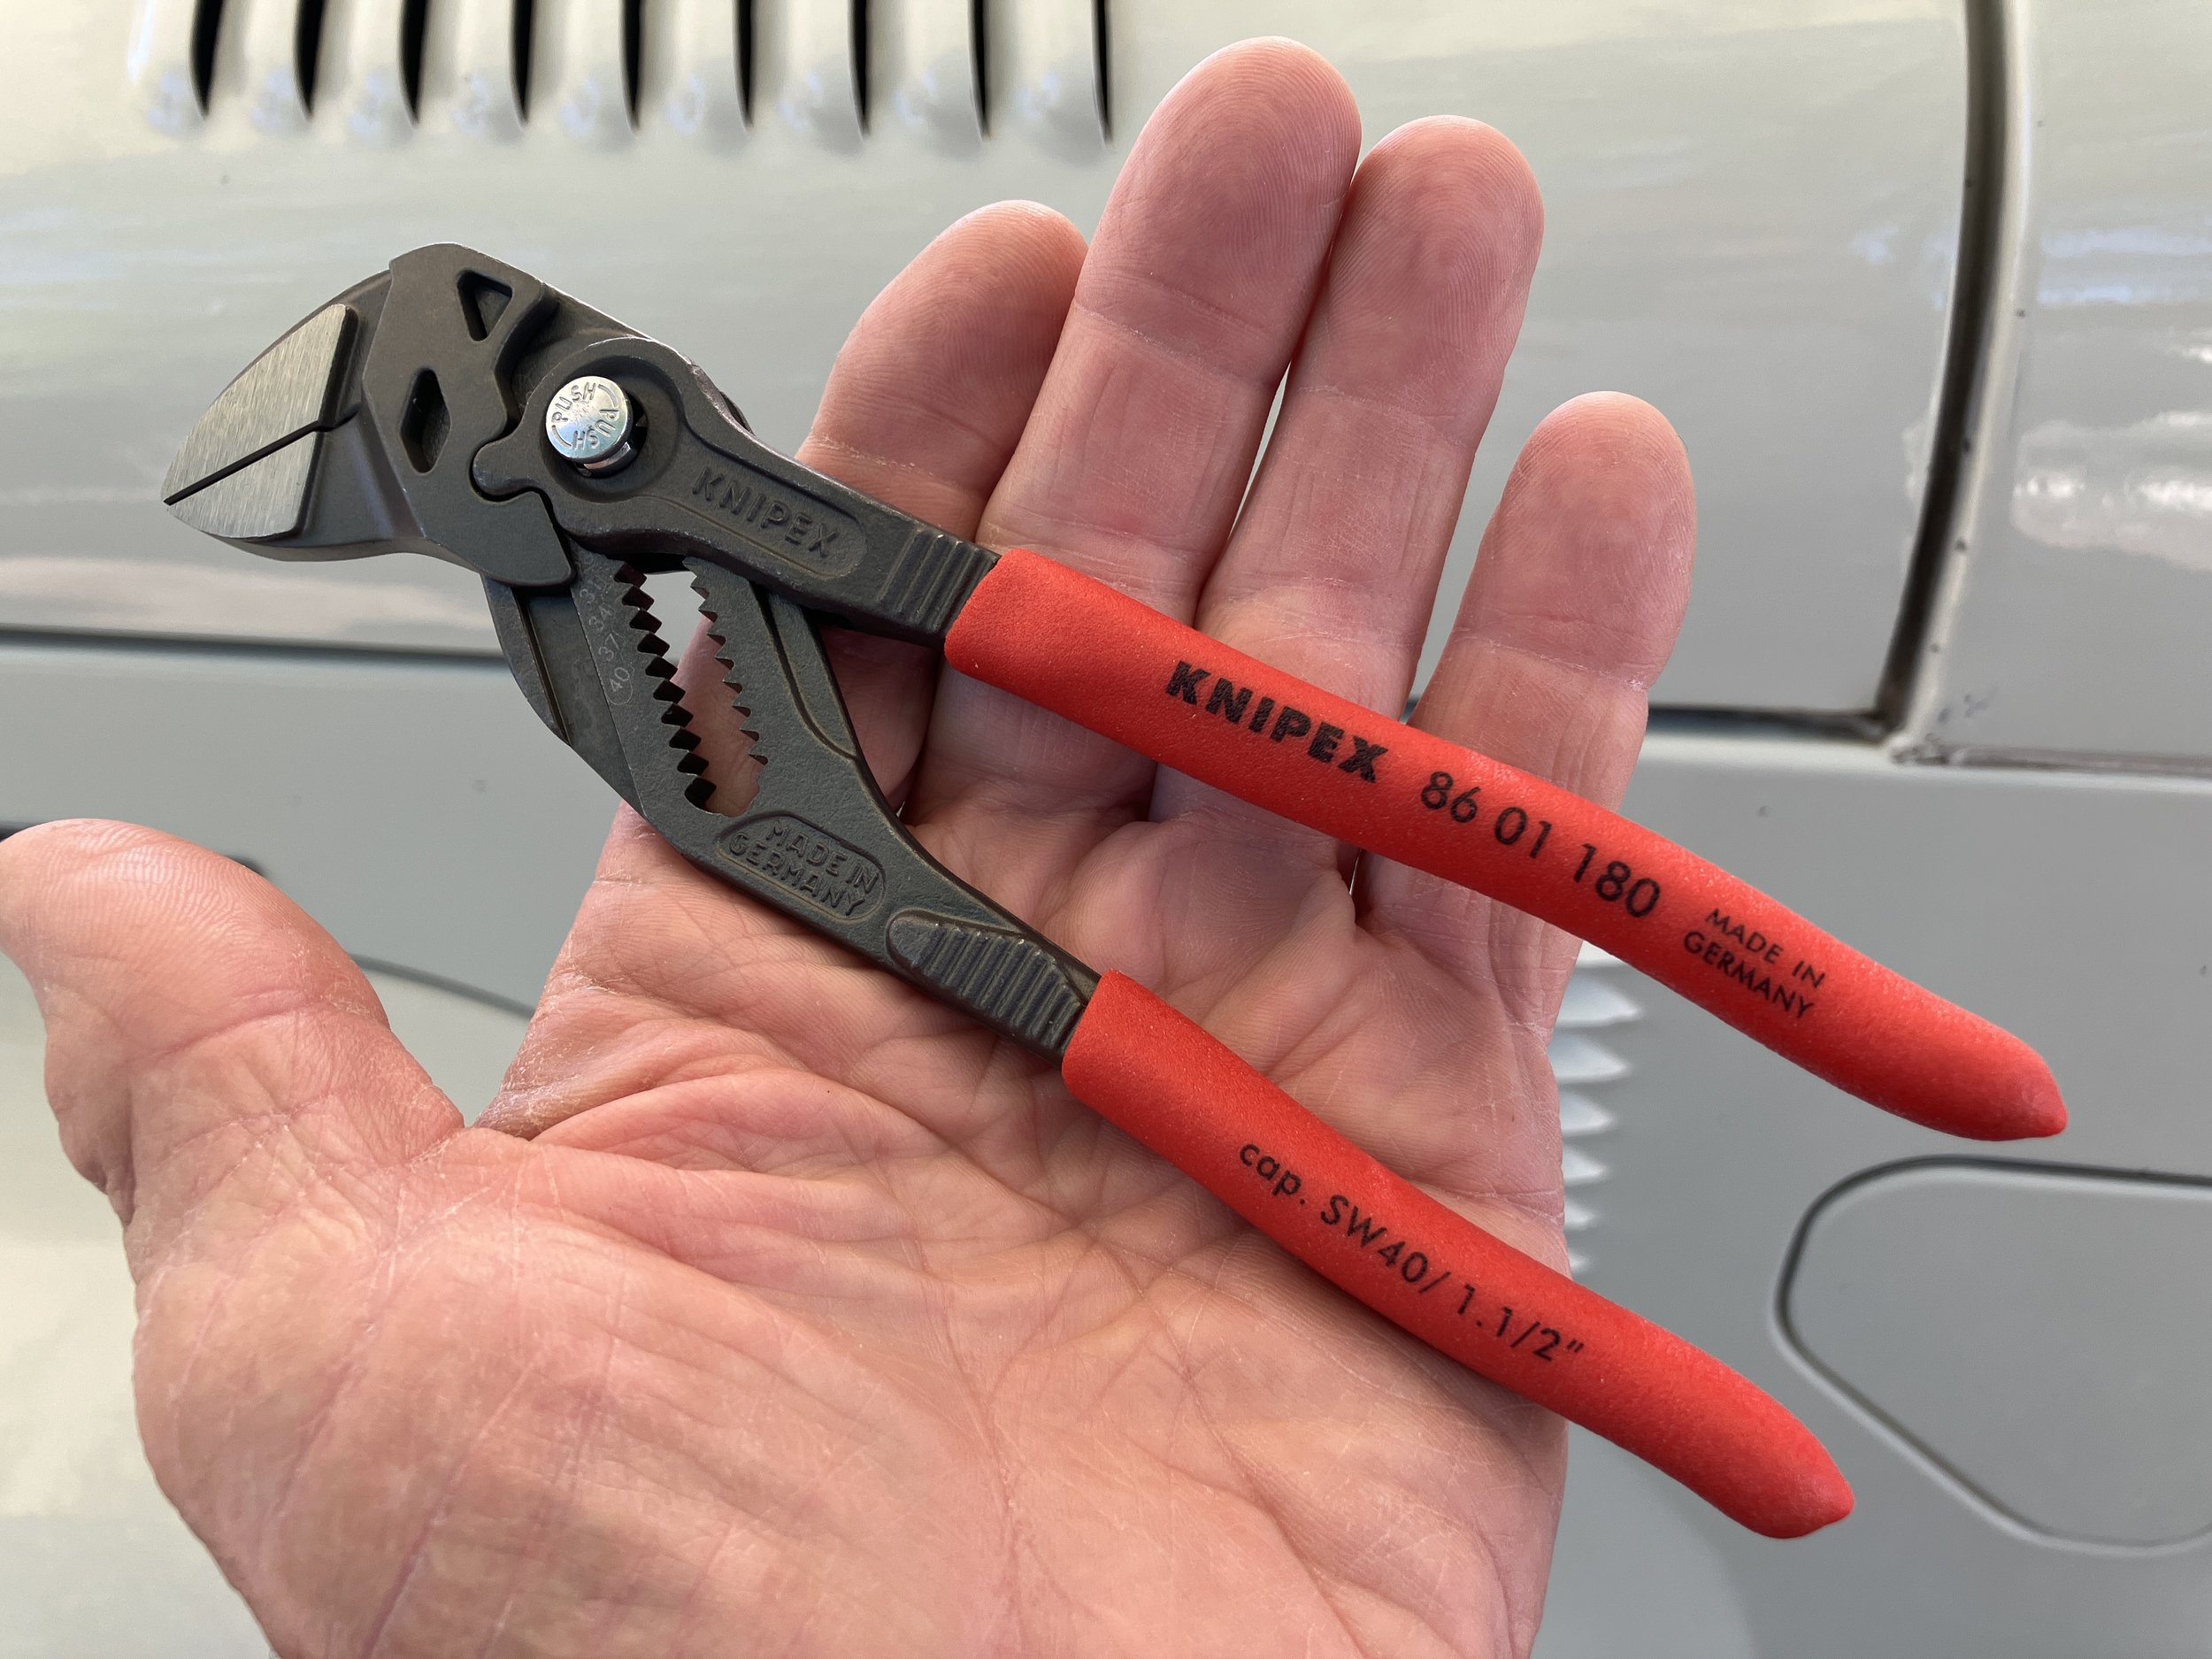
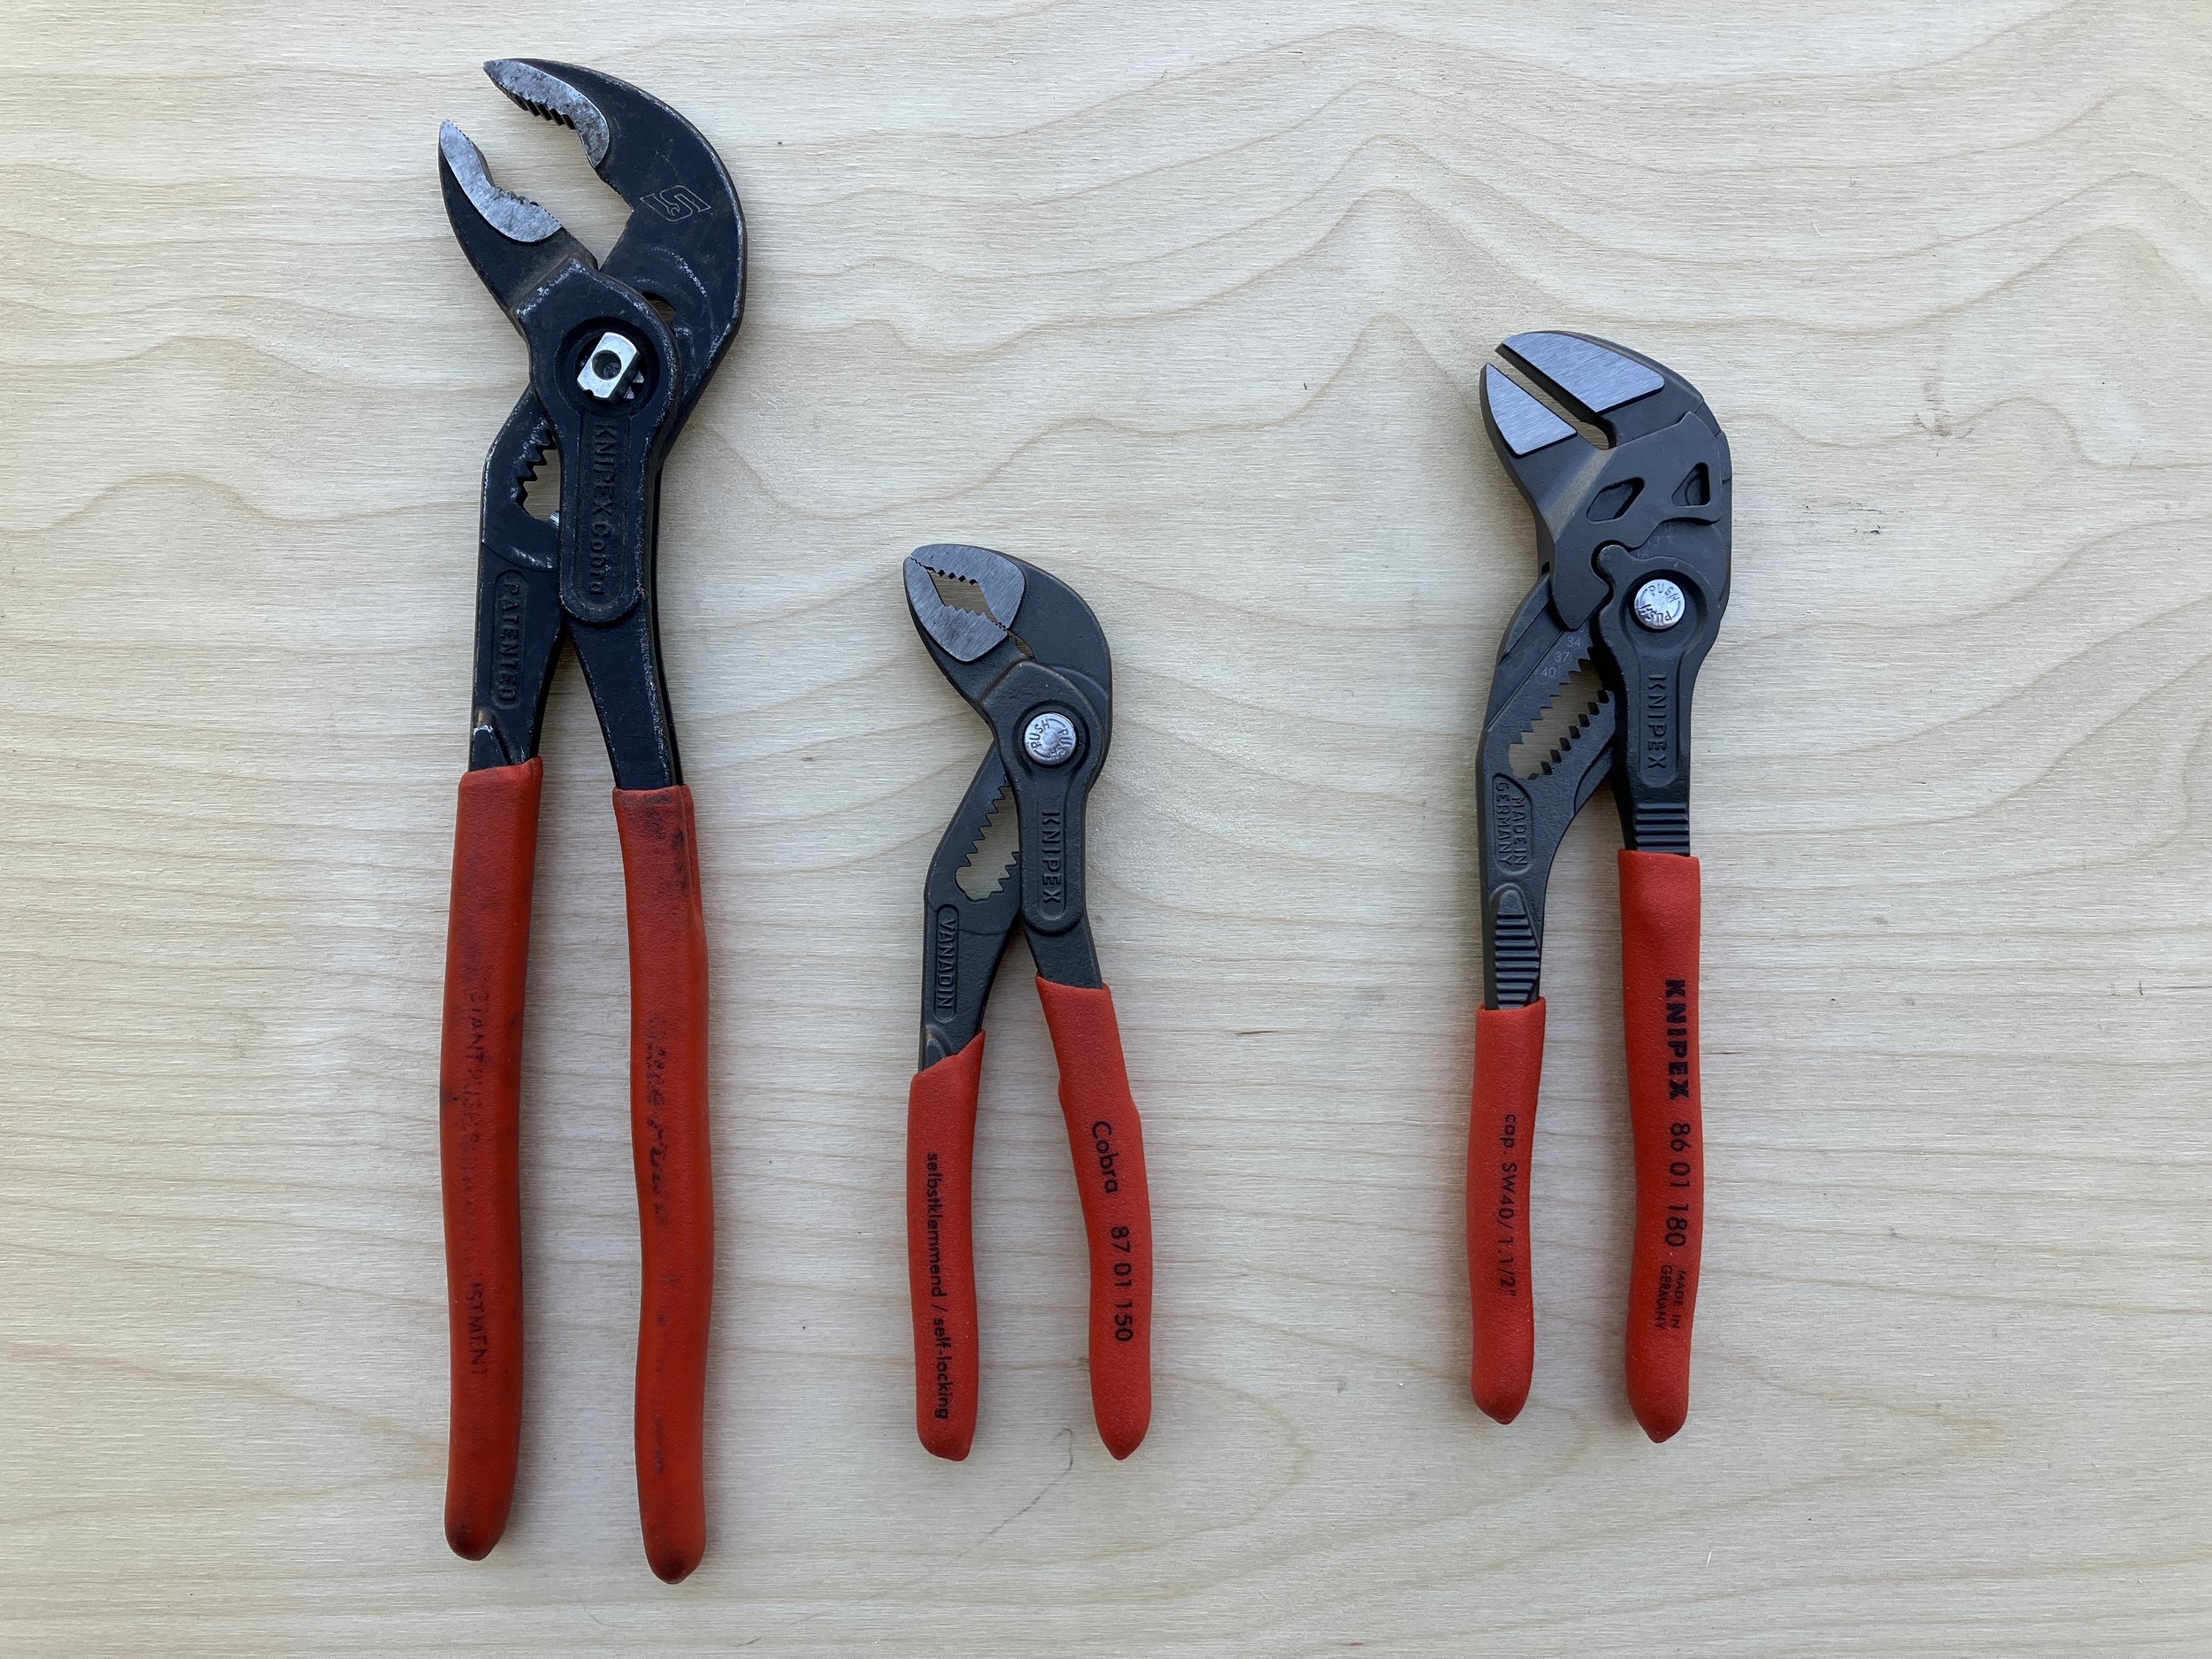
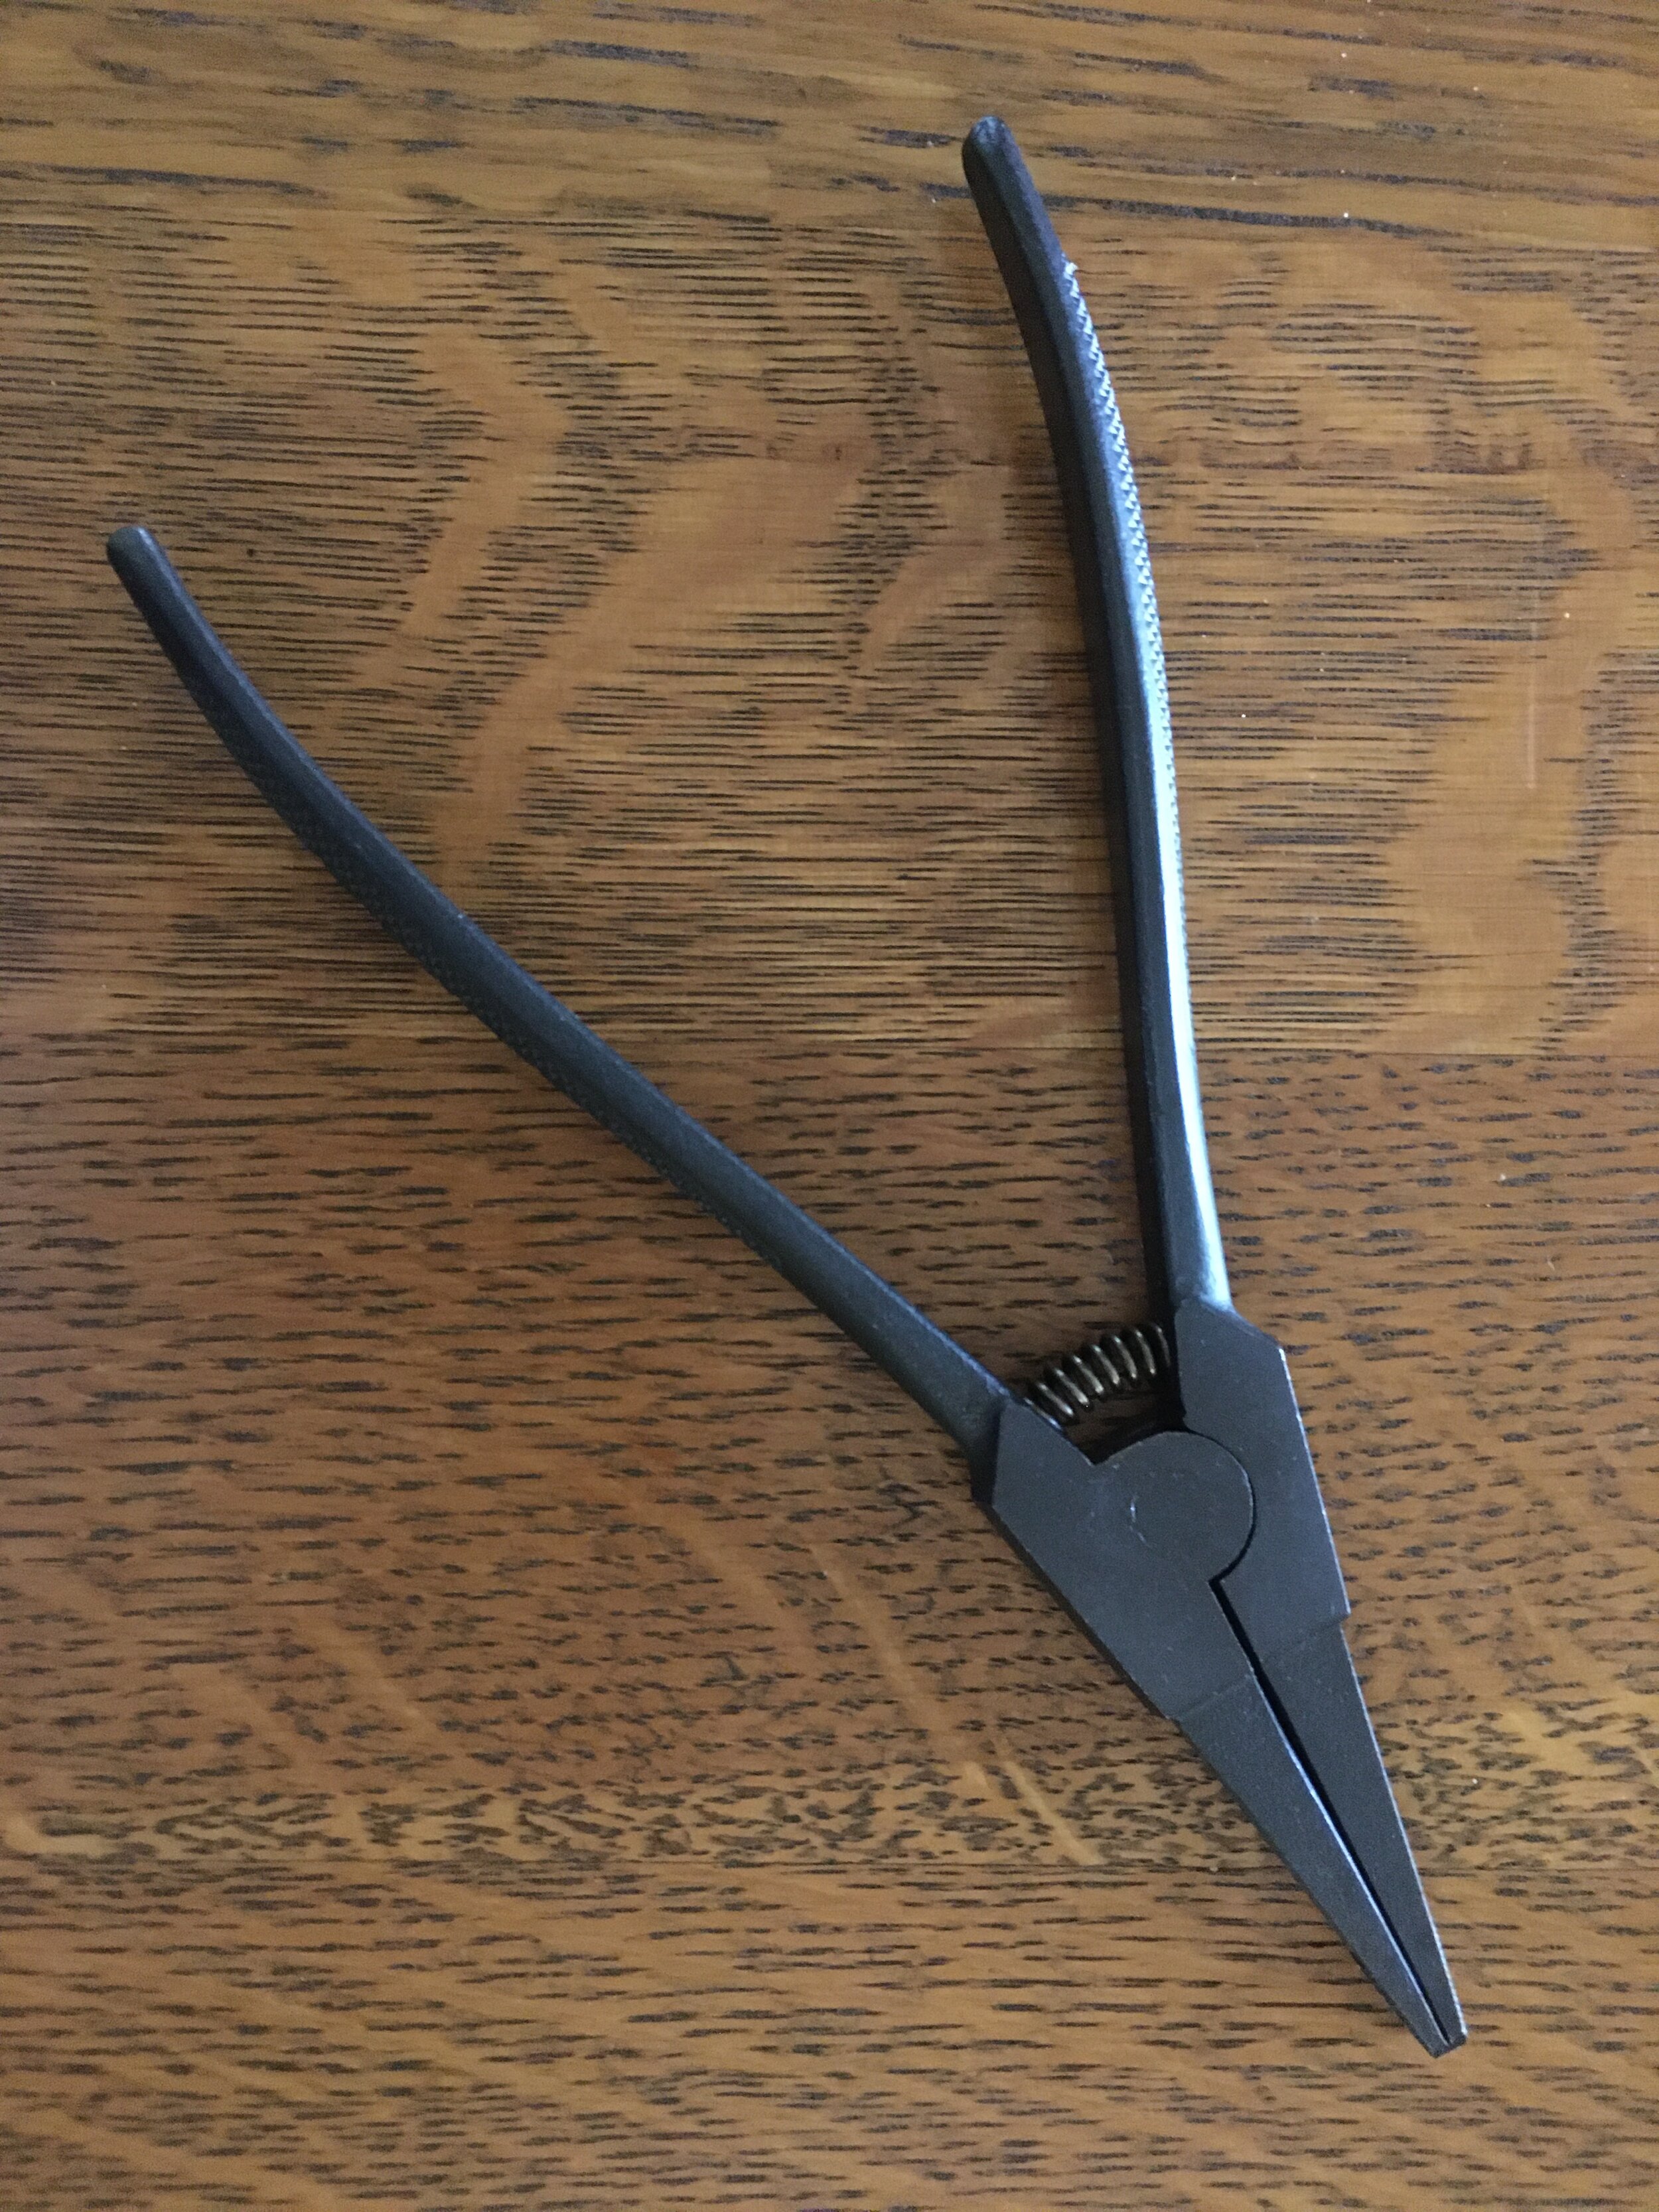
Knipex parallel-jaw pliers
Despite their occasional usefulness—in some cases serving a purpose no other tool can fill—pliers get little respect in the automotive tool world. Possibly the only tool more scorned is the adjustable (or “monkey”) wrench with its sloppy fit on almost any fastener.
Pliers can at least grip properly; their main drawback is the tendency of the teeth to scar the flats of nuts and bolts, and to slip and subsequently round off fasteners if not gripped tightly enough to risk that scarring.
Enter the Knipex parallel-jaw pliers, or as the company refers to them, pliers wrench.
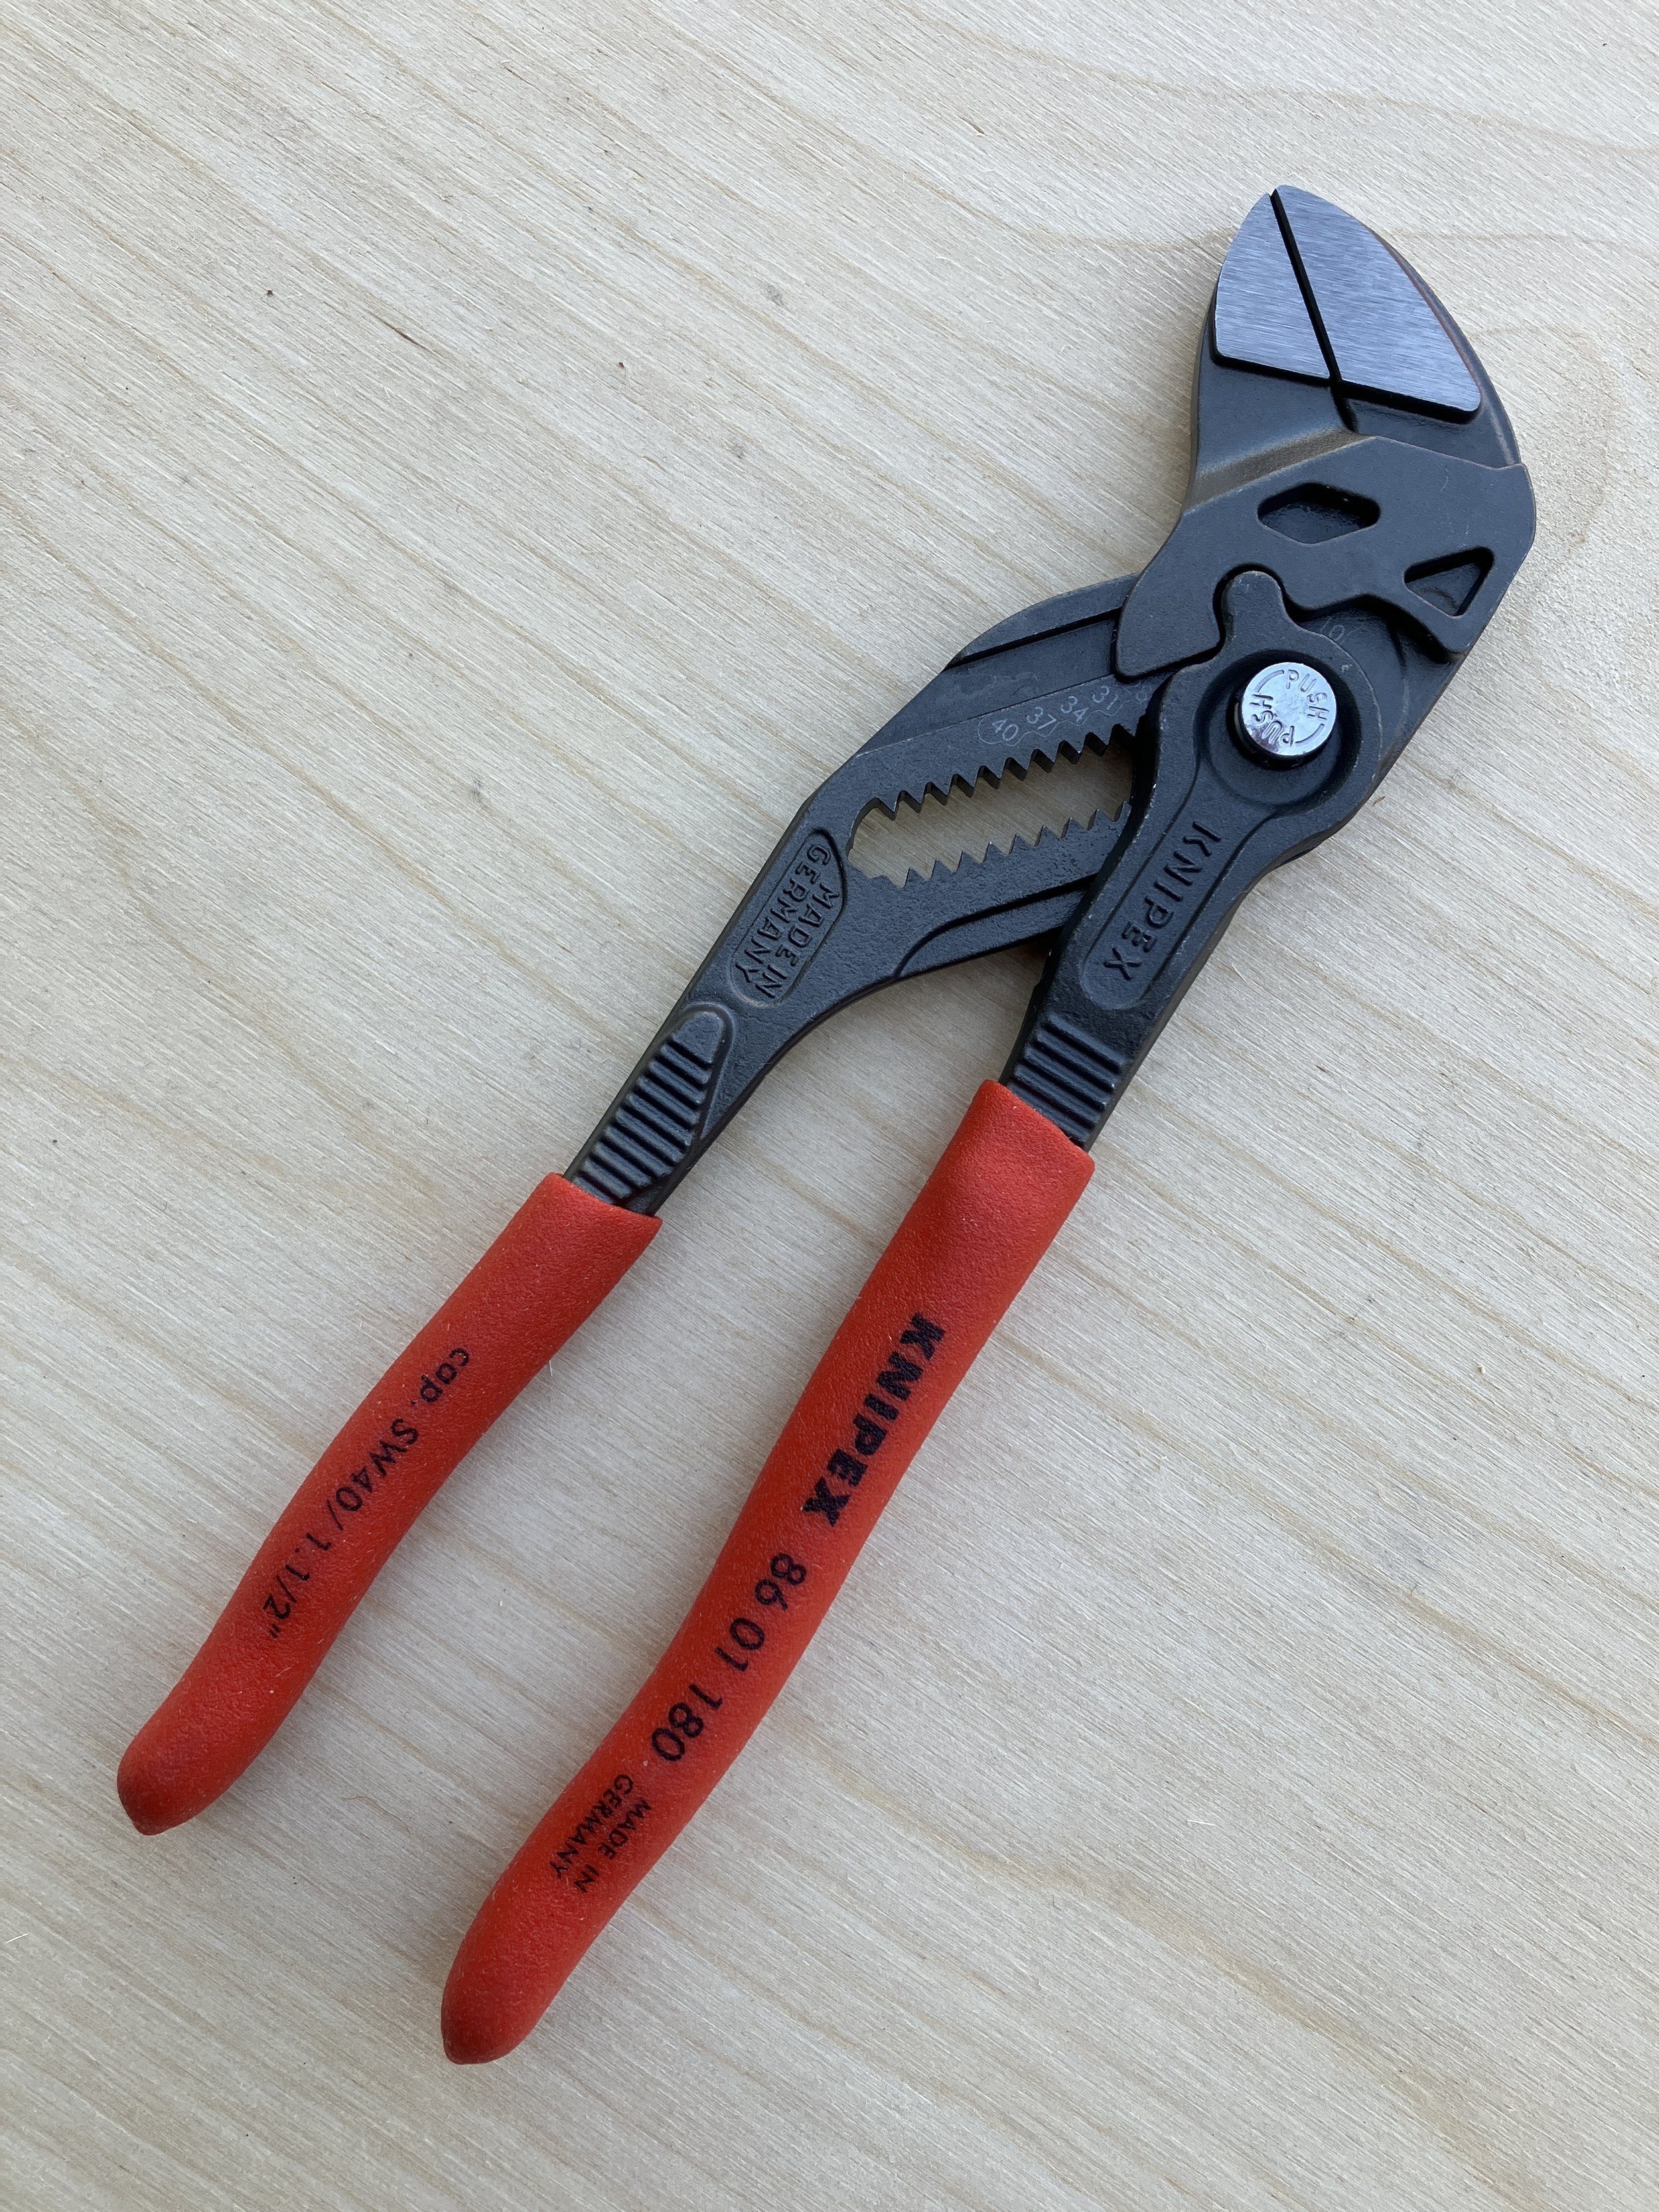
The lower jaw of the Knipex PJ pliers (my nickname) does not pivot about a central axle; instead it moves straight up and down in a track, and is adjusted with a separate handle on a pivot. The coarse adjustment is accomplished by sliding the handle up or down a toothed track, and the overall range is impressive: The compact 180mm model shown here can adjust its grasp from zero—i.e. gripping a piece of paper or sheet metal—up to a full 1 1/2 inches or 40mm. That means a pair of these could, in a pinch, substitute for a full ratchet/socket and wrench set from 3 or 4mm all the way up to 24mm or so (beyond that their leverage might be insufficient). Add the 250mm model for even more versatility.
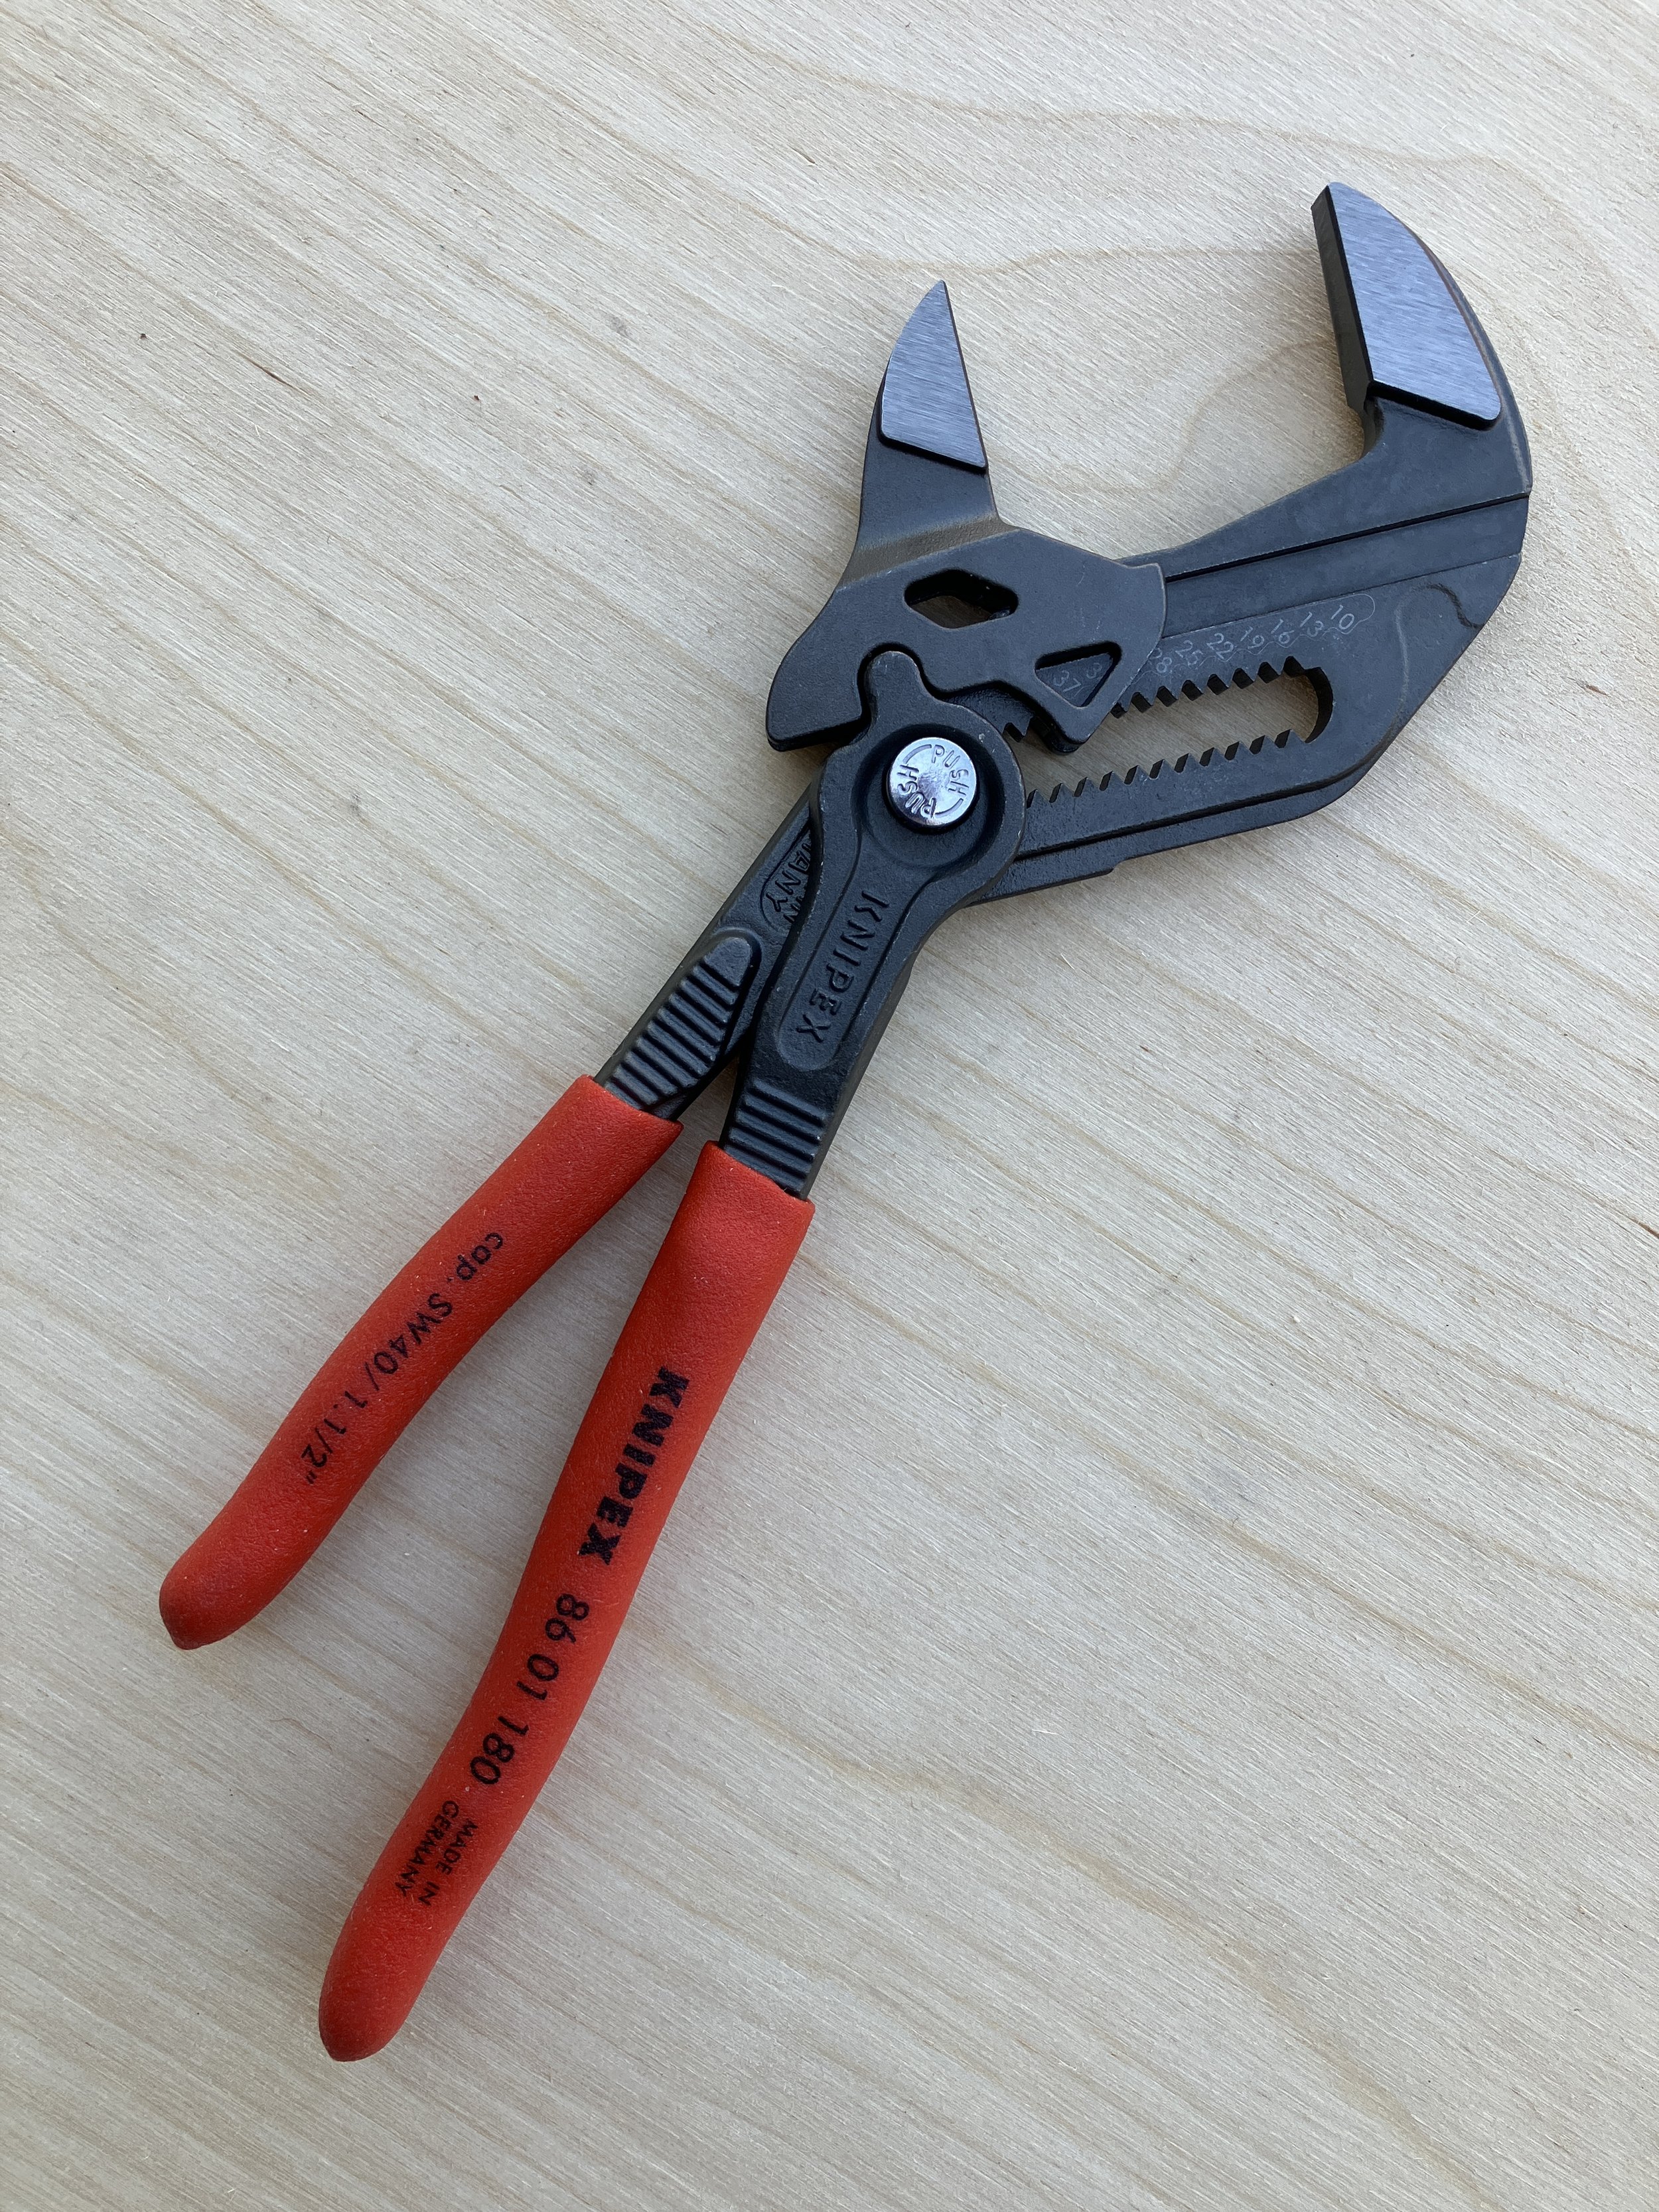
One advantage of using the PJ pliers to, say, hold a nut while one unscrews a bolt from it, is that you actually grip the nut, which you cannot do with a standard wrench. This would be extremely useful in tight spaces were dropping the nut might mean a five-minute search in the bowels of the engine compartment—or the mud underneath. Likewise, when trying to thread a nut onto a bolt in a tight space you can retain a firm grip on it. Like all Knipex (pronounced “kineepex,” incidentally) pliers, due to the superior steel used the jaws are quite narrow, further enhancing their usefulness.
Disadvantages? The lack of teeth renders the PJ pliers useless at gripping round things—axles, the shaft of a bolt, etc.—which is why I also carry the company’s excellent standard sliding-jaw pliers. A very useful addition to a home or field tool kit.
Knipex is here.
The most useful tool I've bought in a long time . . .

For decades I’ve used cheap plastic bolt checkers, with plain holes to confirm diameter and simple scales to measure thread pitch.
This is way, way better. It’s all-metal, and has actual bolt studs and threaded holes to instantly identify nearly any metric or SAE fastener. It took me seconds to identify a couple of weird bolt sizes (3/8 x 24, 1/4 x 28) on my 1976 Triumph TR6, which could theoretically have a mixture of SAE and metric fasteners.
It has holes at each corner, so if you wish you could mount it on the wall behind your workbench.
Made by Hillman. I found it at an Ace Hardware for $30, but you can probably get it or a similar model on Amazon. Highly recommended.

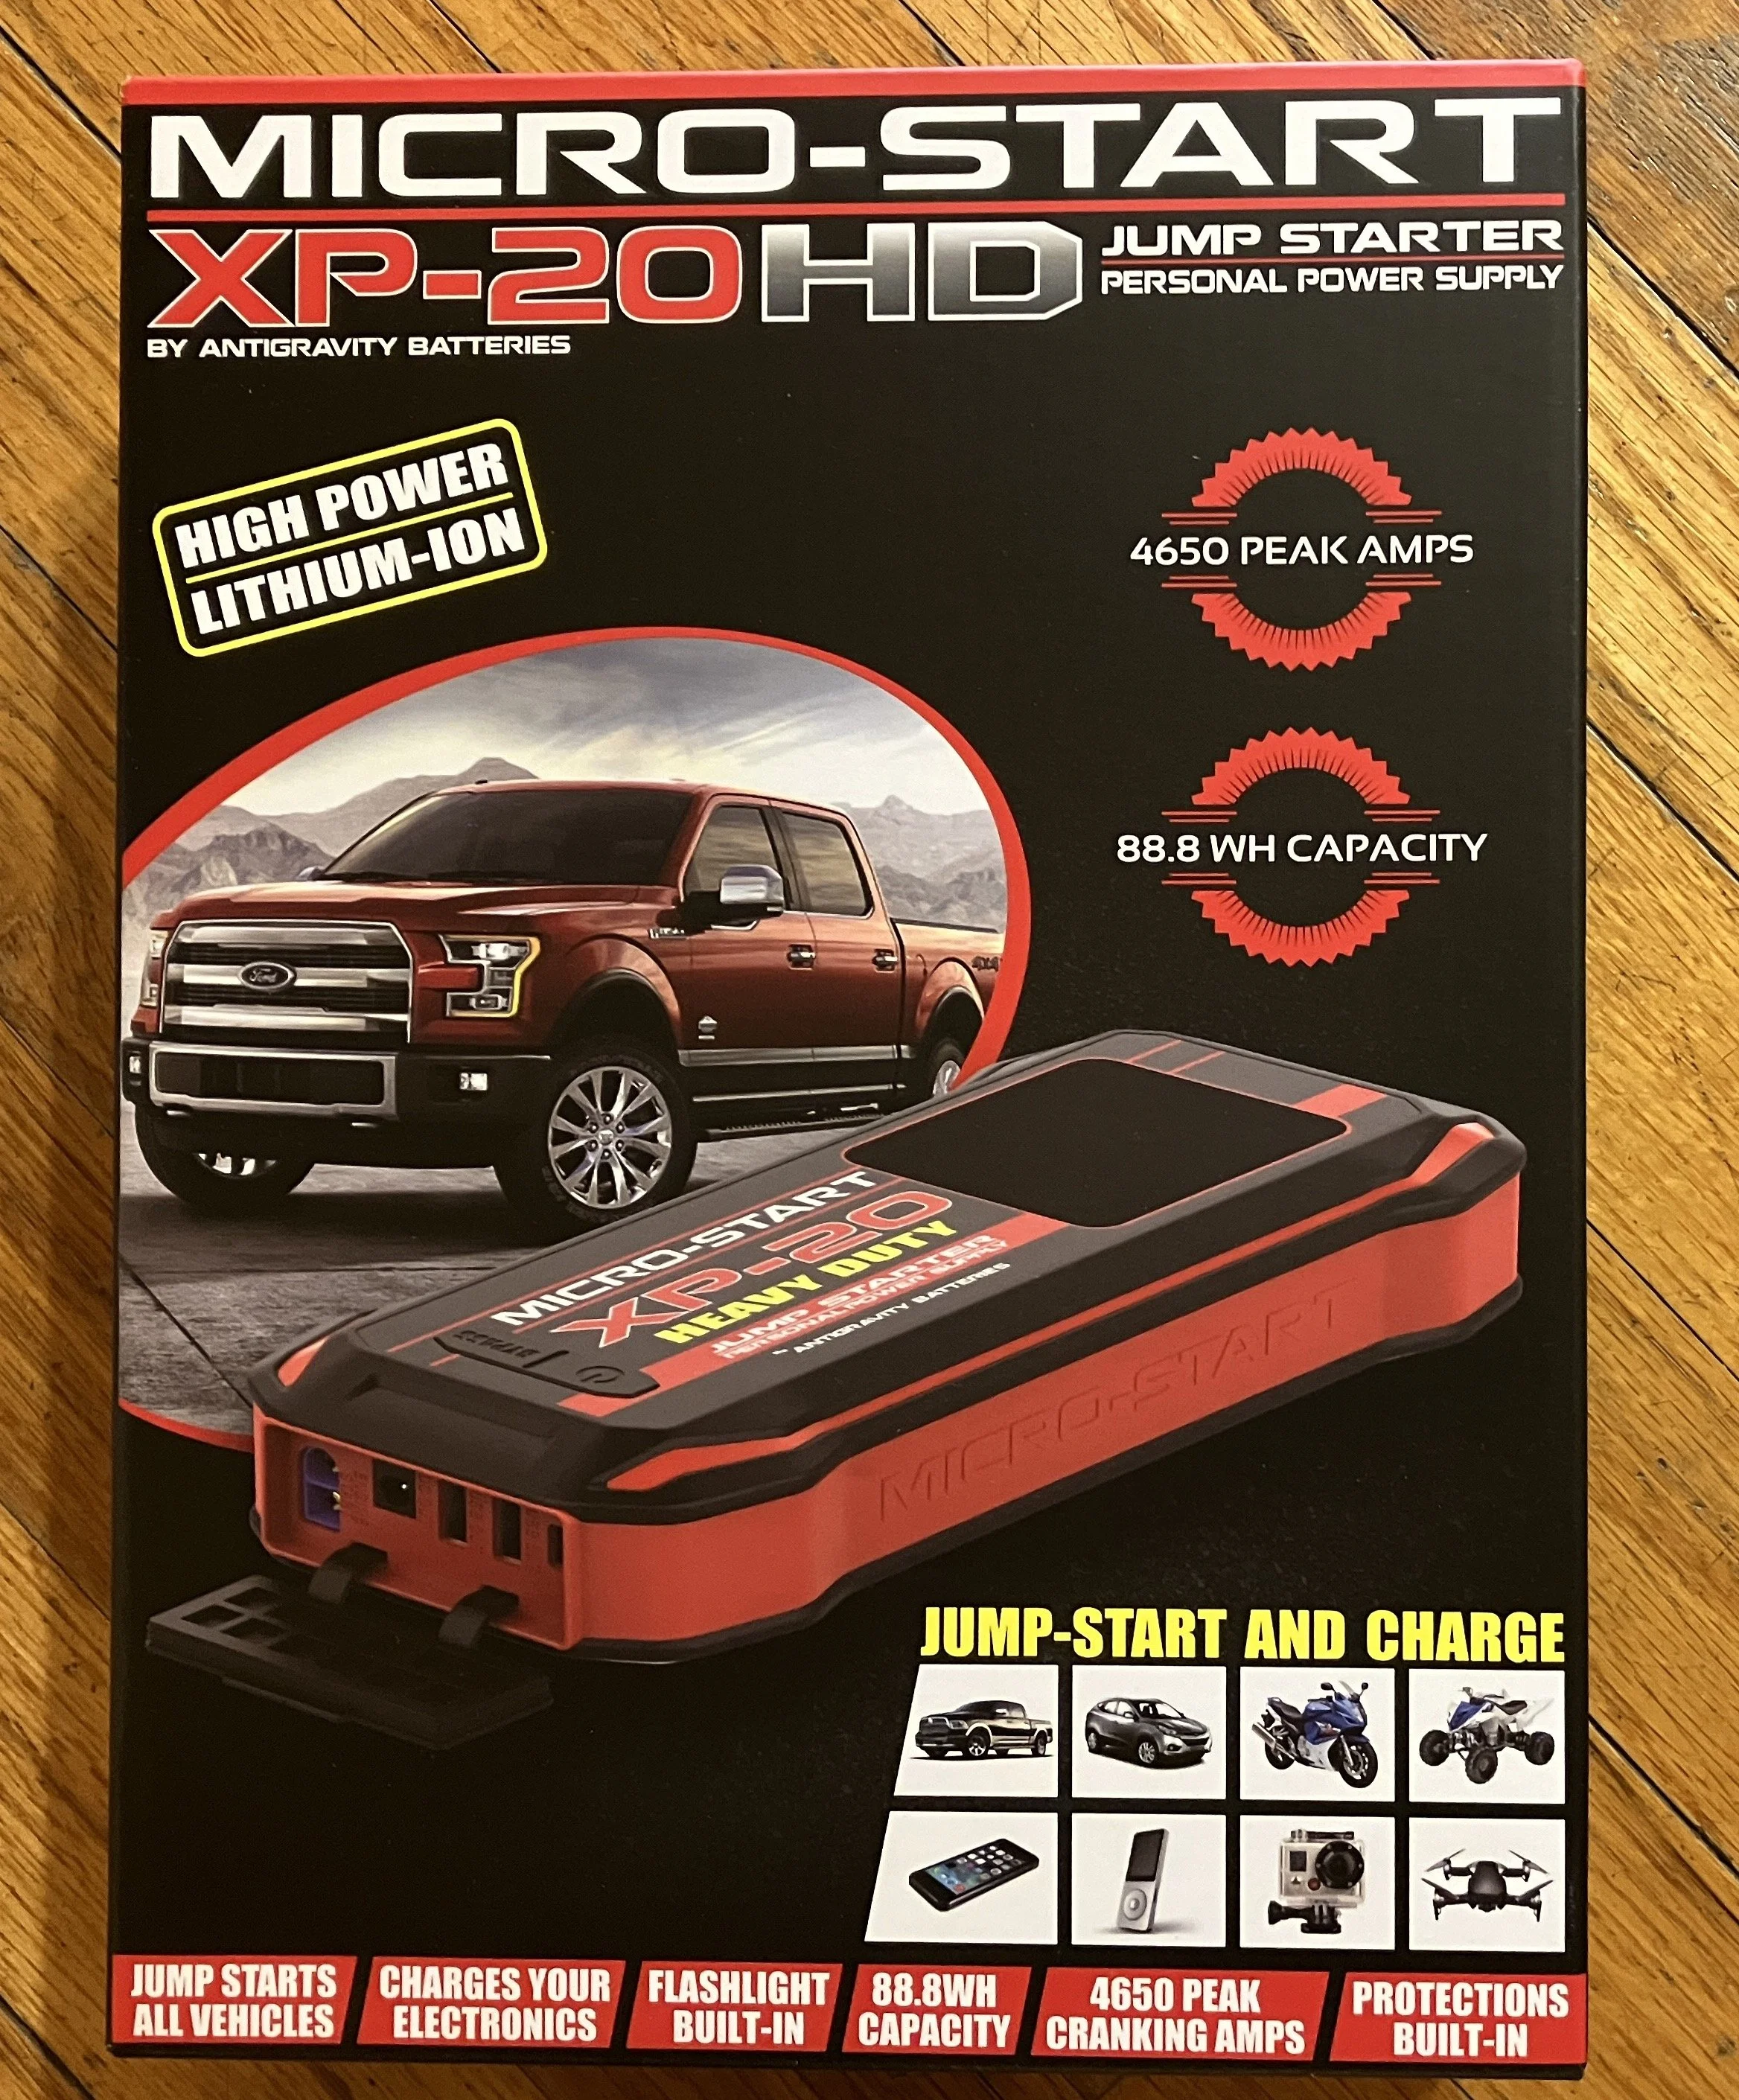
New from Antigravity . . . the ultra-performance Micro-Start XP-20HD
The original Micro-Start XP-1, the first lithium-powered compact jump-starting system on the market, gained instant legend status at the Overland Expo when Tim Scully and I daisy-chained three of them and welded two quarter-inch slabs of steel together, both impressing and horrifying Scott Schafer, the company’s founder. While emphatically not an endorsed application (and probably a deal-killer for any warranty claim), it demonstrated the resilience of the product.
Those same three units went on to do yeoman service at the Expo and on a dozen group trips, jump-starting I have no idea how many SUVs, trucks, and motorcycles, in addition to running our portable devices at the show and other events. We’ve never been without one in each of our vehicles since, and when the heavy-duty XP10 was introduced I put that one in our 6.0-liter diesel Ford F350.
Recently, at long last, two of our original XP-1s began to swell slightly, a sign of impending failure even though both still functioned. So I went to the Antigravity website to see what was new—and found quite a lot. There’s now an economical—and super-compact at three by six inches—XP-3 model, just $120, nevertheless suitable for gasoline engines up to 5.7 liters. The XP-10HD exceeds the capabilities of our already stout XP-10. But what caught my eye were the XP-20 and XP-20HD, the new top-of-the line models with seriously enhanced specifications. So I had the company send me an XP-20HD ($249).
And impressive specs they are. For comparison, the XP-10, which as I mentioned is suitable for starting big diesel engines, offers 300 amps of starting current with a 600-amp peak and a total capacity of 18,000 mAh (milliamp hours). The XP-20HD puts out a massive 930 amps of starting current with a 4,650-amp peak, and total capacity is 24,000 mAh.
That’s not all. Both XP-20 models employ USB-C PD 100-watt charging capability, and will fully recharge in one hour from either a 12VDC or 120VAC source. Each also incorporates a large LED screen that reads out percentage of charge and the power draw of whatever device is connected to it (or the input wattage when charging). When I first used the XP-20HD, to power an iPad at a book festival for taking credit-card payments, the output reading alerted us to the fact that the iPad was running a background program that was drawing excess power. Nice. The XP-20 models will also power/recharge laptop computers via the USB-C output/input port.

Large LED screen shows percentage of charge, and input (or output) wattage.
Oh—incidentally—the XP-20HD will start diesel engines of up to 8 liters and gasoline engines of up to 10 liters. That should take care of most of the overlanding vehicles I know . . .
In the years since the XP-1 first came out the concept of compact jump-start systems has exploded in popularity, and you can now find a dozen or more brands you’ve never heard of on Amazon at discount prices. Personally, my experience with the Antigravity units is enough to retain my loyalty, but I thought I would do a comparison, and so took a look at a friend’s Amazon-sourced unit from GOOLOO, the GP400, which sells for a very tempting $130. (I studiously subsumed my editorial annoyance at the ALL-CAPS brand name and did not let that sway my opinion.)
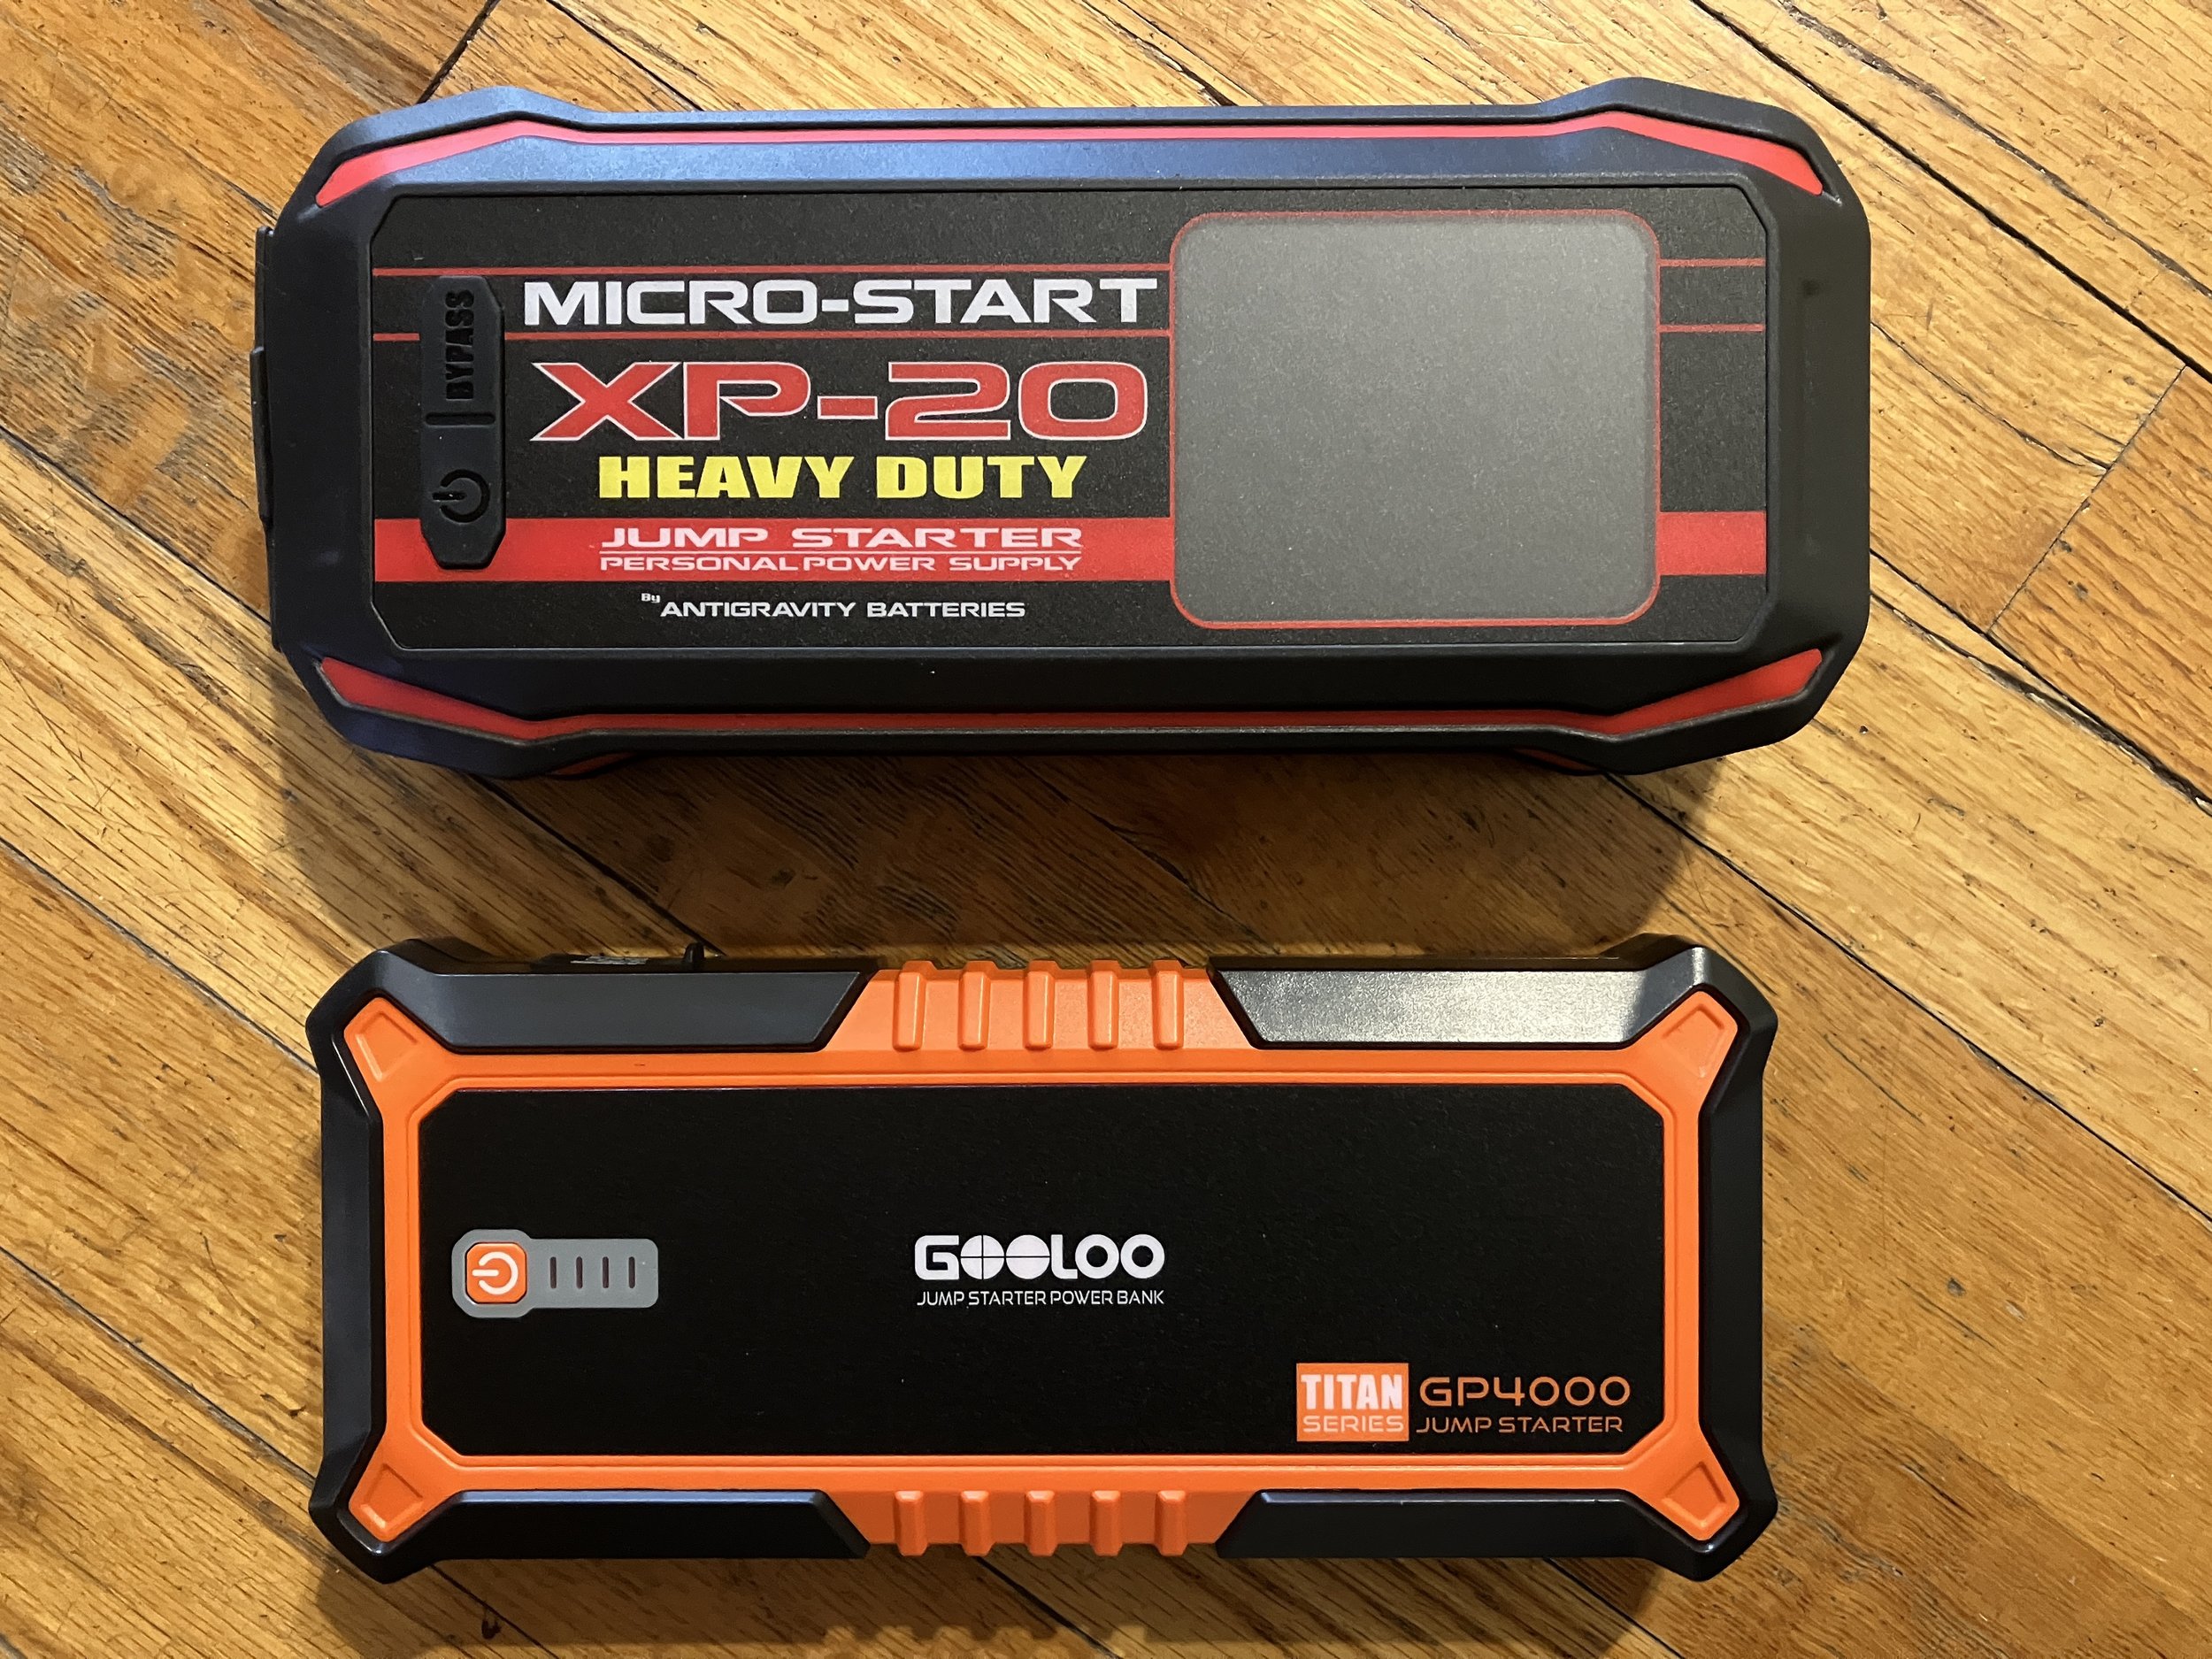
The GP400’s starting specifications are impressive, if about 15 percent below those of the XP-20HD: 800-amp starting current and 4000-amp peak compared to 930 and 4,650 amps. Much more notable is recharge time: five hours for the GOOLOO versus one for the Micro-Start, thanks to its USB-C PD connection and 100-watt capability. That same capability also allows a topped-up XP-20HD to completely recharge a dead MacBook Pro in about an hour—the GOOLOO could theoretically charge the same MacBook, but at a much slower rate. (With a USB-C cord you can even use the MacBook’s Powerbrick to recharge the Micro-Start from a 120/240V source. Got that?)
Other bits: The battery clamps on the GOOLOO are described as “all-metal,” while the clamps on the Micro-Start are solid copper. And the GOOLOO lacks the extremely useful digital readout of remaining capacity and power draw. I actually liked the GOOLOO’s semi-hard case better than the Micro-Start’s semi-floppy case, and the GP400 does offer a lot for the money; however, taken altogether I think the XP-20HD more than justifies its price premium, especially considering Antigravity’s stature and reputation.
Even if, like many of us, you have a dual-battery system in your vehicle, a Micro-Start offers additional peace of mind against the possibility of a no-start situation—not to mention numerous opportunites to be a hero helping out others. The advanced device-powering and fast recharging capabilities of the XP-20 and XP-20HD models catapult them even further beyond the original brilliant Micro-Start concept. Impressive.
That reminds me . . . I’ve got a bit of welding I need to do on the FJ40’s rear rack.
Kidding, Scott. Kidding.
The difference between a good tool and a bad tool . . .
. . . can sometimes be measured in millimeters.
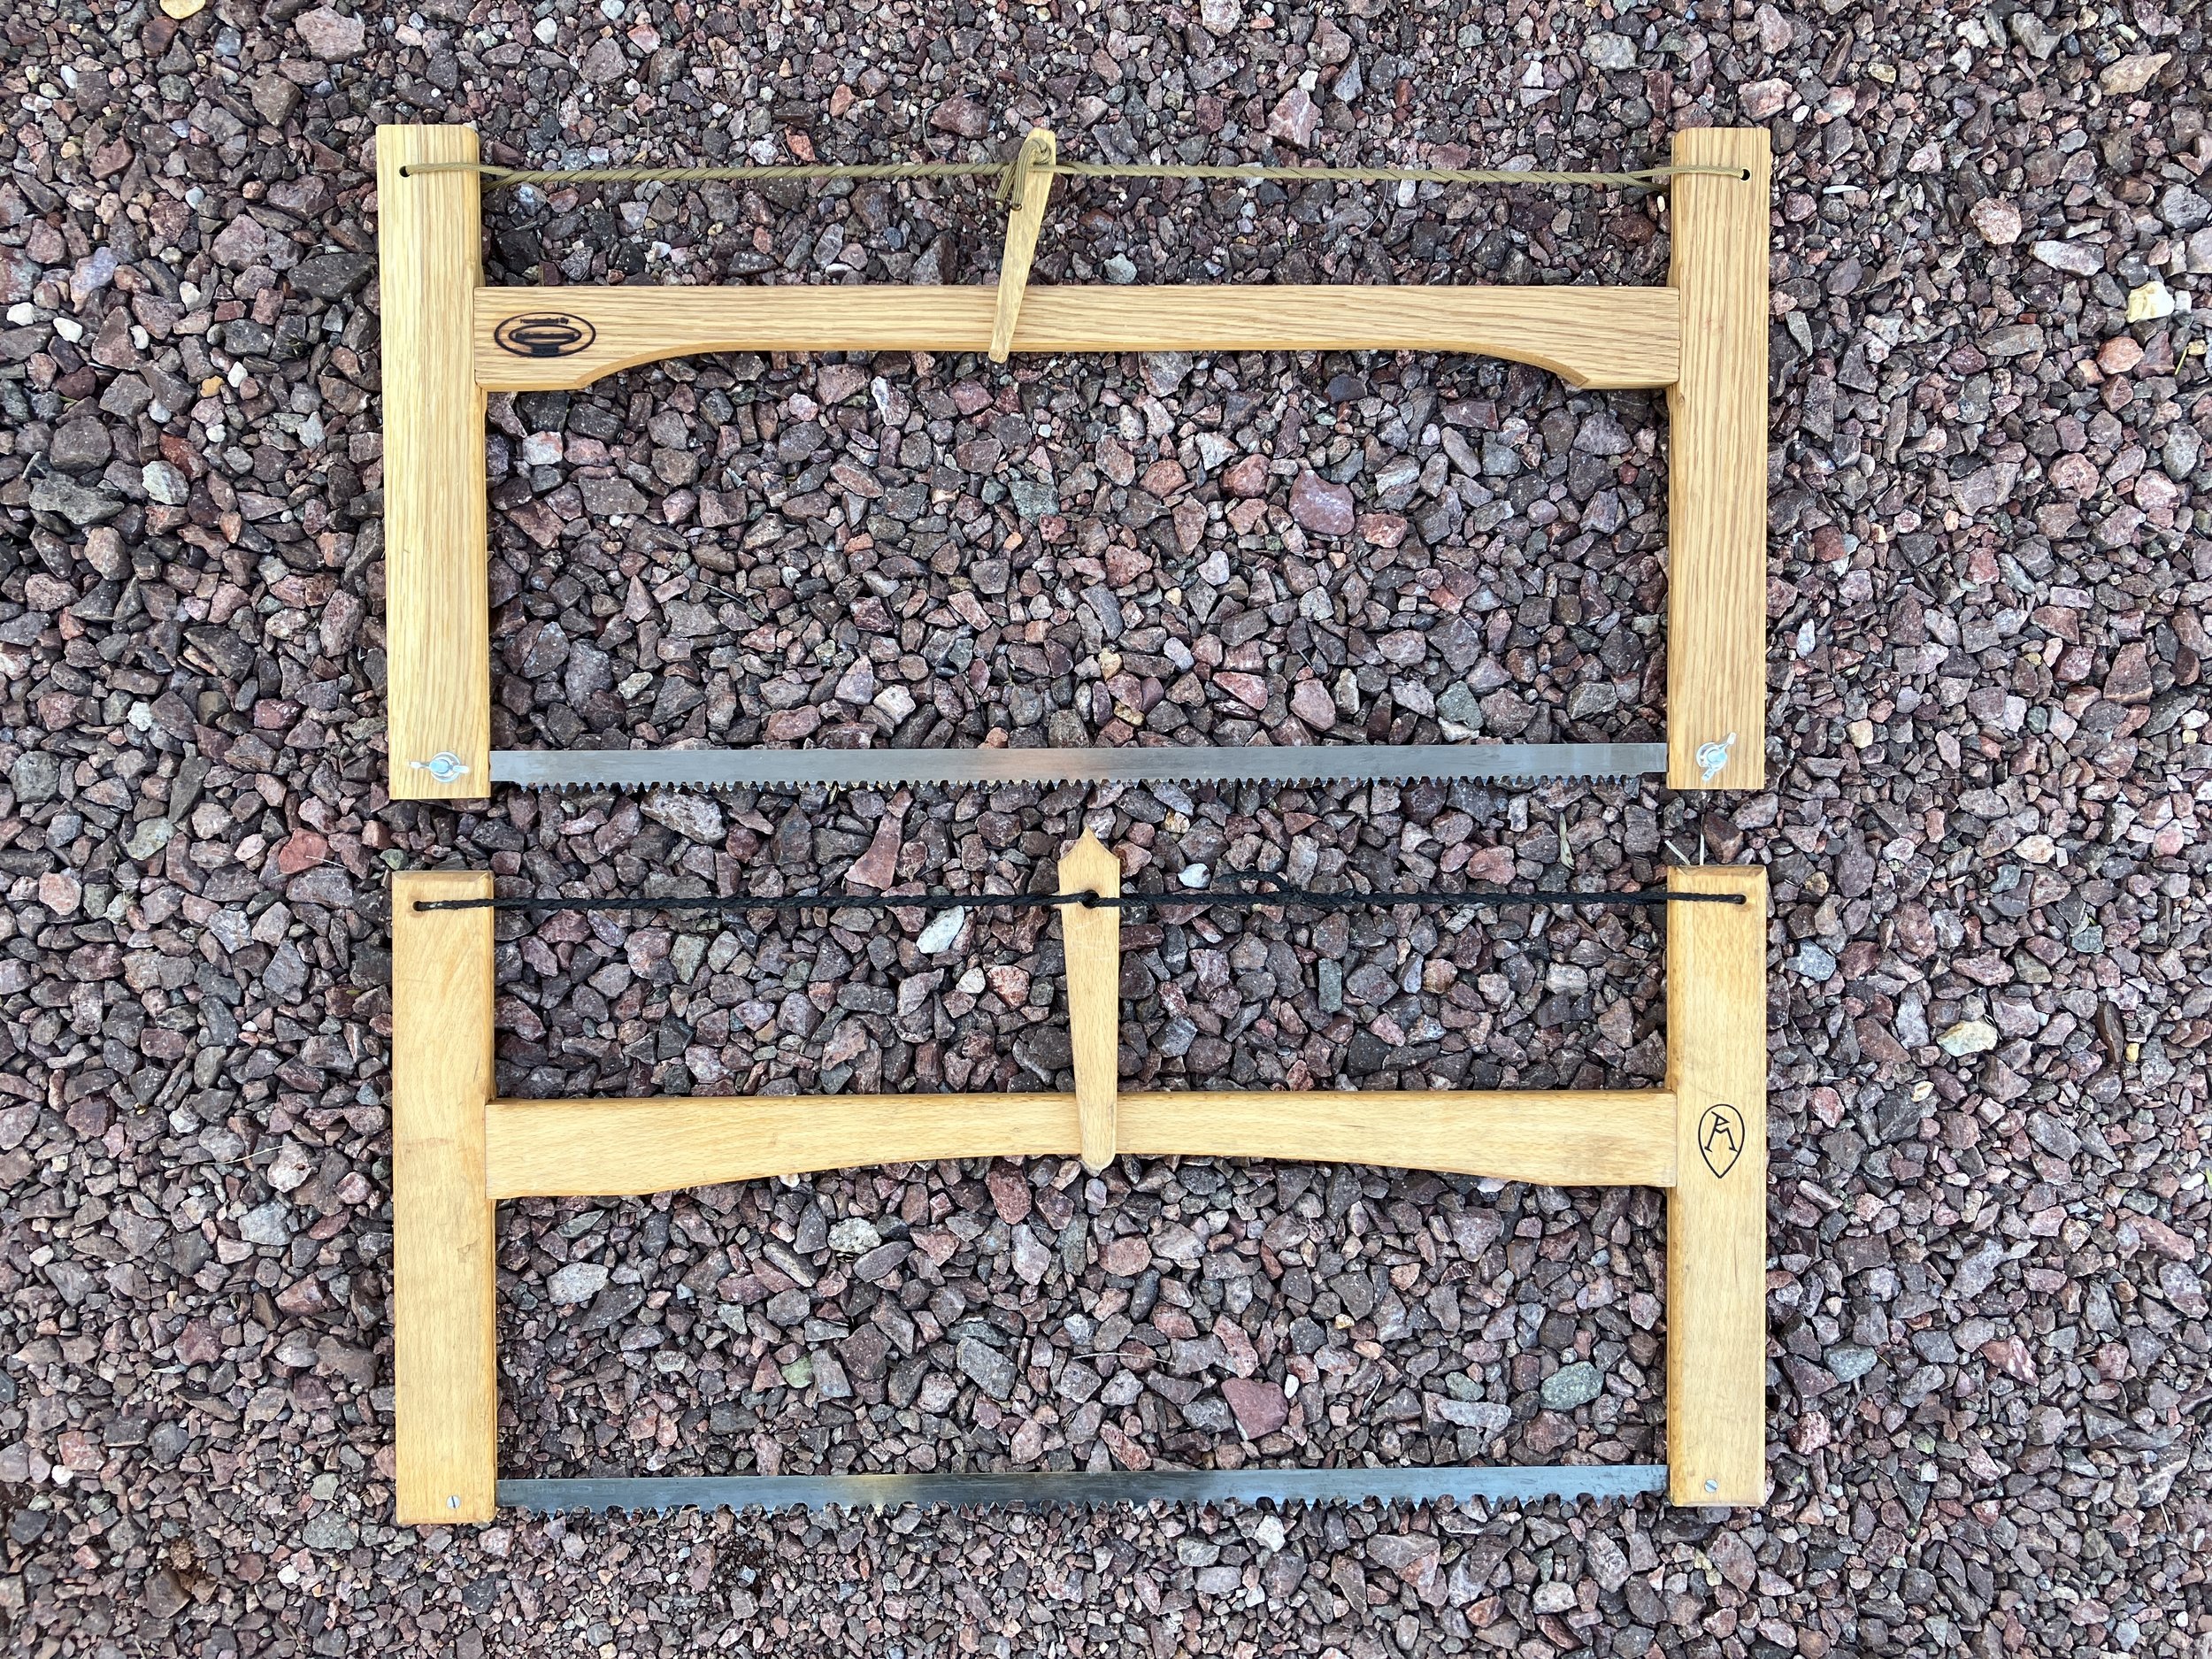
I bought the lovely, collapsible wood bow saw on the bottom from the Ray Mears Woodlore shop in England some years ago. Made for Mears by a local bowyer, it quickly became a favorite—so much so that last year I decided to buy another as an extra. However, the product had disappeared from the site.
A quick search located a seemingly identical product from another English online shop, so I ordered that one, and then set it aside for over a year. A few months back, however, I thought I’d try it out to compare to the “original.”
And . . . it compared poorly. In fact, no matter how much twisting I applied to the “Spanish windlass” tensioning mechanism, the blade torqued and bound maddeningly in every cut. A brief side-by-side comparison revealed why: The crossbar on the new saw was positioned significantly higher than on the Woodlore model, vastly reducing leverage and the resulting tension applied to the blade by the windlass.
Theoretically, the copy should be able to saw through a thicker log, given the extra clearance above the blade; in reality this is a moot point since the thing can barely get through any log.
At some point I might try to modify the new saw by drilling and chiseling a new mortise for the crossbar lower on the frame, but for now it sits idle.
If you’re intrigued by the beauty and efficiency of the Woodlore saw, I did find another here that appears to be constructed properly, and an even more beautiful model here.
The world's best recovery shovel . . .

If you want to start one of those 47-page debates on an overland forum, just type, “What’s the best recovery shovel?” in the topic line.
On one end you’ll be assured that a $20 folding entrenching tool is all you need. On the other you’ll learn that you absolutely must carry a full-length garden shovel so you can reach under to the middle of the vehicle with it. And you’ll hear everything in between.
I’ve tried and owned a lot of them, including oddities such as the WWII Wehrmacht entrenching tool, which is awesome for its size, indestructible, and has one sharpened side edge to use as a semi-effective hatchet. Much superior to the folding U.S. entrenching tool in my opinion. There’s an interesting history of them here.

I also have a factory Land Rover T-handled shovel (half of their “Pioneer Kit,” the other being a pick), which is excellent:

Also an all-steel Wolverine (review here), which is also excellent, if heavy and decidedly crude in construction (I know, it’s not a fly rod, but still . . .). Being all-metal, the Wolverine also gets blisteringly hot if left in the sun.
I sampled one of the Krazy Beaver shovels . . .

. . . and managed to bend one of the teeth my first time out, in addition to which I didn’t like the pinned plastic handle. Not many people realize that you should occasionally sharpen your shovel, and doing so on the Krazy Beaver would be a real pain.
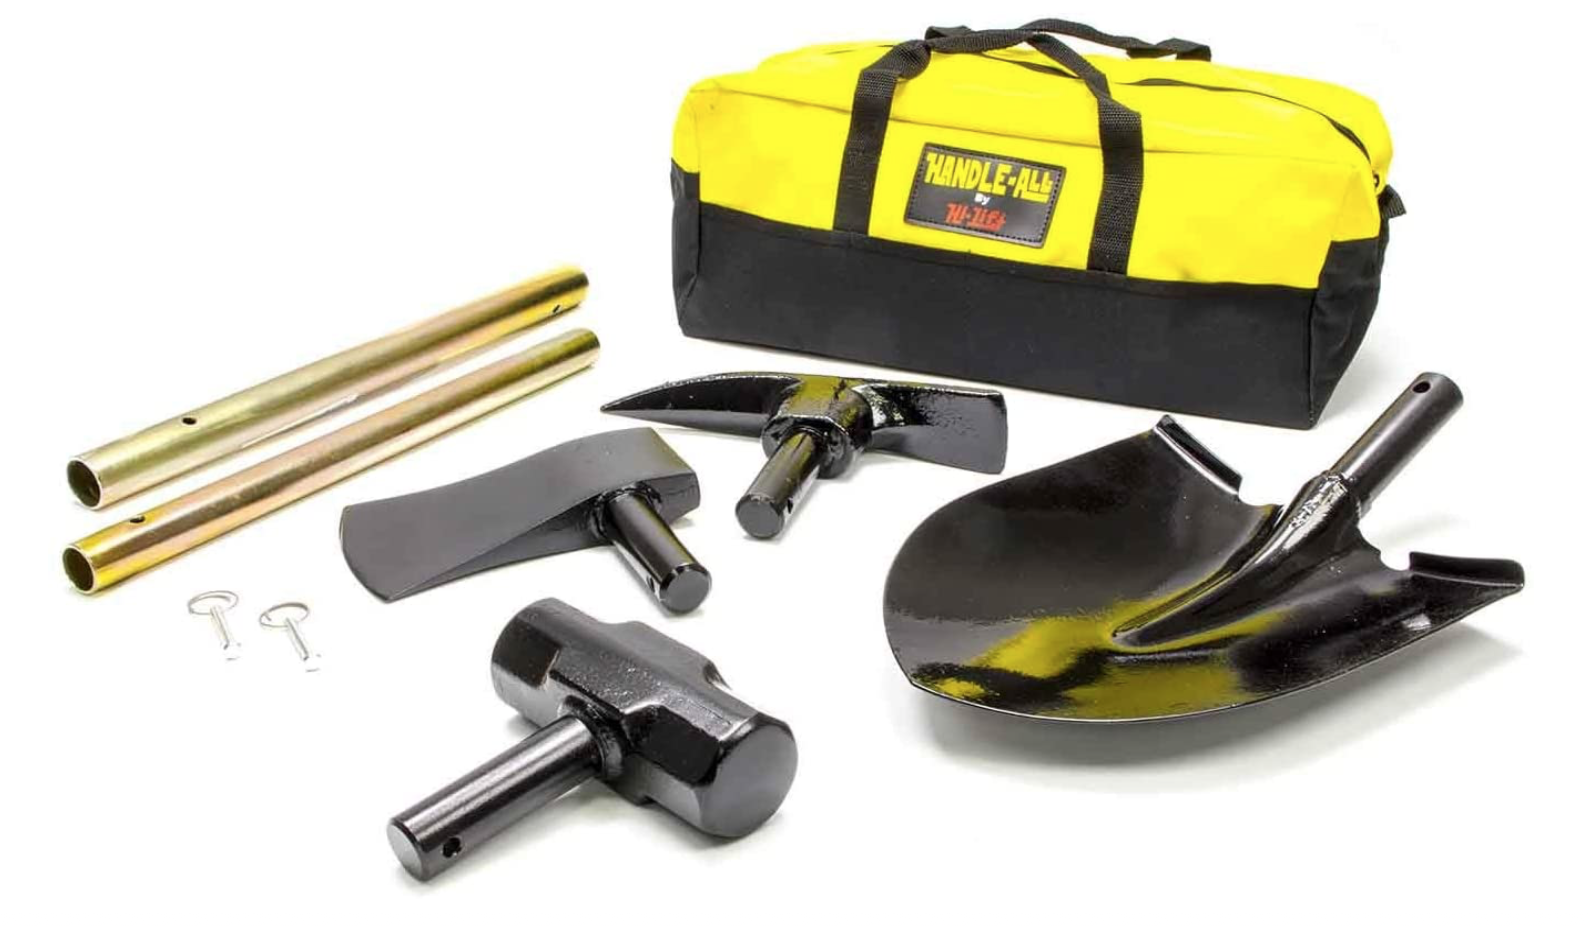
I also tried a Hi-Lift Handle All, which comprises a shovel, sledge hammer, axe, and mattock all in one, and, as typical with such things, performs poorly as any of them. It was indubitably versatile, but utterly awkward and uncomfortable to use.
And before you ask: No, I’ve not tried one of these because I do not live in fear of a Zombie Apocalypse:

I briefly tried an early example of the DMOS Collective folding/collapsing shovel, which felt a bit rickety to me, and full of moving bits begging to be jammed with mud. However, I’ve not tried one of the later models, which I understand are sturdier. They are available with a very nice mounting bracket, and will store easily inside the vehicle, a boon unless you’re into ostentatious exterior displays of all the recovery gear you rarely use. However, I still I can’t imagine that a folding shovel with a collapsible handle held by numerous spring pins could possibly be as strong or last as long as a single-piece model. Also: $239 for the Pro model? Even my broad latitude for equipment elitism blanched at that. The bracket, incidentally, adds another $239 . . .
Through all this experimentationI learned that I strongly prefer a mid-length wood shaft with either a T or D-shaped handle, as on the Land Rover Pioneer unit. Why wood? I live in southern Arizona and most of my foreign travels have been in warm countries. And even when wearing gloves, the steel shaft and handle of the Wolverine were uncomfortably hot if I set down the shovel for a few minutes when the air temperature was above 90ºF and the ground temperature 40º higher. And it was just as uncomfortable in freezing weather. Fiberglass is better, but then the question of aesthetics arises, and what can beat a wood shaft? Its only disadvantage is weathering if left exposed to the elements, but I’m willing to keep the shovel stored in the garage except when I’m on a trip. Judicious re-varnishing would reduce the issue as well. Technically a steel or fiberglass shaft might be stronger, but I can count the broken wood shafts of mid-length shovels I’ve seen on a closed fist.
I like a T or D handle because it’s often necessary to punch the shovel into the substrate (not just when doing a recovery but for many camp tasks), and a T or D handle is way more comfortable for this, and produces more power as well.

Finally, the mid-length shovel is just the best compromise for length. It allows you to reach far under the vehicle yet retain sufficient power, and is of course a lot easier to store than a full-length garden shovel. (Also, I have seen long wood shovel shafts break if abused.)
All this, the world’s longest lede (the correct spelling for the introduction to an article), is leading (leding?) up to my nomination for the world’s best recovery shovel—and I’ll bet it’s one you’ve never encountered in those 47-page threads. Plus it has the coolest name ever for a tool.
It’s called a poacher’s spade. Told you.
Originally—according to tradition—cut down from an old full-size spade, the poacher’s spade was used by poor rural tennants in Britain to dig out rabbits to supplement their meager diets (also to dig out the ferrets and terriers sent after the rabbits). This hunting was illegal since all game was the property of the estate owner—thus, poacher’s spade (or rabbiting spade). It was ideal for the task because the blade was no wider than necessary to unearth a rabbit burrow, and lighter than a full-size shovel if you wound up needing to flee from a shotgun-wielding gamekeeper. The relatively small blade area enhanced rigidity and cut more easily into tough substrate (does England even have tough substrate?).
So, you’re asking, how does this translate to efficacy as a recovery shovel? Why would you want a small blade when you might have a half a cubic yard of sand to get out from under a bogged vehicle in order to be able to insert MaxTrax or other recovery aids?
The answer dawned on me over the course of many, many scenarios digging out vehicles deeply bogged in sand or mud, whether genuinely stuck or put there for training purposes: I realized that a good portion of my digging time and effort was wasted just making room for the shovel itself. When the vehicle was buried to within a few inches of the bodywork, I spent my first couple of minutes at each wheel just scooping out a ramp so I could get the shovel in to where it actually needed to be to dig out the tire without risking gouging the bodywork with the edge of the blade. I theorized that a smaller blade—perhaps no larger than that on an entrenching tool but with a longer, solid handle—might actually be faster than a larger shovel that frequently got in its own way.
I tested the theory with an old trenching (as opposed to entrenching) spade I had, with a D-handled wood shaft and a narrow but square-cornered blade made for cutting nice neat trenches. The blade shape wasn’t ideal but the narrow width immediately showed its superiority in extracting deeply sunk vehicles. There was noticeably less prep work to begin actually uncovering the tires. To my surprise, I found that it wasn’t even at a disadvantage in removing sand, since I typically hold the shovel sideways like a canoe paddle and sweep out sand from the tires. The long, narrow blade scooped out just as much sand as a fat blade.
Experiment complete and successful, I had no doubt what kind of shovel I wanted to get.
I knew about poacher’s spades thanks to a long fascination with the 18th, 19th, and 20th century practitioners of the time-honored pursuit, who elevated the skill of winkling out food from under the noses of estate owners and gamekeepers to a high art. In addition to spades, poachers employed guns, traps, snares, nets, ferrets, terriers—they even developed a particular breed of dog called a lurcher, a cross between a coursing dog and a herding breed such as a border collie. The result was both intelligent and fast—the perfect companion for a poacher (the name comes from the Romany word lur, meaning thief or bandit). I have several books written by legendary poachers such as Brian Plummer, Ian Niall, and Jim Connell, and the tales they tell of close calls are wild indeed.

I also knew where to go to get a proper poacher’s spade: Bulldog Tools in Wigan, Greater Manchester, founded in 1780 and still forging tools at the same location. Bulldog made entrenching tools for the British military in WWI and does so today. Bulldog tools are available from several outlets in the U.S., and are sometimes sold under the name Clarington Forge here. I ordered their Premier 28” Rabbiting Spade, which is equipped with an ash shaft ending in a beautiful split and steam-bent D (or Y) handle. The blade and handle socket are forged in one piece, and the socket extends nearly halfway up the shaft. (Strangely the steel part doesn’t seem to get as hot as the Wolverine’s hollow steel; I suspect the wood core might bleed off some heat but I don’t know.)

And . . . it’s perfect. The blade is thick and rigid but not heavy thanks to its size. The length is just right. And despite being forged in England in a 240-year-old factory, it was only $66.
Let me be clear: A $20 folding Chinese entrenching tool will dig you out if the alternative is staying put. For that matter, your bare hands will dig you out if the alternative is staying put. But for me, having the most suitable tools for a particular job enhances my enjoyment while traveling. And if something has gone wrong—even something as inconsequential as a bogging—those suitable tools take all the stress and a lot of the work out of the situation.
There’s another reason to carry a recovery shovel made in Britain: It will lend you a proper British attitude toward getting bogged, which usually involves saying, cheerfully, “Bugger,” then relaxing and having a brew-up before tackling the problem. And while you’re doing that you usually figure out the easiest and safest way to solve the issue, in contrast to the normal American Oh-shit-we’re-stuck-we-need-to-get-out-now! panic attack.
Cheers.
One-Case Toolkit – Episode 3 – Tool Rolls and Cases (Online Workshop)

This is part three of the One-Case Toolkit series online. Please note we had some bandwidth and camera-quality technical issues on this recording, so parts of the over-head camera show-and-tell stutter a bit, but the information is solid!
Assembling a quality set of tools for a field repair kit is only half the job. For tools to function efficiently and make repair jobs easier, they need to be stored properly, in a way that protects them, reduces noise, and above all keeps them organized and logically accessible. In this segment Jonathan will discuss ways to do that, from Pelican cases to Wolf Packs to Zarges boxes, and a variety of tool rools.
An interactive Q & A session is included.
Length: 1 hour, including Q&A
Resources from the Episode:
Company websites:
http://www.adventuretoolcompany.com
http://www.blueridgeoverlandgear.com
Tool Storage Products:
Step22 Pangolin $145
Step22 Stingray box $85
ATC Wrench Roll $60
ATC Shop Roll $100
Blue Ridge Tool Bag $136
Blue Ridge Recovery Bag $70
7POverland sells their recovery kit in this bag https://7p.io
Socket rails: Amazon—Casoman 6-piece ABS socket organizer ($19.97)
Tools mentioned:
Hammer – https://www.parktool.com/category/tools
Ground cloth – Rescue Essentials QuikLitter https://bit.ly/2N56HmM
and https://www.blueridgeoverlandgear.com/collections/tools/products/trail-creeper-multi-mat

Knipex: The right tool for the job

If you’ve ever needed to disassemble a Land Cruiser hub (or quite a few others), you’ve run into the retaining ring that secures the end of the stub axle. It’s not a circlip with holes that accept a standard snap-ring plier; the free ends come to bevelled points that are expletive-inducing to remove with any makeshift tool. Graham Jackson and I got them off our Troopy in the middle of the Australian bush by filing flat shoulders in the tips of a pair of his needle-nosed pliers. But it was still a dicey job to avoid having the things sproing off 20 feet into the dirt.
Rather unbelievably, I’d been through this same procedure at least a dozen times on our other Land Cruisers, from my 40 to our FJ55 to our FJ60. Every expletive-filled time I thought, I need a proper tool for this (expletive) job!
Finally I got one, and oh brother what a difference. It’s from the German tool maker Knipex, and it turns the task of removing and replacing this ring into an effortless and expletive-less five-second procedure.

If you drive a Land Cruiser and carry a tool kit for field repairs, get one, part # 4510170.
You’ll thank me some day.
A better Hi-Lift handle keeper?

If you own a Hi-Lift jack, you’ve probably dealt or struggled with the issue of how to lock the handle firmly in place during transport.
The spring clip that comes on the jack is worthless (and not designed) for that purpose. The polyurethane collars that slip over the handle and shaft are okay, but in my experience they stick when new, and eventually wear and slip down on the jack if it’s stored upright, or vibrate right off the end if it’s stored horizontally. For a time I just used a piece of One-wrap (hook-and-loop tape), but I’m not a big Velcro fan, and it quickly clogs with dirt when used in such an application.
A few years ago I set out to make something better. With an old sheet of half-inch-thick HDPE plastic—I don’t even remember what from, perhaps a cutting board?—I started playing around with ideas, and eventually came up with what you see here.

It slips easily over the shaft and handle of a Hi-Lift, and you can lock it anywhere you like with the two through-pieces and then the spring clip. It can’t slip. The only disadvantages I’ve found are that it won’t slide over the removable clamping foot if you keep one attached (although you could modify the opening so it could), and it has multiple pieces that might be prone to loss. However, I think it would be easy to modify it with a safety wire that would keep all three plastic bits together.
Always remember to store your Hi-Lift with the operating lever in the “lift” position.
P.S. If you don’t want to make your own, Step22 Gear has a promising alternative, here. I just got one and will be reviewing it soon.
Hint: When using “Search,” if nothing comes up, reload the page, this usually works. Also, our “Comment” button is on strike thanks to Squarespace, which is proving to be difficult to use! Please email me with comments!
Overland Tech & Travel brings you in-depth overland equipment tests, reviews, news, travel tips, & stories from the best overlanding experts on the planet. Follow or subscribe (below) to keep up to date.
Have a question for Jonathan? Send him an email [click here].
SUBSCRIBE
CLICK HERE to subscribe to Jonathan’s email list; we send once or twice a month, usually Sunday morning for your weekend reading pleasure.


Overland Tech and Travel is curated by Jonathan Hanson, co-founder and former co-owner of the Overland Expo. Jonathan segued from a misspent youth almost directly into a misspent adulthood, cleverly sidestepping any chance of a normal career track or a secure retirement by becoming a freelance writer, working for Outside, National Geographic Adventure, and nearly two dozen other publications. He co-founded Overland Journal in 2007 and was its executive editor until 2011, when he left and sold his shares in the company. His travels encompass explorations on land and sea on six continents, by foot, bicycle, sea kayak, motorcycle, and four-wheel-drive vehicle. He has published a dozen books, several with his wife, Roseann Hanson, gaining several obscure non-cash awards along the way, and is the co-author of the fourth edition of Tom Sheppard's overlanding bible, the Vehicle-dependent Expedition Guide.