
Overland Tech and Travel
Advice from the world's
most experienced overlanders
tests, reviews, opinion, and more
Essential overland kit? The Suri sustainable sonic toothbrush.
Okay, okay. I know oral hygiene is on the “lite” side of subjects for an overlanding column, but bear with me.
For years and years I resisted electric toothbrushes. My only experience with them was an early model that did nothing but wiggle back and forth, which I felt perfectly capable of doing on my own. But a few years back, a friend gave me a modern unit (he had got two on a deal), and I realized that the newer technology really did seem to clean better than a manual brush (several independent studies bear this out). I was more or less sold.
Why more or less? I still didn’t like all the extra plastic and electrics, and to my horror, when the battery died on that first one I discovered it wasn’t replaceable. A kit on Amazon promised a fix, but after disassembling the unit and trying some extremely precise de- and re-soldering, I gave up. The hygiene angle kept me a customer, but reluctantly.
The other issue involved taking the thing camping. The electric brush was bulky, and of course was yet another item that needed recharging off an inverter. And I was reluctant to use the thing when we were camped too near others, expecting snickering.
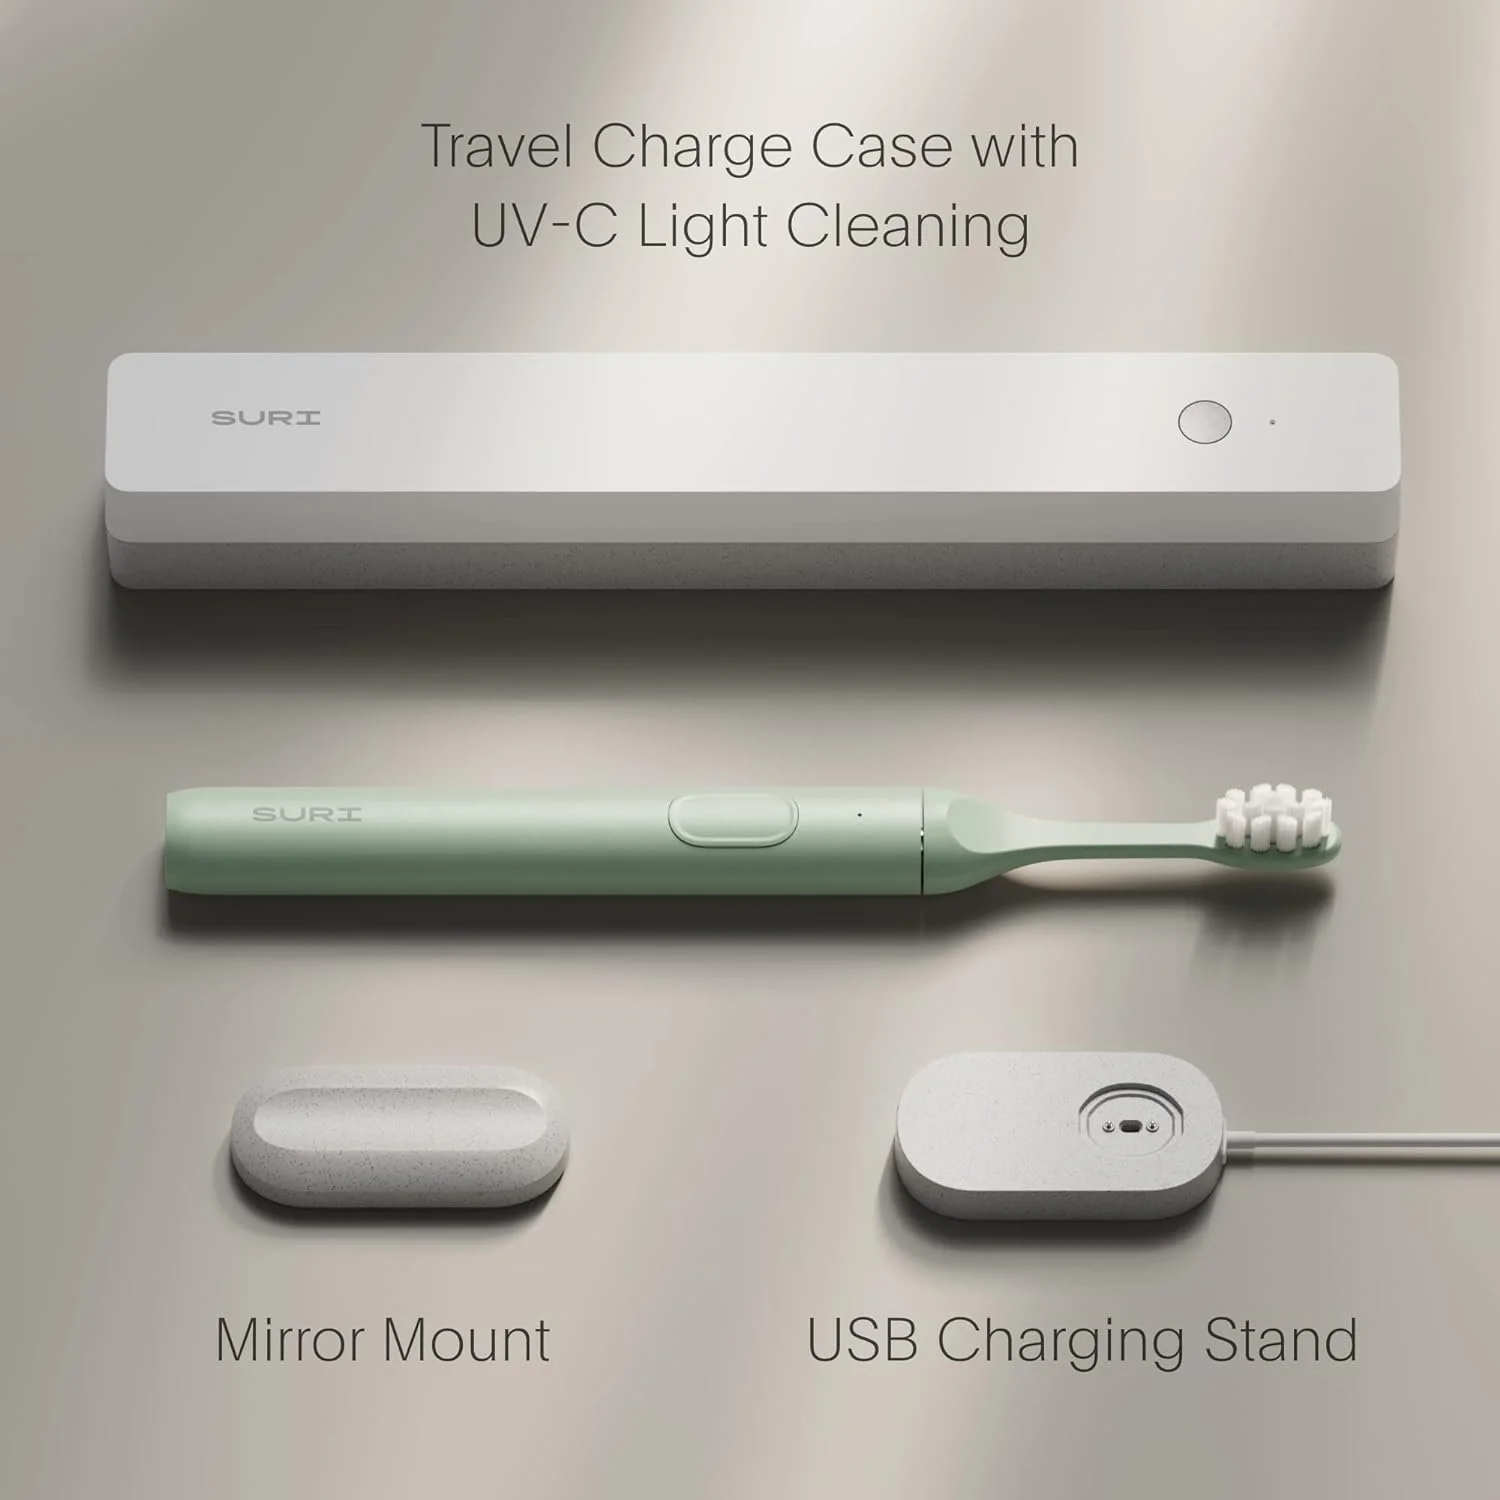
That’s changed with, of all things, a link on Instagram, a pitch for a “sustainable sonic toothbrush” called Suri. The website showed an extremely compact brush with an aluminum body, and, more importantly, a factory-replaceable battery. How about those disposable brush heads, of which, the company says, over four billion are discarded worldwide each year? The Suri’s plant-based plastic heads are not only recyclable, the company includes a postage-paid envelope to send them back (suggesting that you save up three or four at a time to save them shipping costs). Finally, the Suri’s recharger is tiny, and uses a USB connector, making recharging much, much easier on the road.
Done. Ordered.
I wondered if the Suri’s compact design would mean its smaller motor wouldn’t clean as well as our regular brush, but to my (our) surprise found it at least as good if not better. I’d originally thought it might be just a traveling brush (it claims a 40-day battery life; if it’s half that I’d still be impressed), but it’s taken over as our main unit. I’m planning to buy another for our place in Fairbanks. (The unit comes with a clever stick-on magnetic holder that adheres to the inside of your medicine cabinet.)
So there you have it: my slavish endorsement of . . . a toothbrush. I’m happy to support a company that seems genuinely to be trying to reduce its impact on the planet.
Suri is here.

Get one while you can: The REI Trailgate
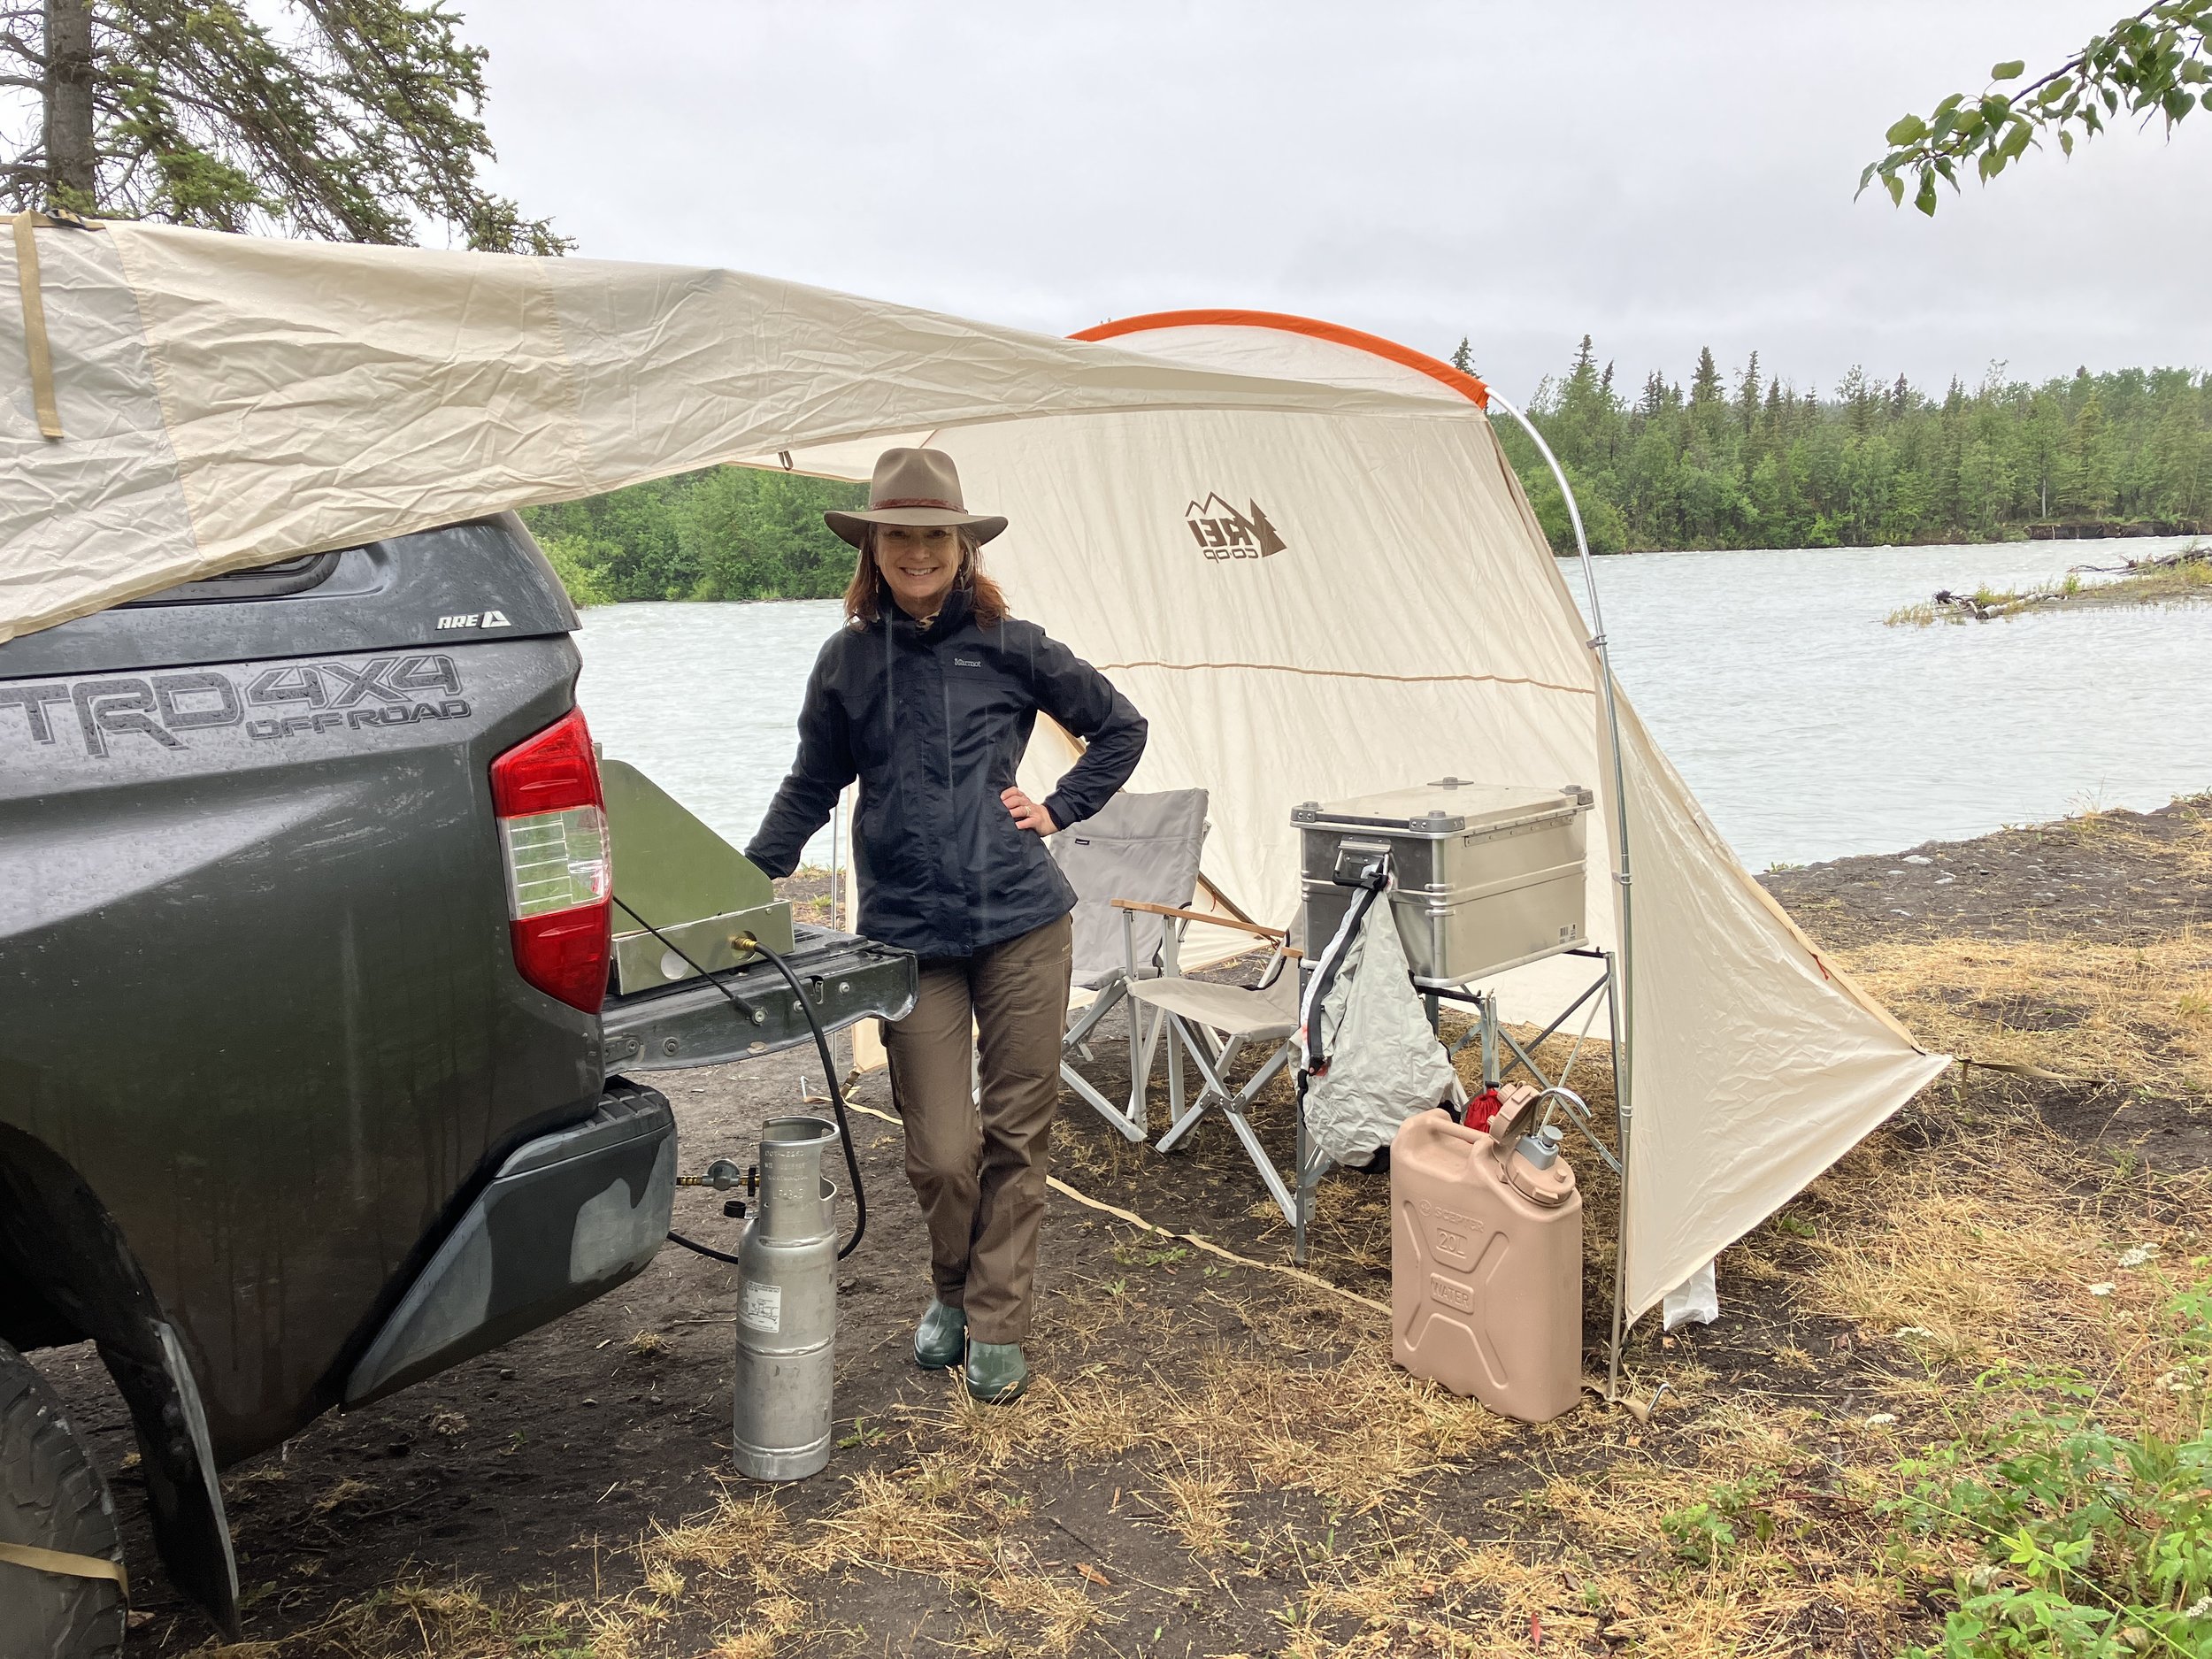
Last year Roseann drove our inherited RAV4 up through Idaho and into Montana and Wyoming to speak at the Northern Rockies Nature Journaling Conference and then run one of her field arts classes at the historic Spear-O-Wigwam guest ranch in the Bighorn Mountains. To provide shelter from sun and rain while camping she bought a “Trailgate” vehicle shelter from REI. Not only did it serve her well, it survived a direct hit from a very large section of a tree during a windstorm, winding up only slightly cock-eyed. She came back completely sold on the product, and we brought a second one to Alaska to use with our Tundra. After two trips with it up here, I’m sold as well—and I just read it is being discontinued and is on sale at REI for a pittance: $104.
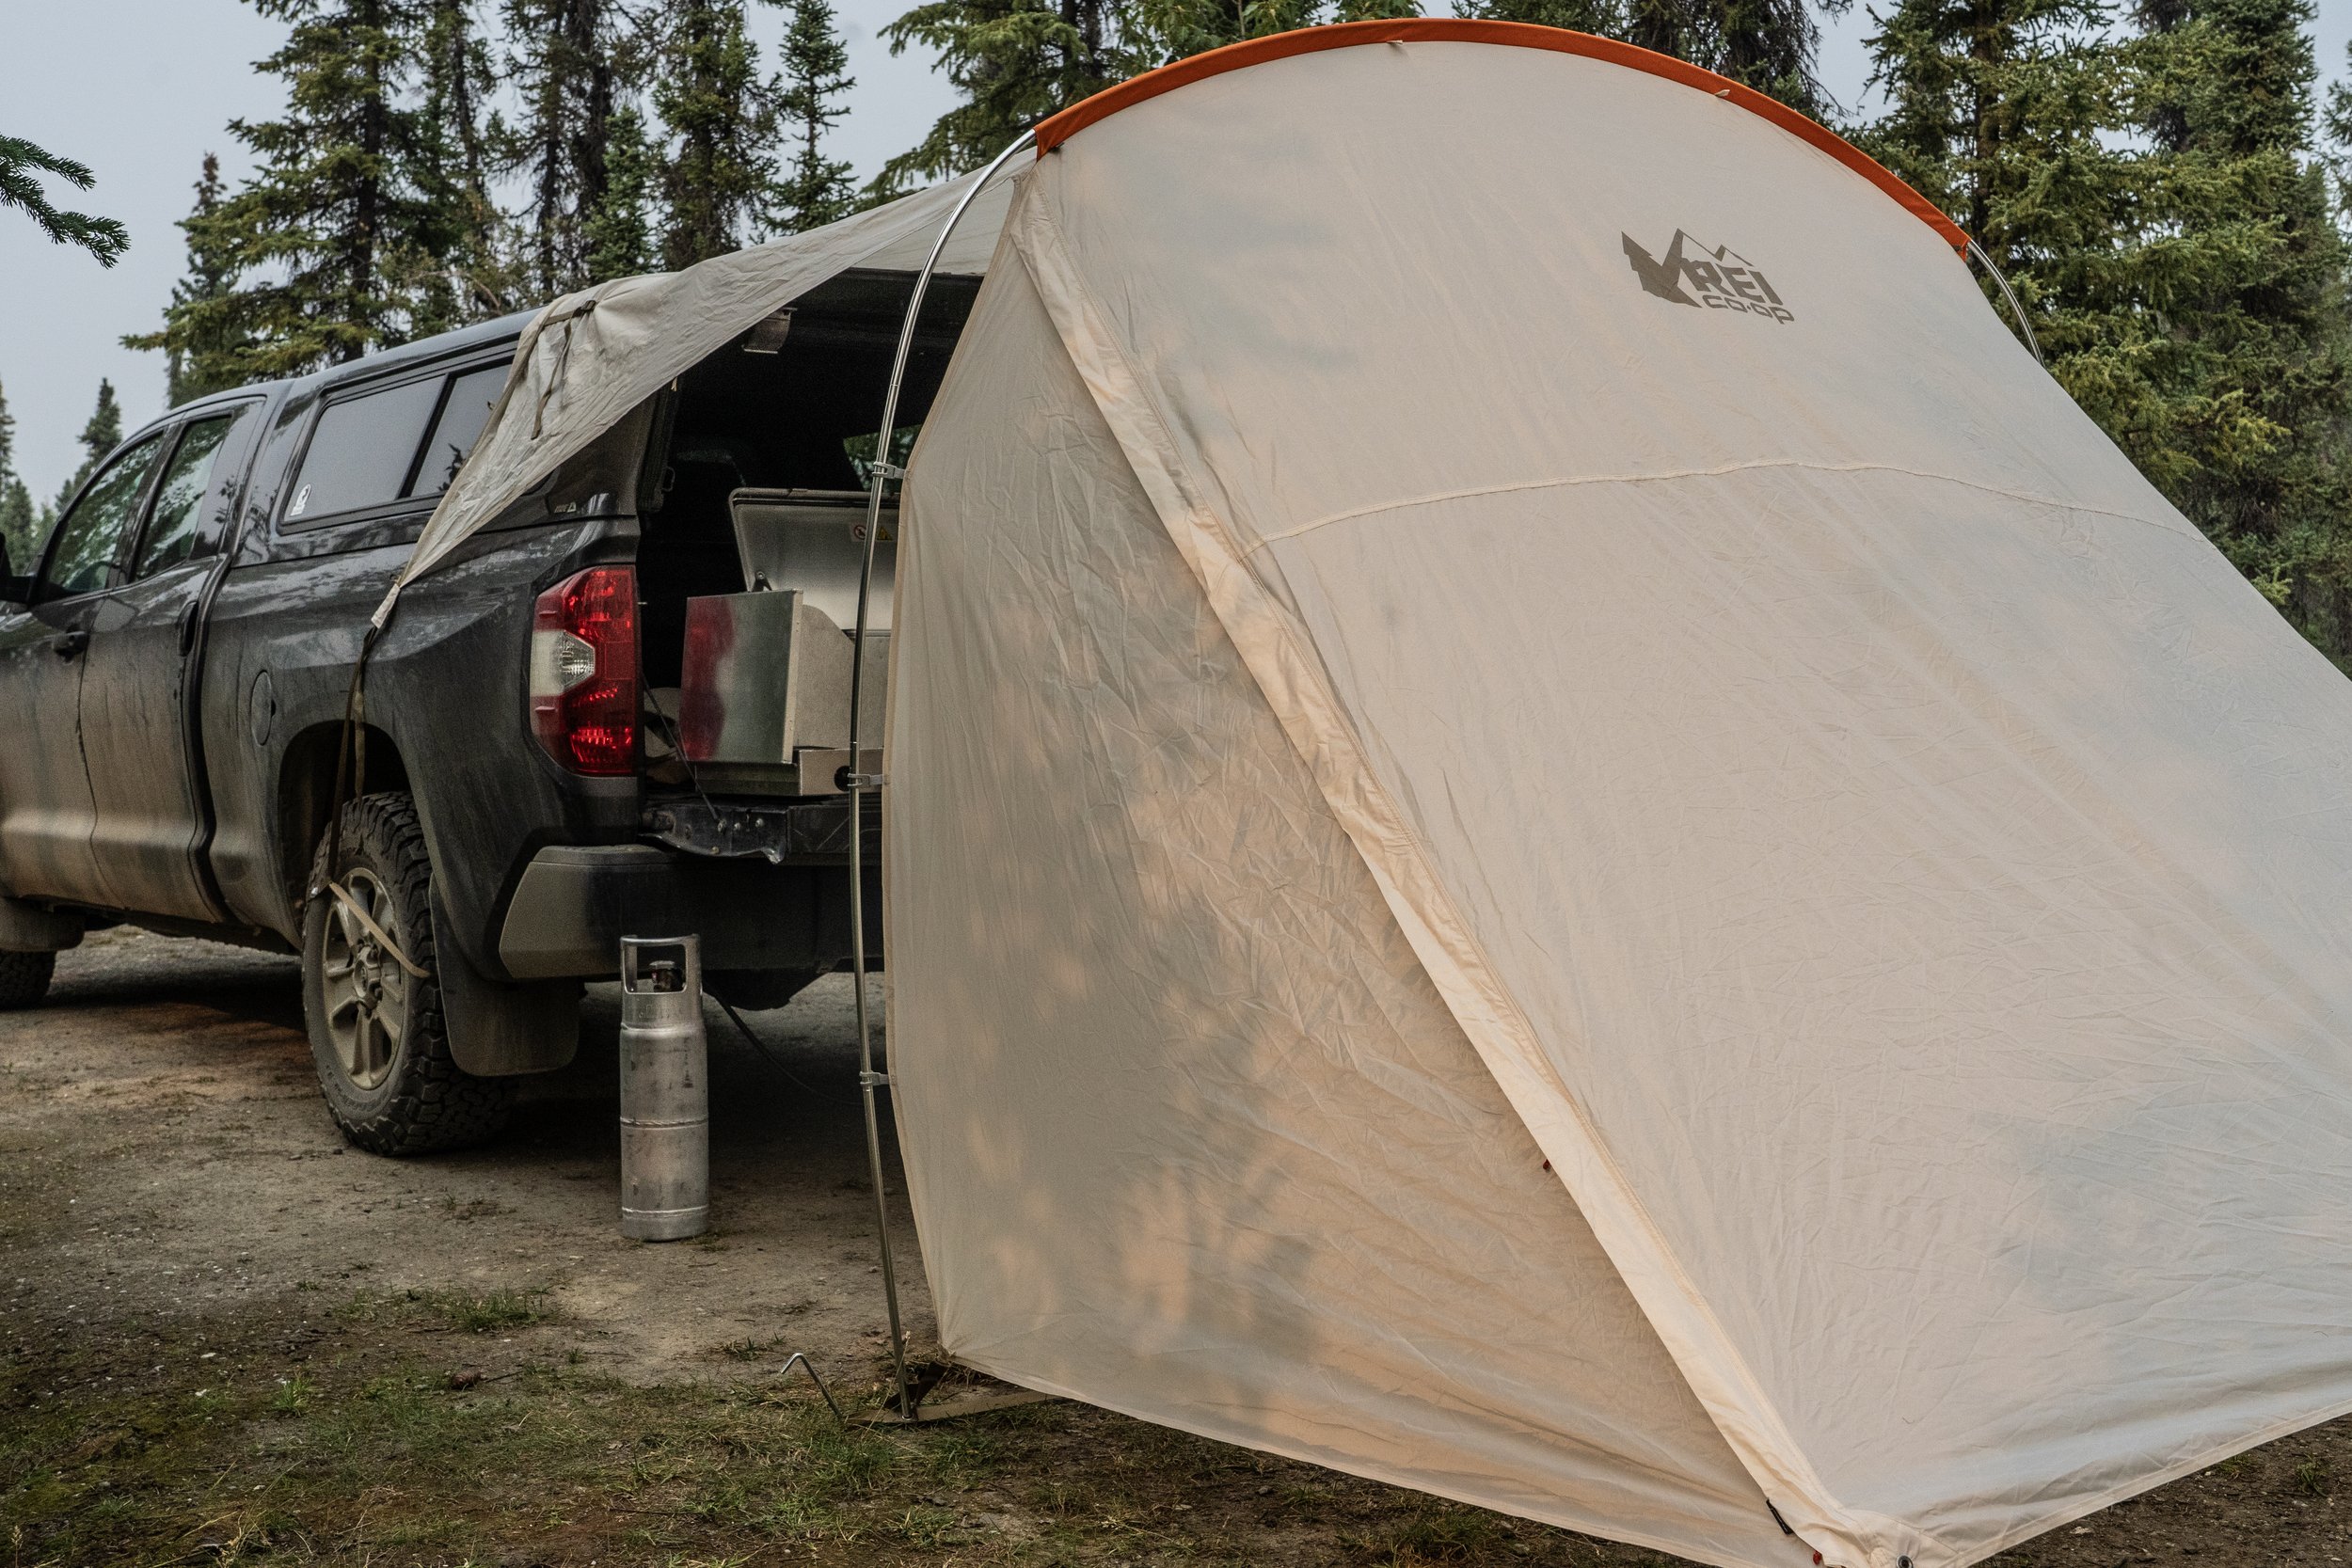
The Trailgate uses a single tensioned aluminum pole of substantial 12.8mm diameter. It can be anchored in calm donditions with just two takes at the back, in addition to the straps that connect it to the vehicle via the wheels—either wrapped around the rear tires or threaded through the wheels. (You could also simply stake the ends to the ground alongside the vehicle.) The fabric is UV-resistant polyester, and the total covered area is about 100 square feet. With a tailgate kitchen and chairs placed under the arch of the canopy, we had plenty of room to cook, eat, and relax while staying out of a drizzle camped next to the Klutina River. The canopy drained perfectly. If you don’t need full coverage, the back panel can be unzipped and rolled up.
We found that the Trailgate fit the full-size Tundra better than it did the RAV4, although it was perfectly functional on the smaller vehicle. If you’re in the market for a shelter of this type, grab one while you can.
REI is here.
White Duck's Regatta bell tent—affordable, roomy, and stylish too
Although I have tested and used—and enjoyed—many models and styles of roof tent, I strongly prefer ground tents for overland travel.
Why? Several reasons. First is roominess. Even the biggest roof tent is no more spacious than a large backpacking tent, while the ground tents I like have standing headroom and space for full-size cots (which allow luggage to be stored underneath) plus a table and, depending on the floor size, chairs. You can cook inside if needed, so if inclement weather—say blowing rain—keeps you cooped up for a day or more, you can still function, and even enjoy yourself. Sure, a roof tent can be augmented with a “mullet,” as a friend refers to them—a ground extension with standing room—but they’re still cramped for anything but changing clothes.
Second is weight. The lightest roof tent we ever owned was a clamshell carbon-fiber model from Autohome. At the time (2008) it cost almost $4,000 dollars; it was a . . . cozy . . . fit for two, and yet it still weighed 90 pounds—in addition, of course to the weight of the roof rack needed to support it. Most roof tents weigh far more. Yet the heaviest ground tent I’ve owned, a ten-foot by ten-foot Springbar Traveler, weighed 72 pounds total, and the tent in question today weighs 51 pounds.
Ah, you say, but one doesn’t have to deal with the weight of the roof tent each time it’s deployed. Quite true and a fair argument, but it brings up my next point: weight placement. A roof tent’s weight is carried in the worst possible place, atop the vehicle, where it (and its roof rack support) significantly affects the vehicle’s center of gravity. The total can effortlessly exceed 200 pounds, even if you don’t add the de rigueur jerry cans. I remember on a trip Roseann and I helped lead along the Continental Divide, one very newly restored FJ60 was equipped with a roof tent, and a rack that proved to have seriously flawed gutter-mounted brackets, which began self-destructing on the first day. Eventually it got so bad we removed the entire rack and tent and strapped it down to the massive contractor’s rack atop our support truck. At the end of the first day without the rack and tent, the owner came up to me and said, “Wow, it sure handles better without that weight up there.” And this is not to mention the significant aerodynamic drag added by a rack and tent. Again, a roof-tent fan can legitimately argue for the space saved inside the vehicle, but the cost is steep.
Finally there’s the actual price. The most expensive ground tent we’ve owned was that U.S.-made Springbar, which currently retails for $1,400. A high-quality roof tent is easily double that or more. The savings is more than enough to add cots and very nice sleeping bags—probably the table and chairs as well.
I could mention other issues with roof tents—the hassle of midnight pee breaks, the boat-in-a-storm feel rocking back and forth in a high wind atop a base equipped with springs. But for now I’ll rest my case.
Favorite ground tents in the past include that classic, canvas Springbar Traveler, a clever, stable, and roomy design now so shamelessly copied by Chinese-made pretenders that the company had to introduce its own imported line to compete. (Springbar’s owners endeared themselves to me forever years ago after they sent me a demo unit to review and, when I called to arrange shipping it back, asked me to donate it to a local Scout group instead.) I also like the Black Pine Turbo Tent with its integrated, jointed poles that allow pitching of the frame and canopy in a couple of minutes (although the fly is separate). And I have a soft spot for the Australian OzTent and its 30-second deployment, although the stowed tent is too long to fit inside most vehicles.
I’ve just added a new one to that favorites list: the White Duck Regatta bell tent.

I’ve long been intrigued by the bell tent design—as contrasted to a square wall tent—for a few reasons. The shape is more naturally aerodynamic than a flat-sided tent, and it doesn’t matter if the wind changes direction. The central pole is under nothing but compression stress, which renders it virtually immune to bending or breakage. The conical roof effectively sheds rain and snow. And with proper peak venting condensation should be minimal.
So when Matt Glass, a longtime industry representative, contacted me with the offer of the White Duck Regatta, I jumped at the chance. Since Roseann and I were planning a recce trip up Alaska’s Dalton highway, we’d have a perfect opportunity to put it to use. We chose the ten-foot model as a reasonable compromise between space and weight/bulk. Total weight of the ten-foot version is 51 pounds in its canvas duffel, but removing the pole bag and stake bag first makes it much easier to handle. The Regatta is also available in 8, 13, 16, and 20-foot diameters.
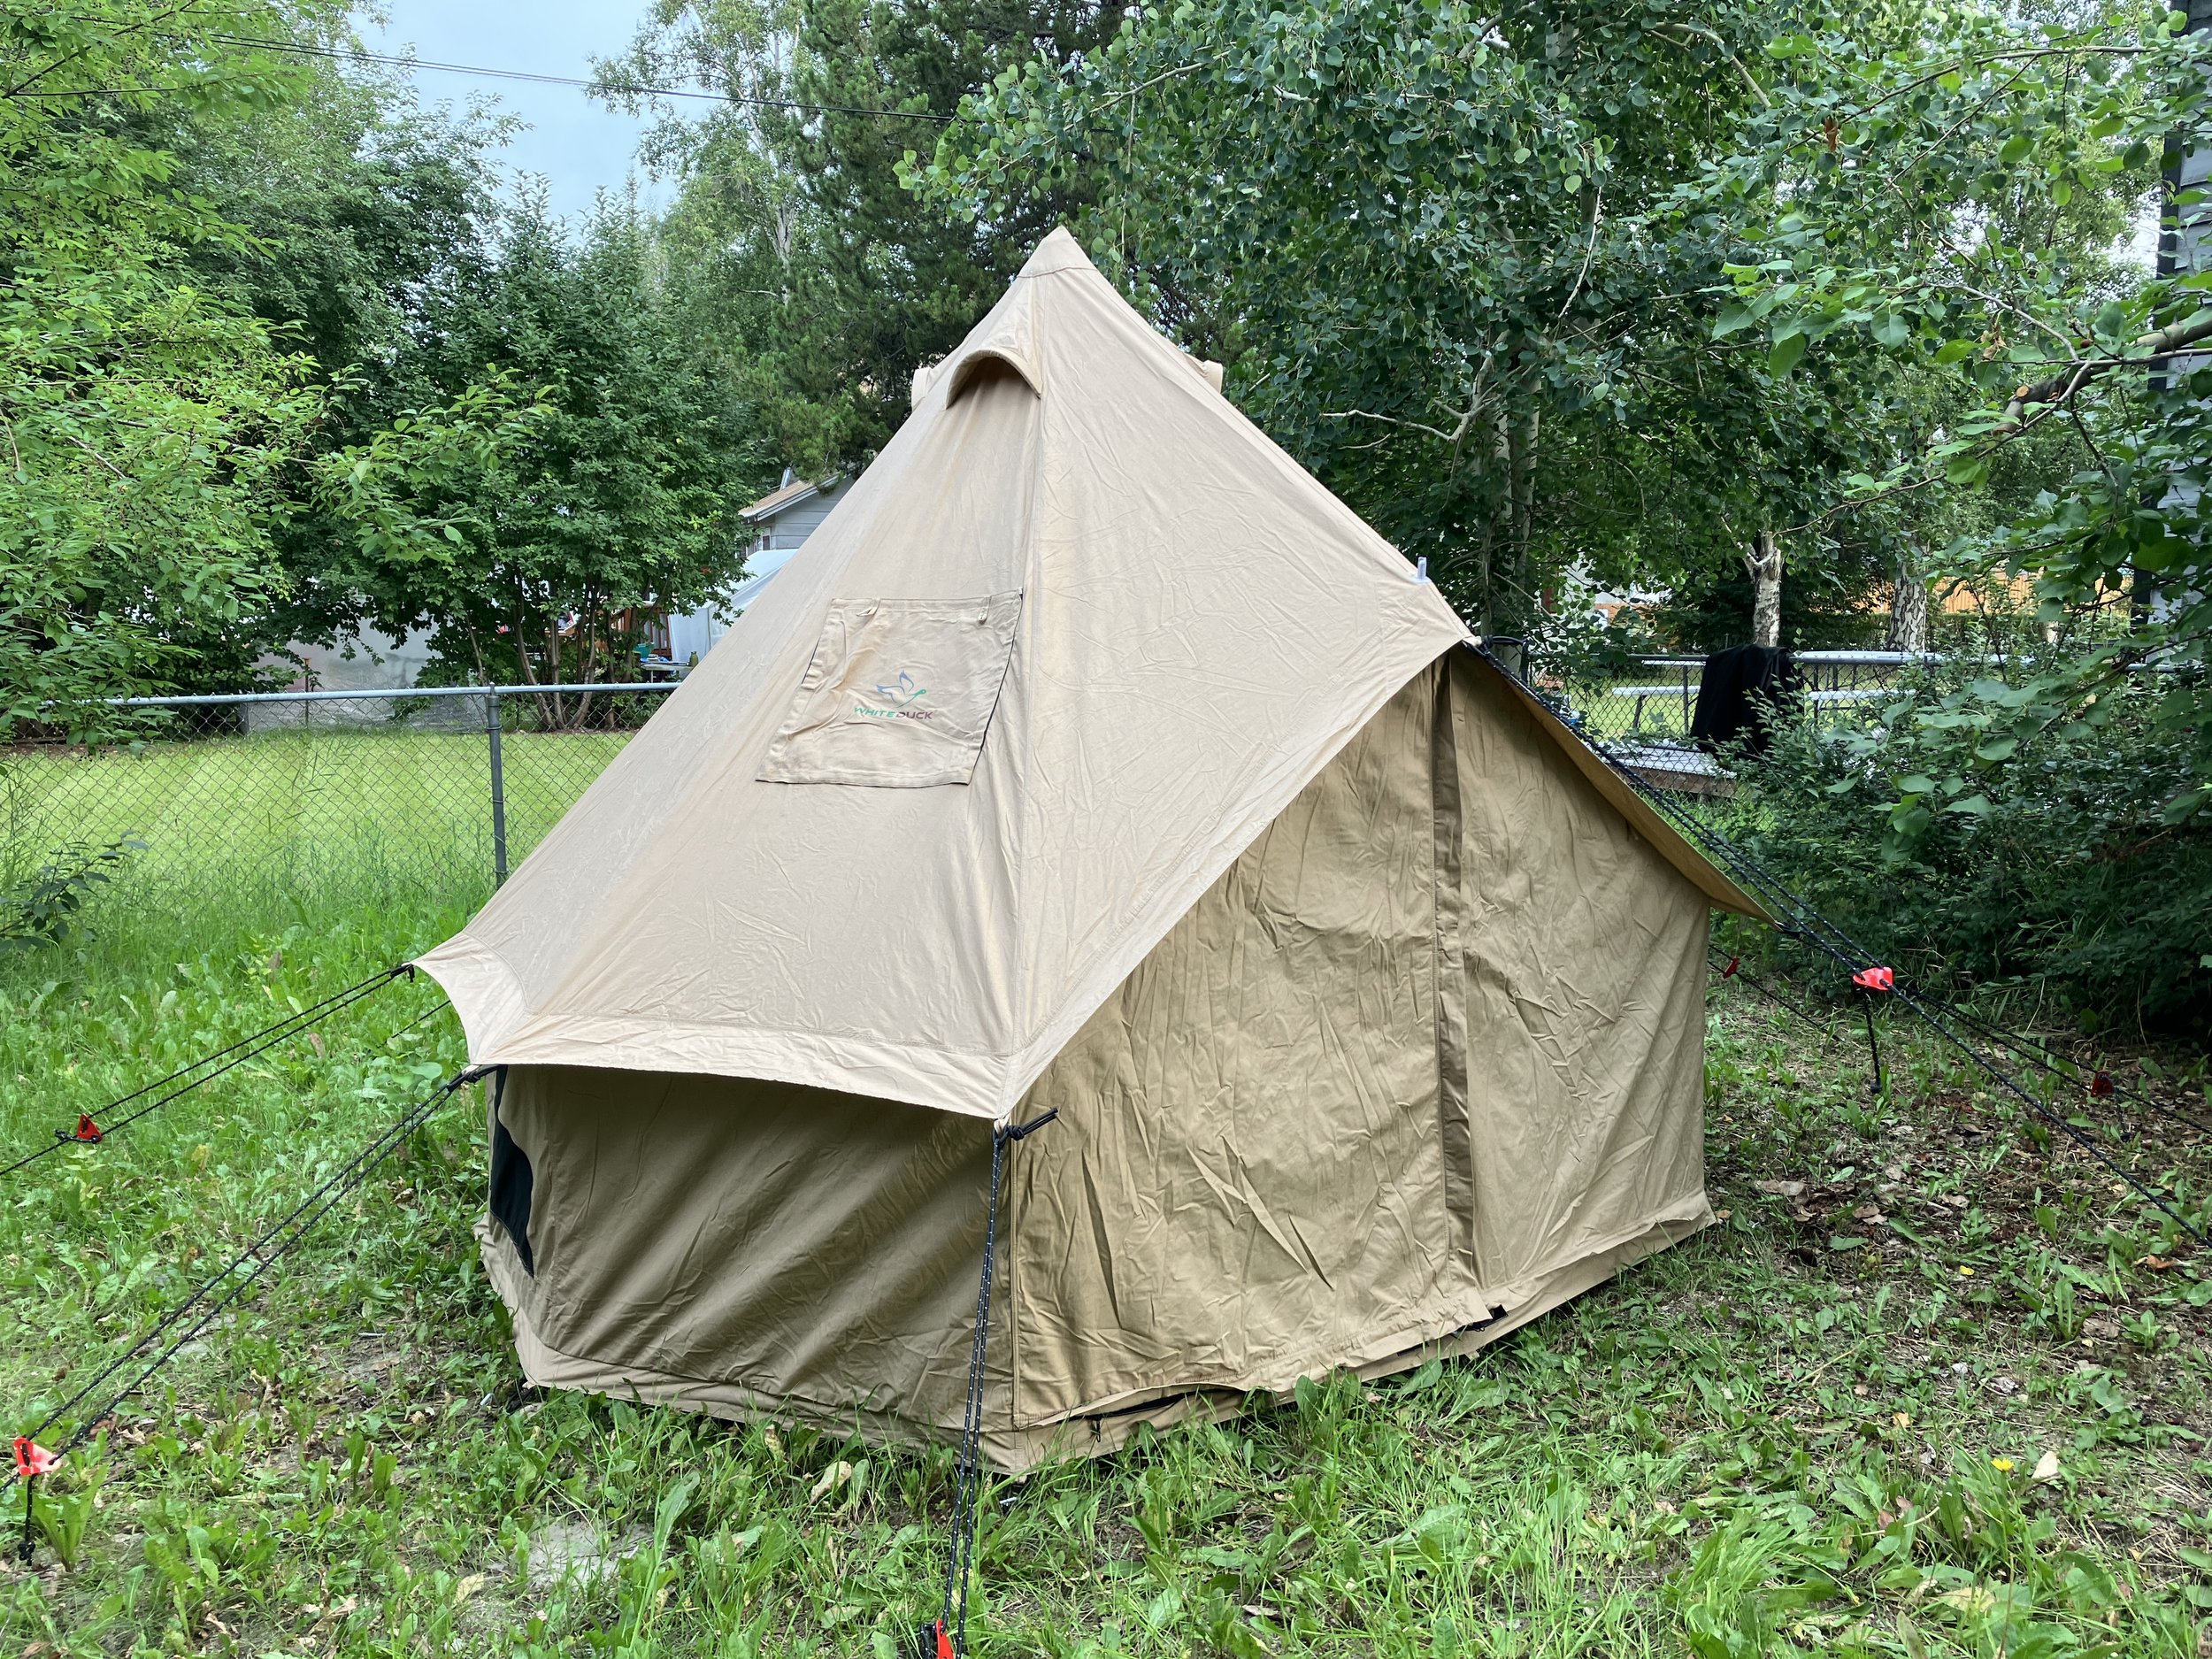
First trial pitch took 20 minutes. Note flap over stove jack, and peak vents.
The Regatta tents are all made from single-walled 8.5-ounce cotton duck, UV-treated canvas, in your choice of three earth-toned colors. This material sheds moisture the old-fashioned way: The fibers swell when wet and effectively block water penetrating. Thus no fly is needed, reducing weight and complexity. Cotton canvas, being heavier per unit area than nylon or polyester, is also more naturally resistant to flapping, yet without the fly it also creates a brighter interior. The Regatta incorporates a heat-proof stove jack for winter camping. The floor is sewn-in polyethylene—tough, completely waterproof, and easily cleanable with a sponge.
The center pole of the Regatta is a massive 1.5 inches in diameter—neither you nor the weather gods will bend this thing. It incorporates a steel loop near the top for hanging a lantern. The single door pole is an inch in diameter. I was overjoyed to see the tent’s outside perimeter stakes were J-shaped rebar—heavy but indestructible. The floor perimeter stakes, which aren’t under significant tension, were lighter round steel pegs which I nevertheless replaced with hardware-store 8-inch nails. The kit even includes a soft-faced no-bounce mallet. (I replaced this too, with a two-pound sledge, partially because the nail heads would have destroyed the face of the included hammer.)
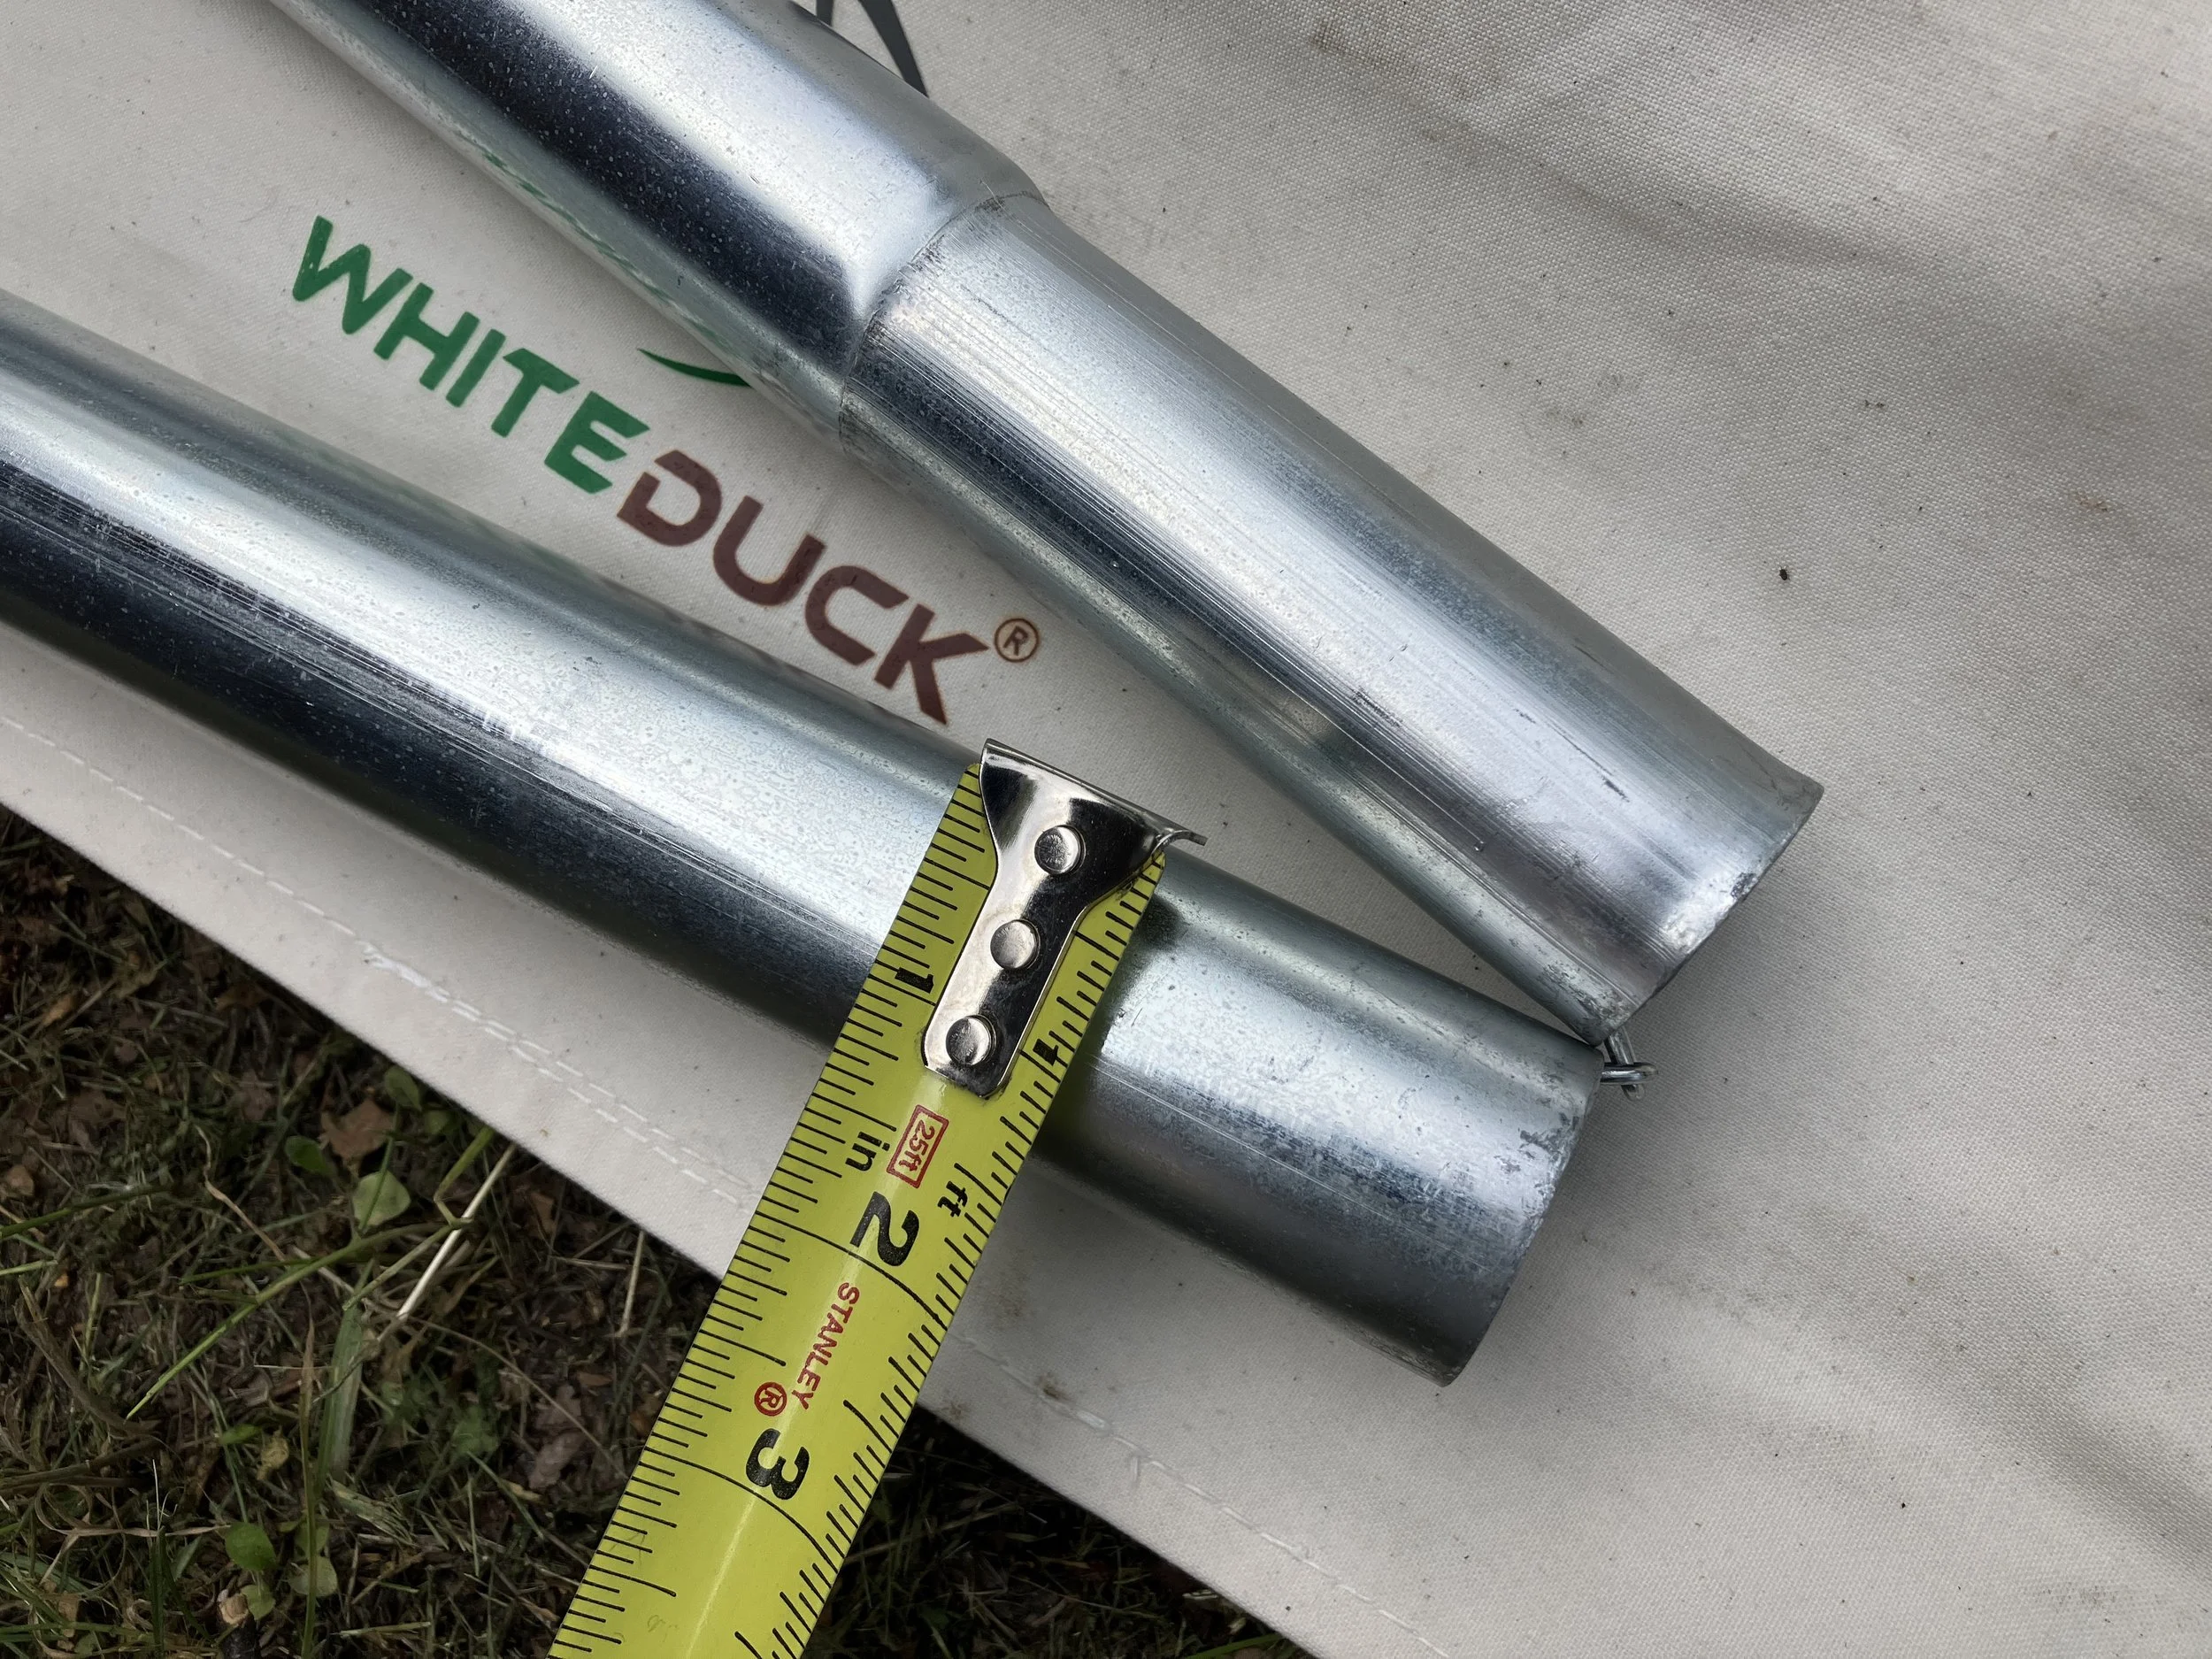
Center pole is 1.5 inches in diameter. The sections are joined by elastic cord, connected by chain at the joints to prevent chafe.
Pitching is simple. Lay out the tent (door closed) and push in the floor’s perimeter pegs, stretching the floor to shape. Open the door, locate from the outside the cone-shaped receptacle in the canopy for the center pole, insert the top of the pole from the outside, then walk in the bottom and set in place. Insert the door pole, then stake out and tension the outside perimeter stakes. My first attempt took no more than 20 minutes; I soon had it down to a bit over 10 without rushing.
Three arched screen windows, the screen door, and three peak vents allow good ventilation and should minimize condensation. There is over seven feet of headroom around the center pole; the walls are 2’7” tall in the ten-foot model.
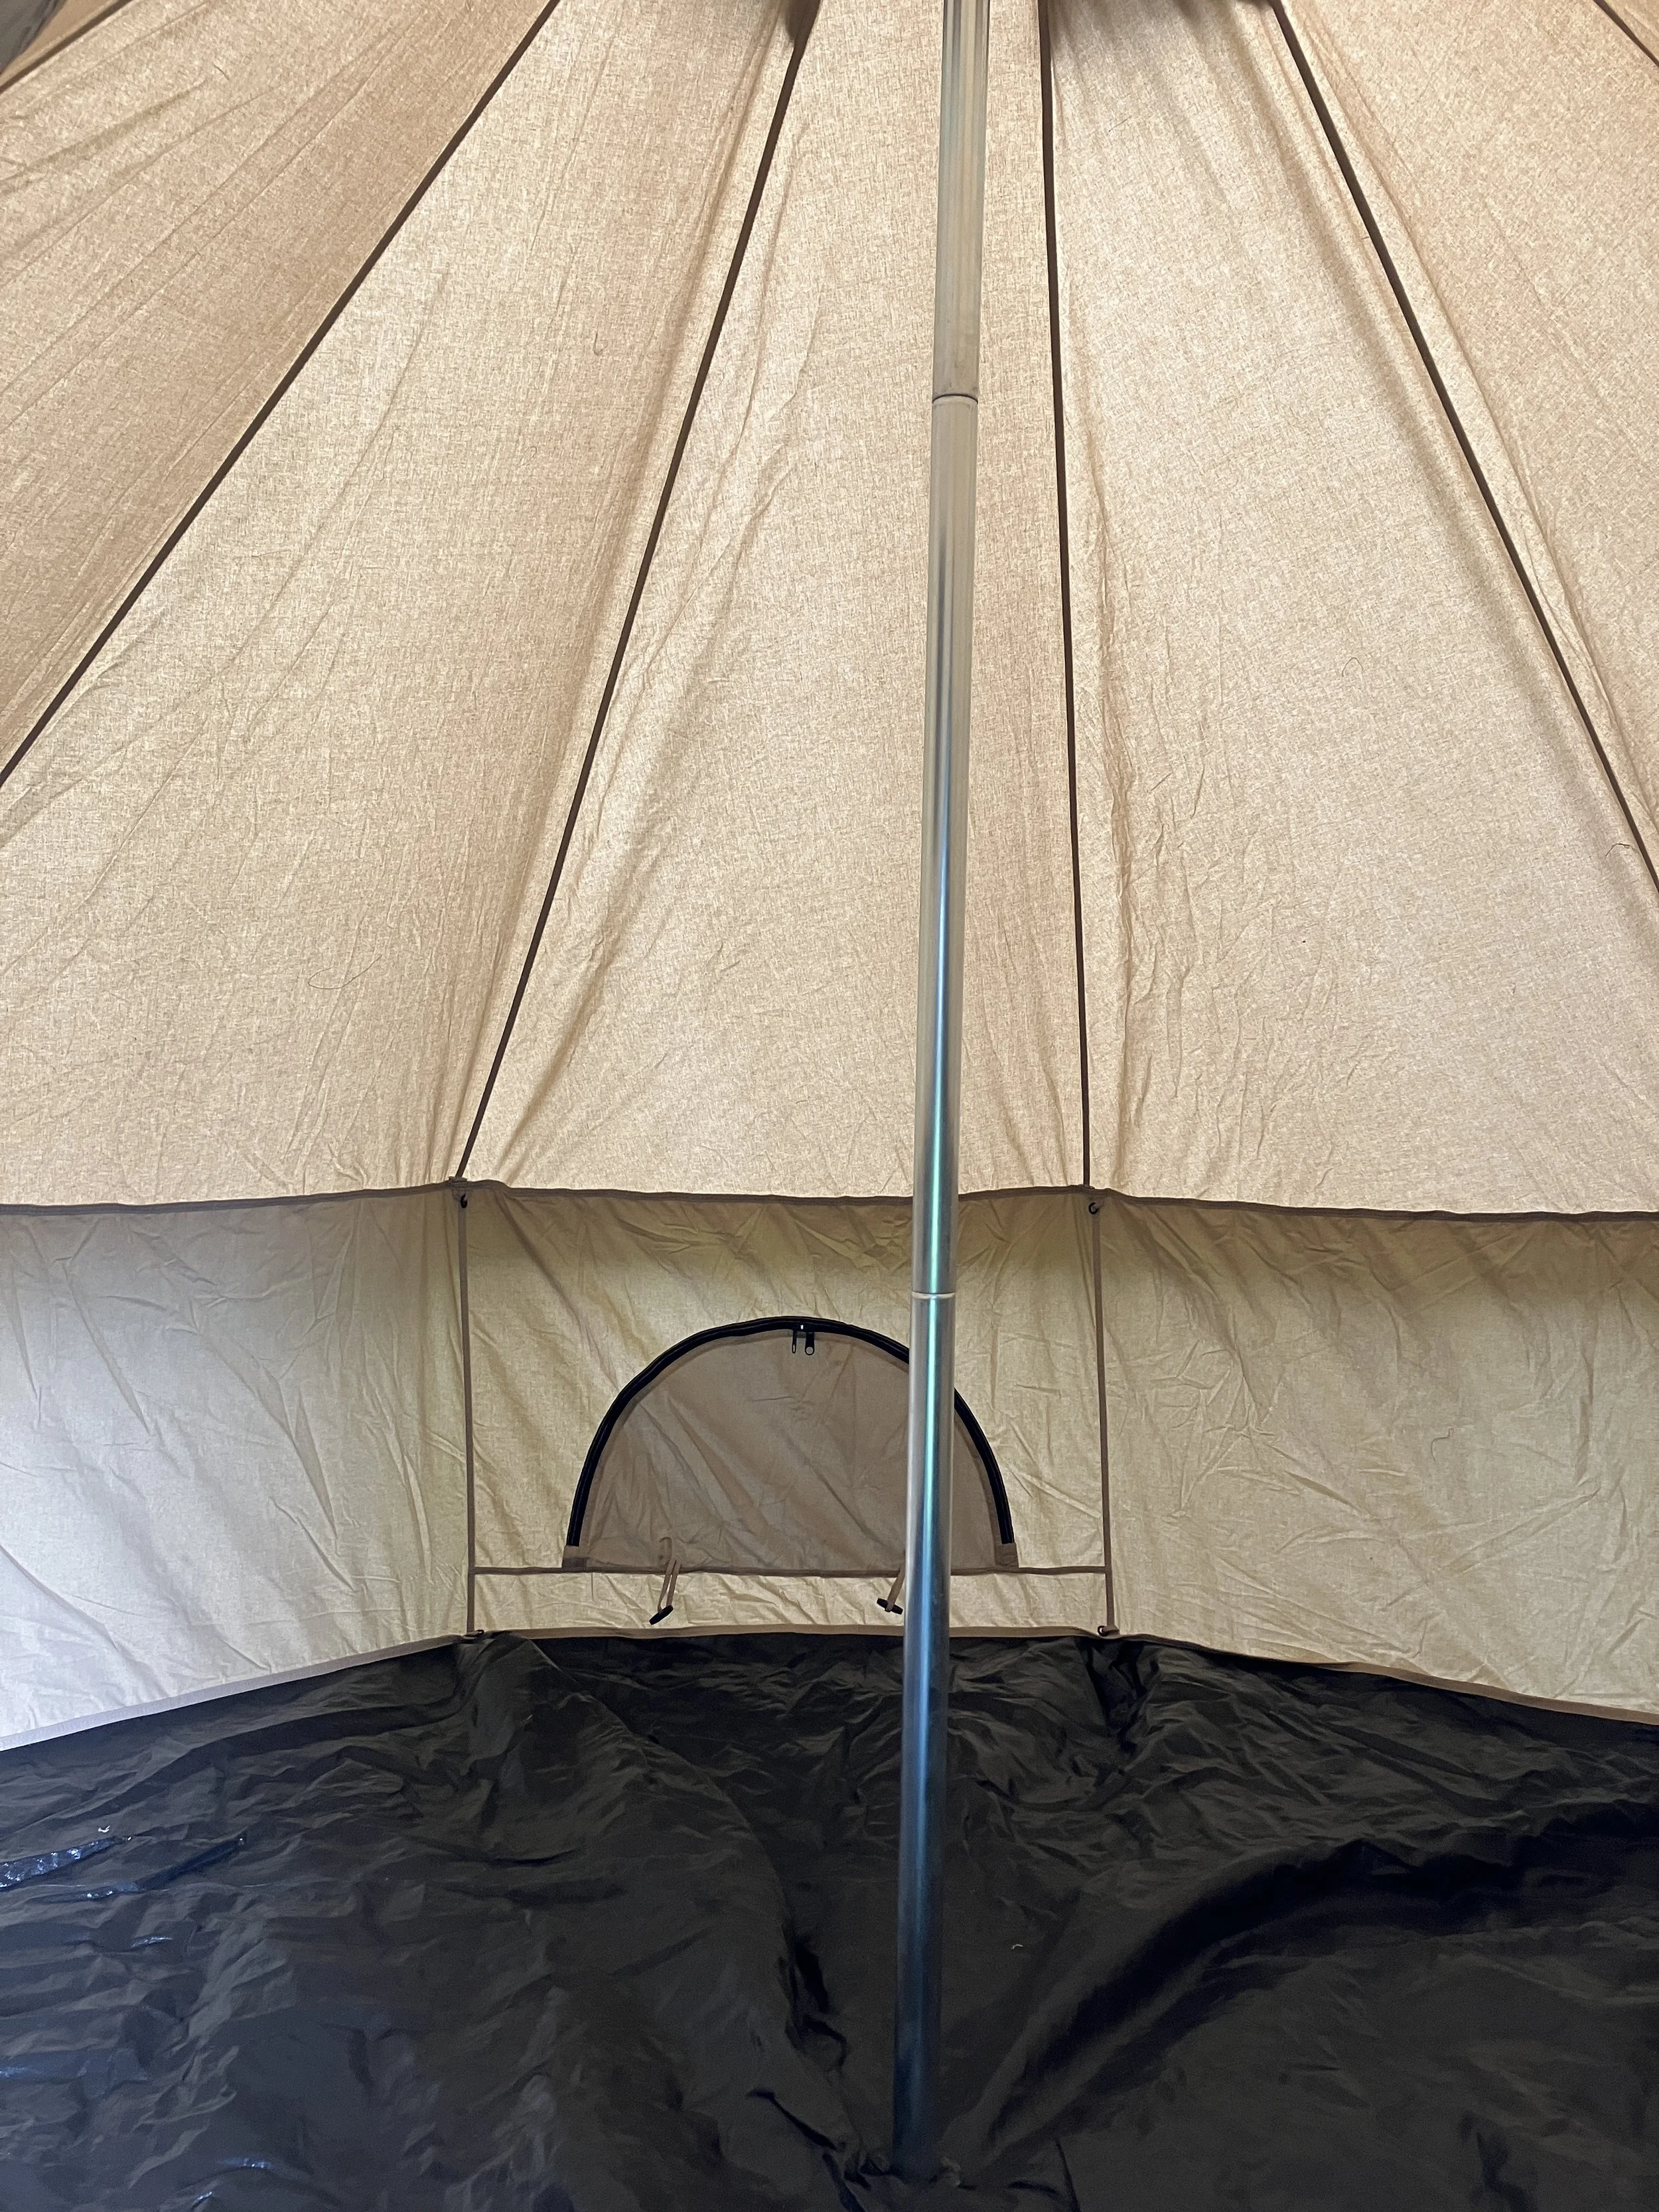
Single-wall design creates a bright interior. Floor is impermeable polyethylene.
One downside of the nonagonal shape of the Regatta is that cots won’t snug up tight against the interior walls, as they do in a wall tent. There’s a space left behind them—which of course you can use for storage. I found the best way to arrange two cots was to angle them in an inverted V toward the back of the tent, heads together. This left plenty of room around the pole and in front. Of course depending on your cots you could fold them away during the day. Or if, God forbid, you are sleeping on the floor like savages, just roll up your bag and pad.
Another downside to the bell tent is that you need about a 20-foot diameter circle to pitch the ten-foot model, to ensure the perimeter stakes are out far enough to pull the walls erect. I’ve mused on hacking this by fabricating individual poles for the wall guy-out points, which would enable staking the perimeter lines much closer. But so far I haven’t had trouble finding a large enough pitching area.
The Regatta performed perfectly on our Dalton excursion. Warm weather meant there were still a few late-season mosquitoes around, but the tent was impregnable. The zippers operate smoothly and more quietly than many other tent zippers of my experience. The canvas door can be tied back for extra ventilation. The optional canvas awning would provide a generous front porch; it’s on my list to obtain, although you could also rig many different tarps to perform the same function, anchored in the middle on the top of the door pole.
The ten-foot Regatta is $700, and I consider it an excellent buy. It’s made in Pakistan.
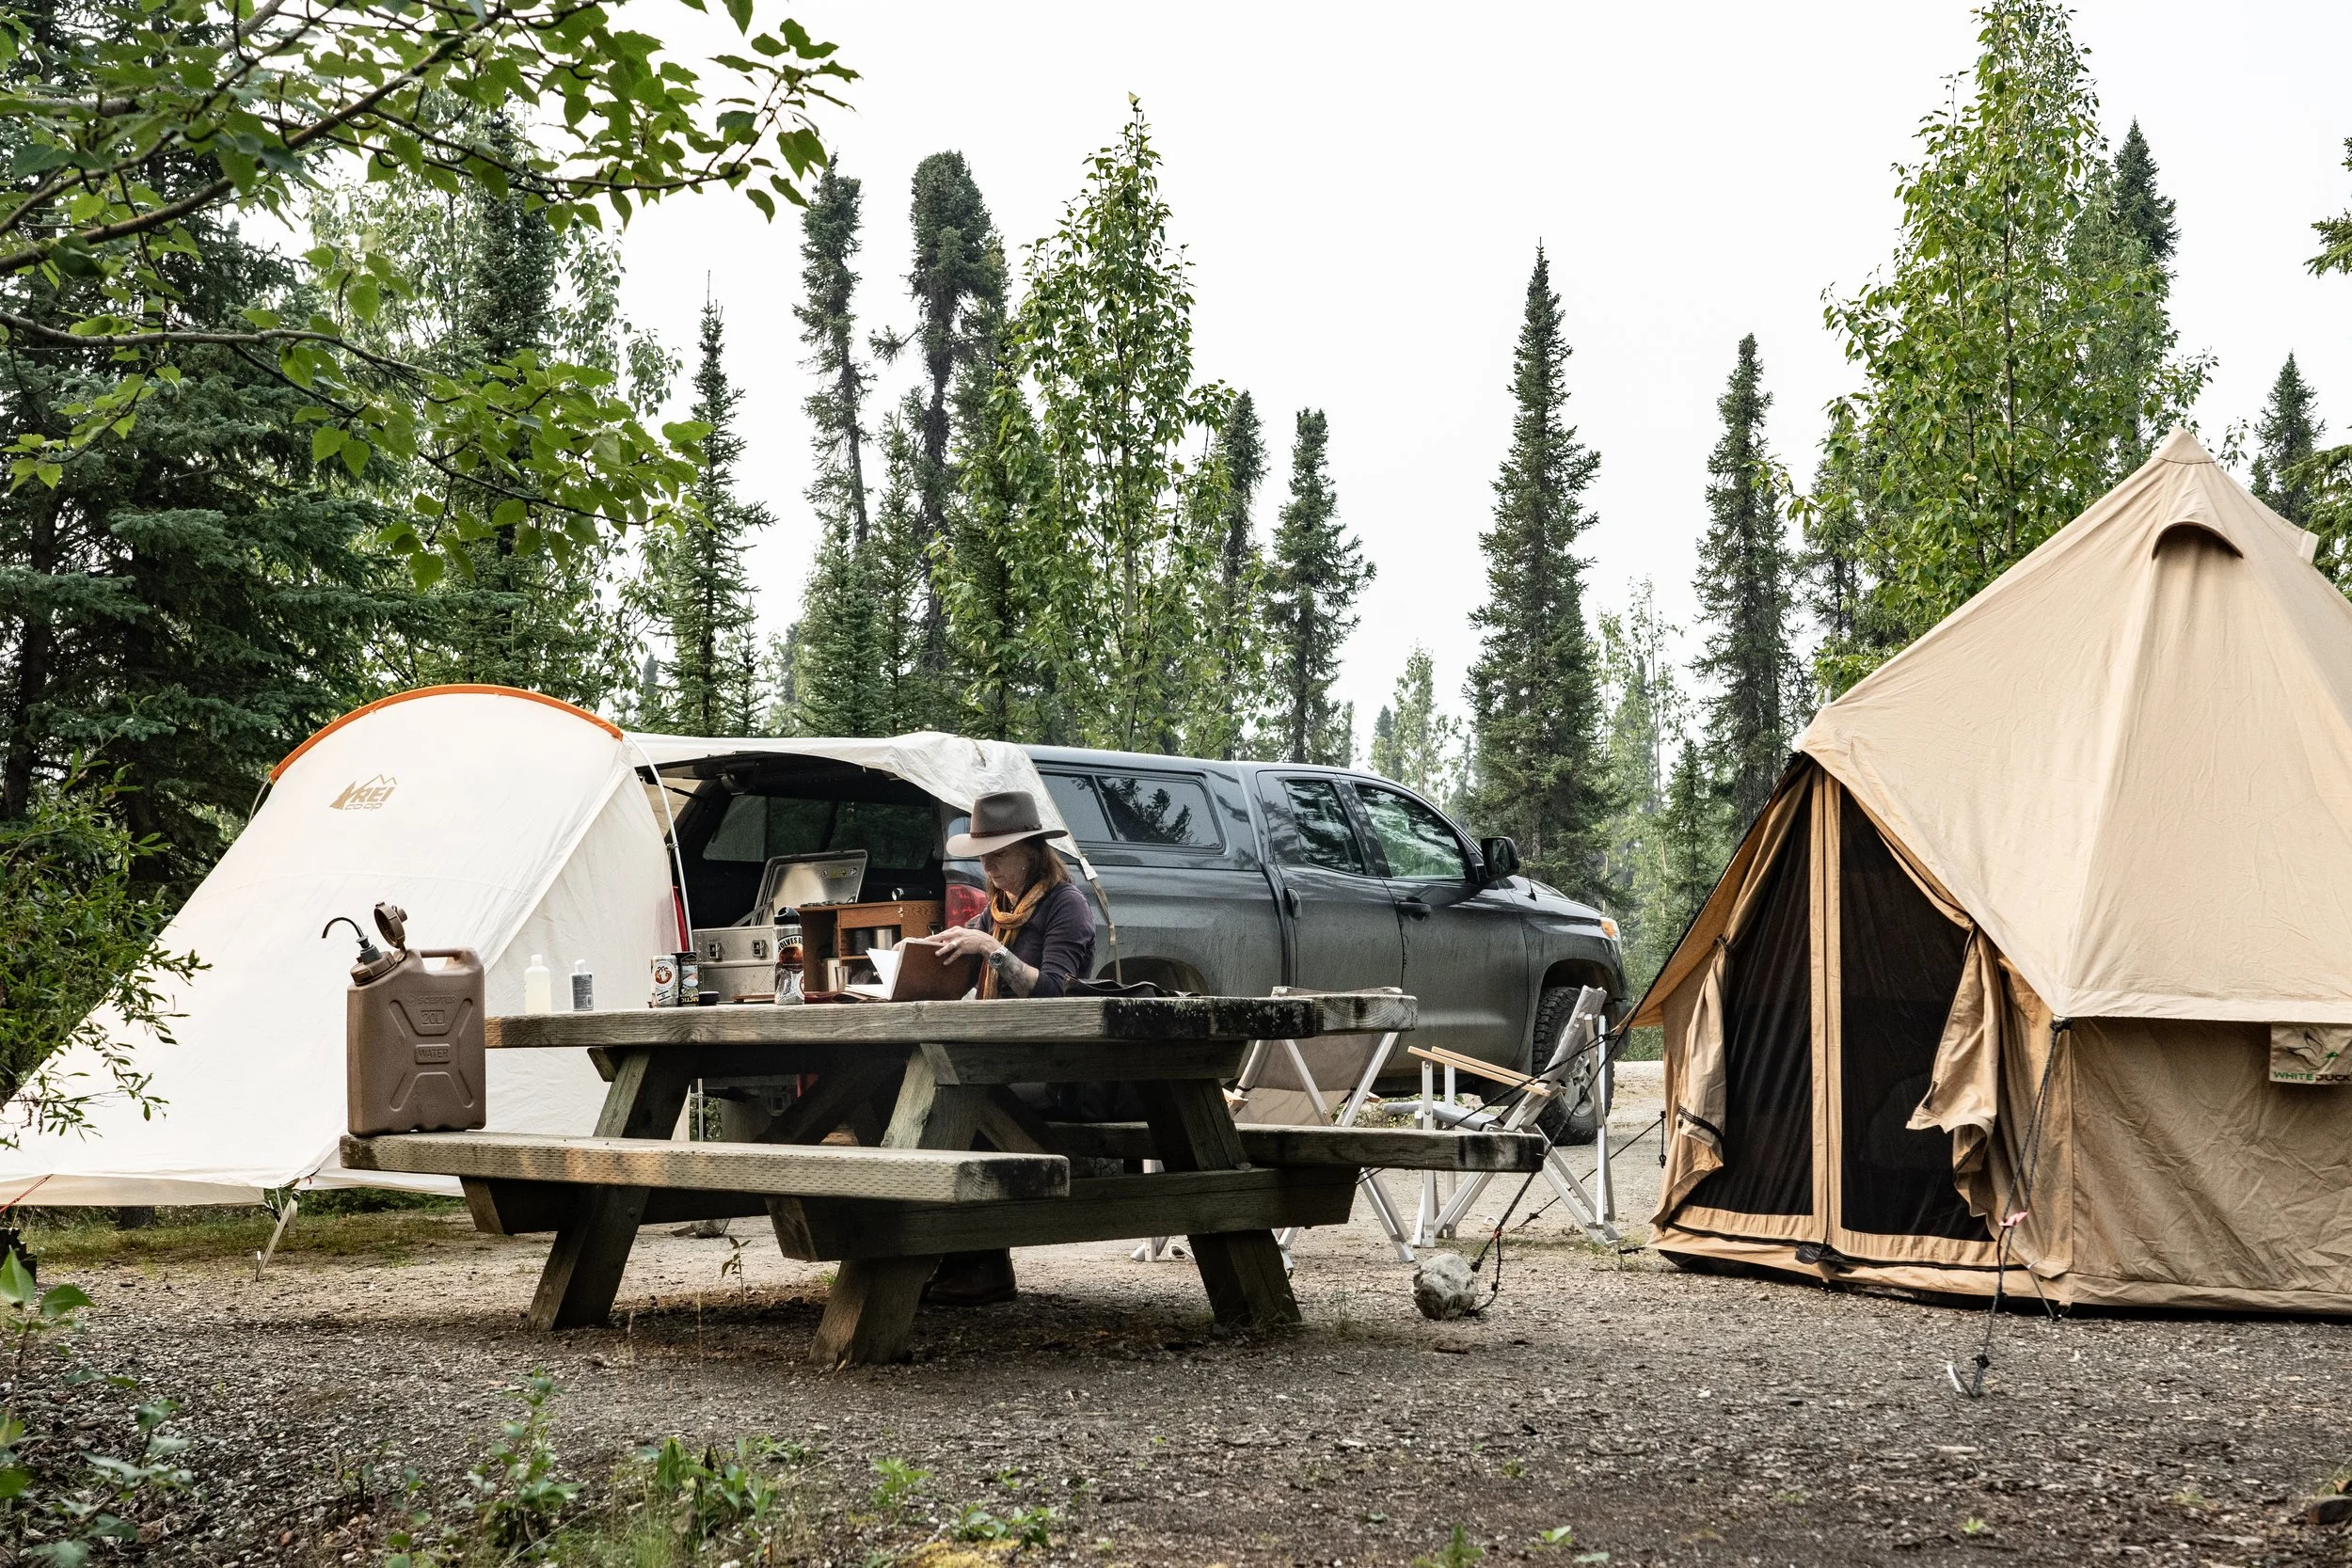
A last note: This tent just looks right at home in the Alaska bush. We stayed at one BLM camp, and I saw two different passers-by walking their dogs point it out to their companions. Nothing wrong with a little style in addition to function.
White Duck offers free shipping to the lower 48 states. They are part of the Better Cotton Initiative (BCI), a global effort to ensure sustainable cotton production. White Duck is here.

Scepter water can/Fynspray pump—the easy way
The New-Zealand-manufactured Fynspray galley pump is the best way to turn a Scepter water can into a convenient and fast dispensing system. The normal procedure, shown on several sites, involves cutting off the base of the larger of the two small sub-caps on the main Scepter screw-on lid, then drilling a one and one-half-inch hole around the remnant hole, which is only about three-quarters of an inch in diameter. You can do this on the lid that came with the can, or on a spare, which is what I did.

If you have a drill press and can secure the cap, this is an easy task. However, if you try to do it with a hand drill and a one and one-half inch hole saw, you won’t have any guide for the hole saw and can wind up really buggering the job. I found an easy work-around.
Instead of cutting off the screw base for the small cap, I left it in place, including its cap. I then used a cheap hole saw with a protruding guide bit, and drilled straight down through the top of the cap. The hole saw is slightly smaller in diameter than the cap, so it will shave off the circumference as you go. However, it will perfectly center the drill bit. If your hole saw is deep enough you can go all the way through. Mine wasn’t quite deep enough, but it scored the cap deeply enough that, by unscrewing and discarding the small cap, it cut the rest of the way through with zero walking. Cut off the unneeded securing ring, and . . . done.


The Fynspray pump works on both the up and down stroke, so it’s very fast. And you can leave the can upright, even secured in a holder if desired. The smaller cap on the lid serves as a vent for full flow.

The Fynspray mod is infinitely better than the insultingly ineffective Scepter hose and nozzle, which requires you to lay the can on its side, and has no provision for venting, so you must constantly tip the can up to relieve the resulting vacuum. Tip: If you’ve already bought the Scepter nozzle, you can repurpose its hose to make the extension for the Fynspray pump.

Fynspray pumps are available at Fawcett Boat Supply, among other places.
The new ARB Earth Camper
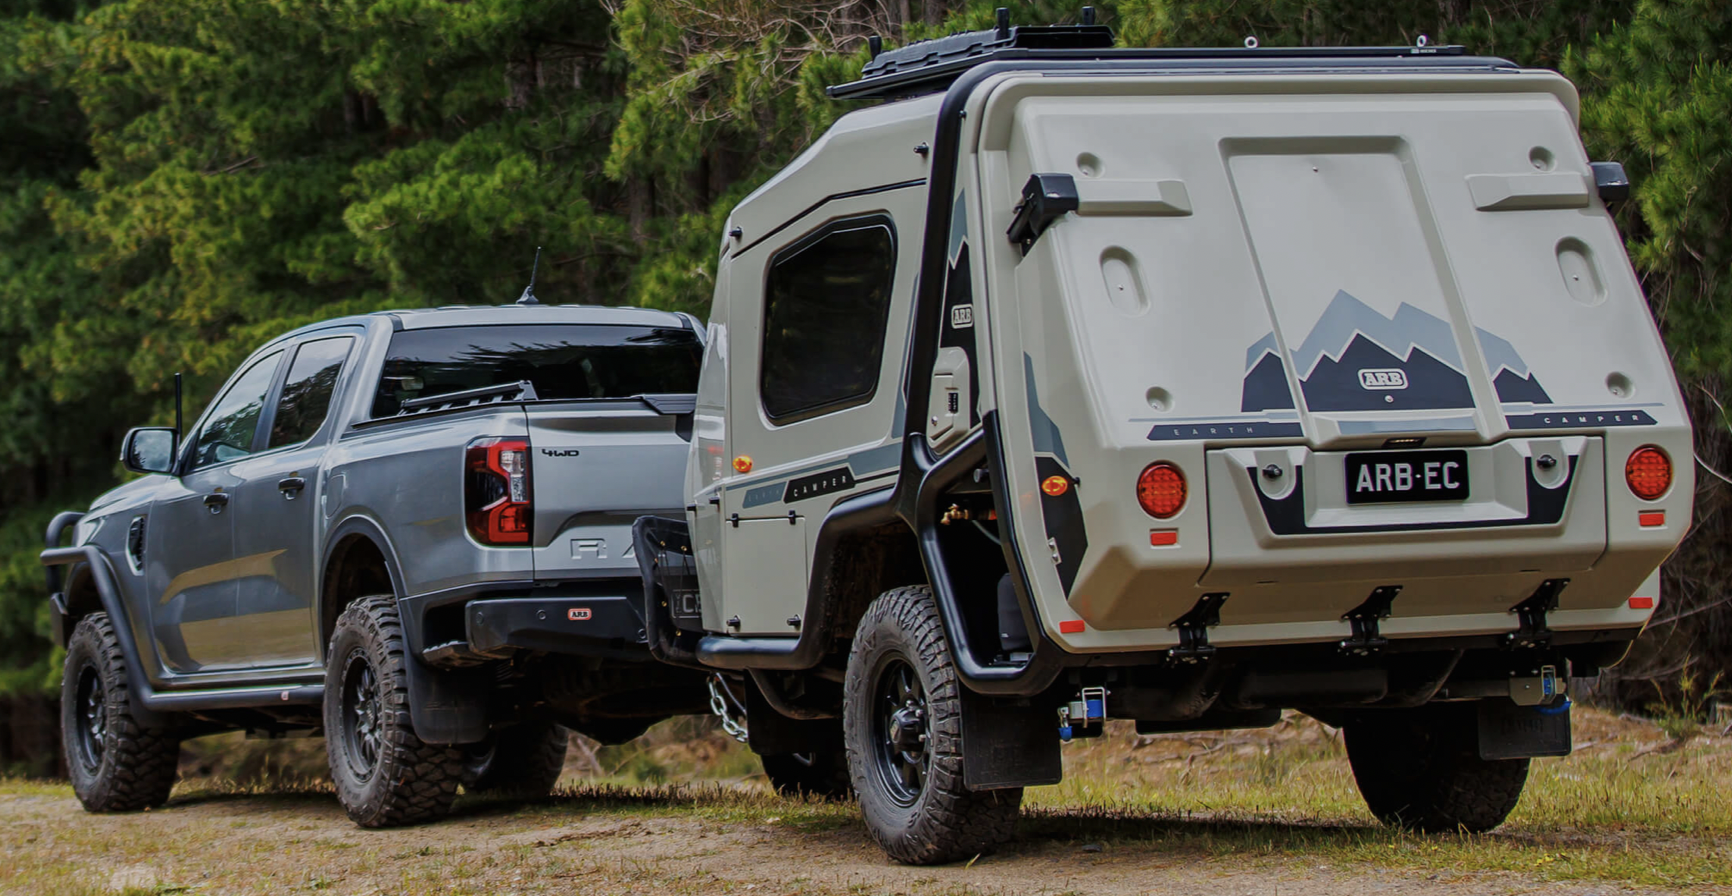
In what is surely a natural progression, ARB has just announced its very own “adventure” trailer, which they’ve named the Earth Camper. At first glance, it seems to live up to the ARB reputation in terms of build quality and innovation.
It’s built around a massive, mandrel-bent and welded tubular chassis, which should provide absolutely flex-free support to the composite body panels. The trailer is supported by long-travel independent suspension employing, of course, Old Man Emu shocks. Electric brakes, alloy wheels (with Toyota lug spacing), and Maxxis all-terrain tires with spare are standard.
The salient feature of the trailer is the enormous clamshell back, which folds down at the push of a button to provide a raised, hard floor. A door then provides access to a queen-size bed. For quick overnight stays you can be tucked away inside a couple minutes. For a full camp, a tent erects around the floor to provide a completely sheltered dressing, sitting, and eating space. A dining table unfolds from the base of the bed area.

On the left side of the trailer is a full-pull-out kitchen, including a 96-liter dual-zone fridge freezer, a three-burner stove, and sink. There’s plenty of storage above and to the side. Internal tanks provide a full 140 liters (36 gallons) of water, and an additional storage nook holds a 20-liter jerry can. That’s more water than most full-size trailers and campers provide. Well done ARB.

Electrical power is provided by a 120-watt solar panel and a 100-amp-hour lithium battery—that’s right: standard LiFePO4 power. Again, well done—and there is room in the battery compartment for a second 100AH battery. You can also easily plug in portable solar panels for extra input. Charge control is via a high-quality Redarc system.
On the opposite side of the camper is an optional en-suite toilet and shower enclosure of luxurious proportions, and a Hot Tap water heater and shower system.

There are numerous other features, and optional awnings and side curtains that will transform the Earth Camper into the full epic Aussie quarter-acre encampment. The versatility—from two-minute crash pad to let’s-stay-a-month homestead—will be one of the trailer’s most attractive features.
I have no word yet on price or weight, but I suspect ARB will sell every one of these they can produce. find out more here.

The Guzzle H2O Stream: One purifier to rule them all?
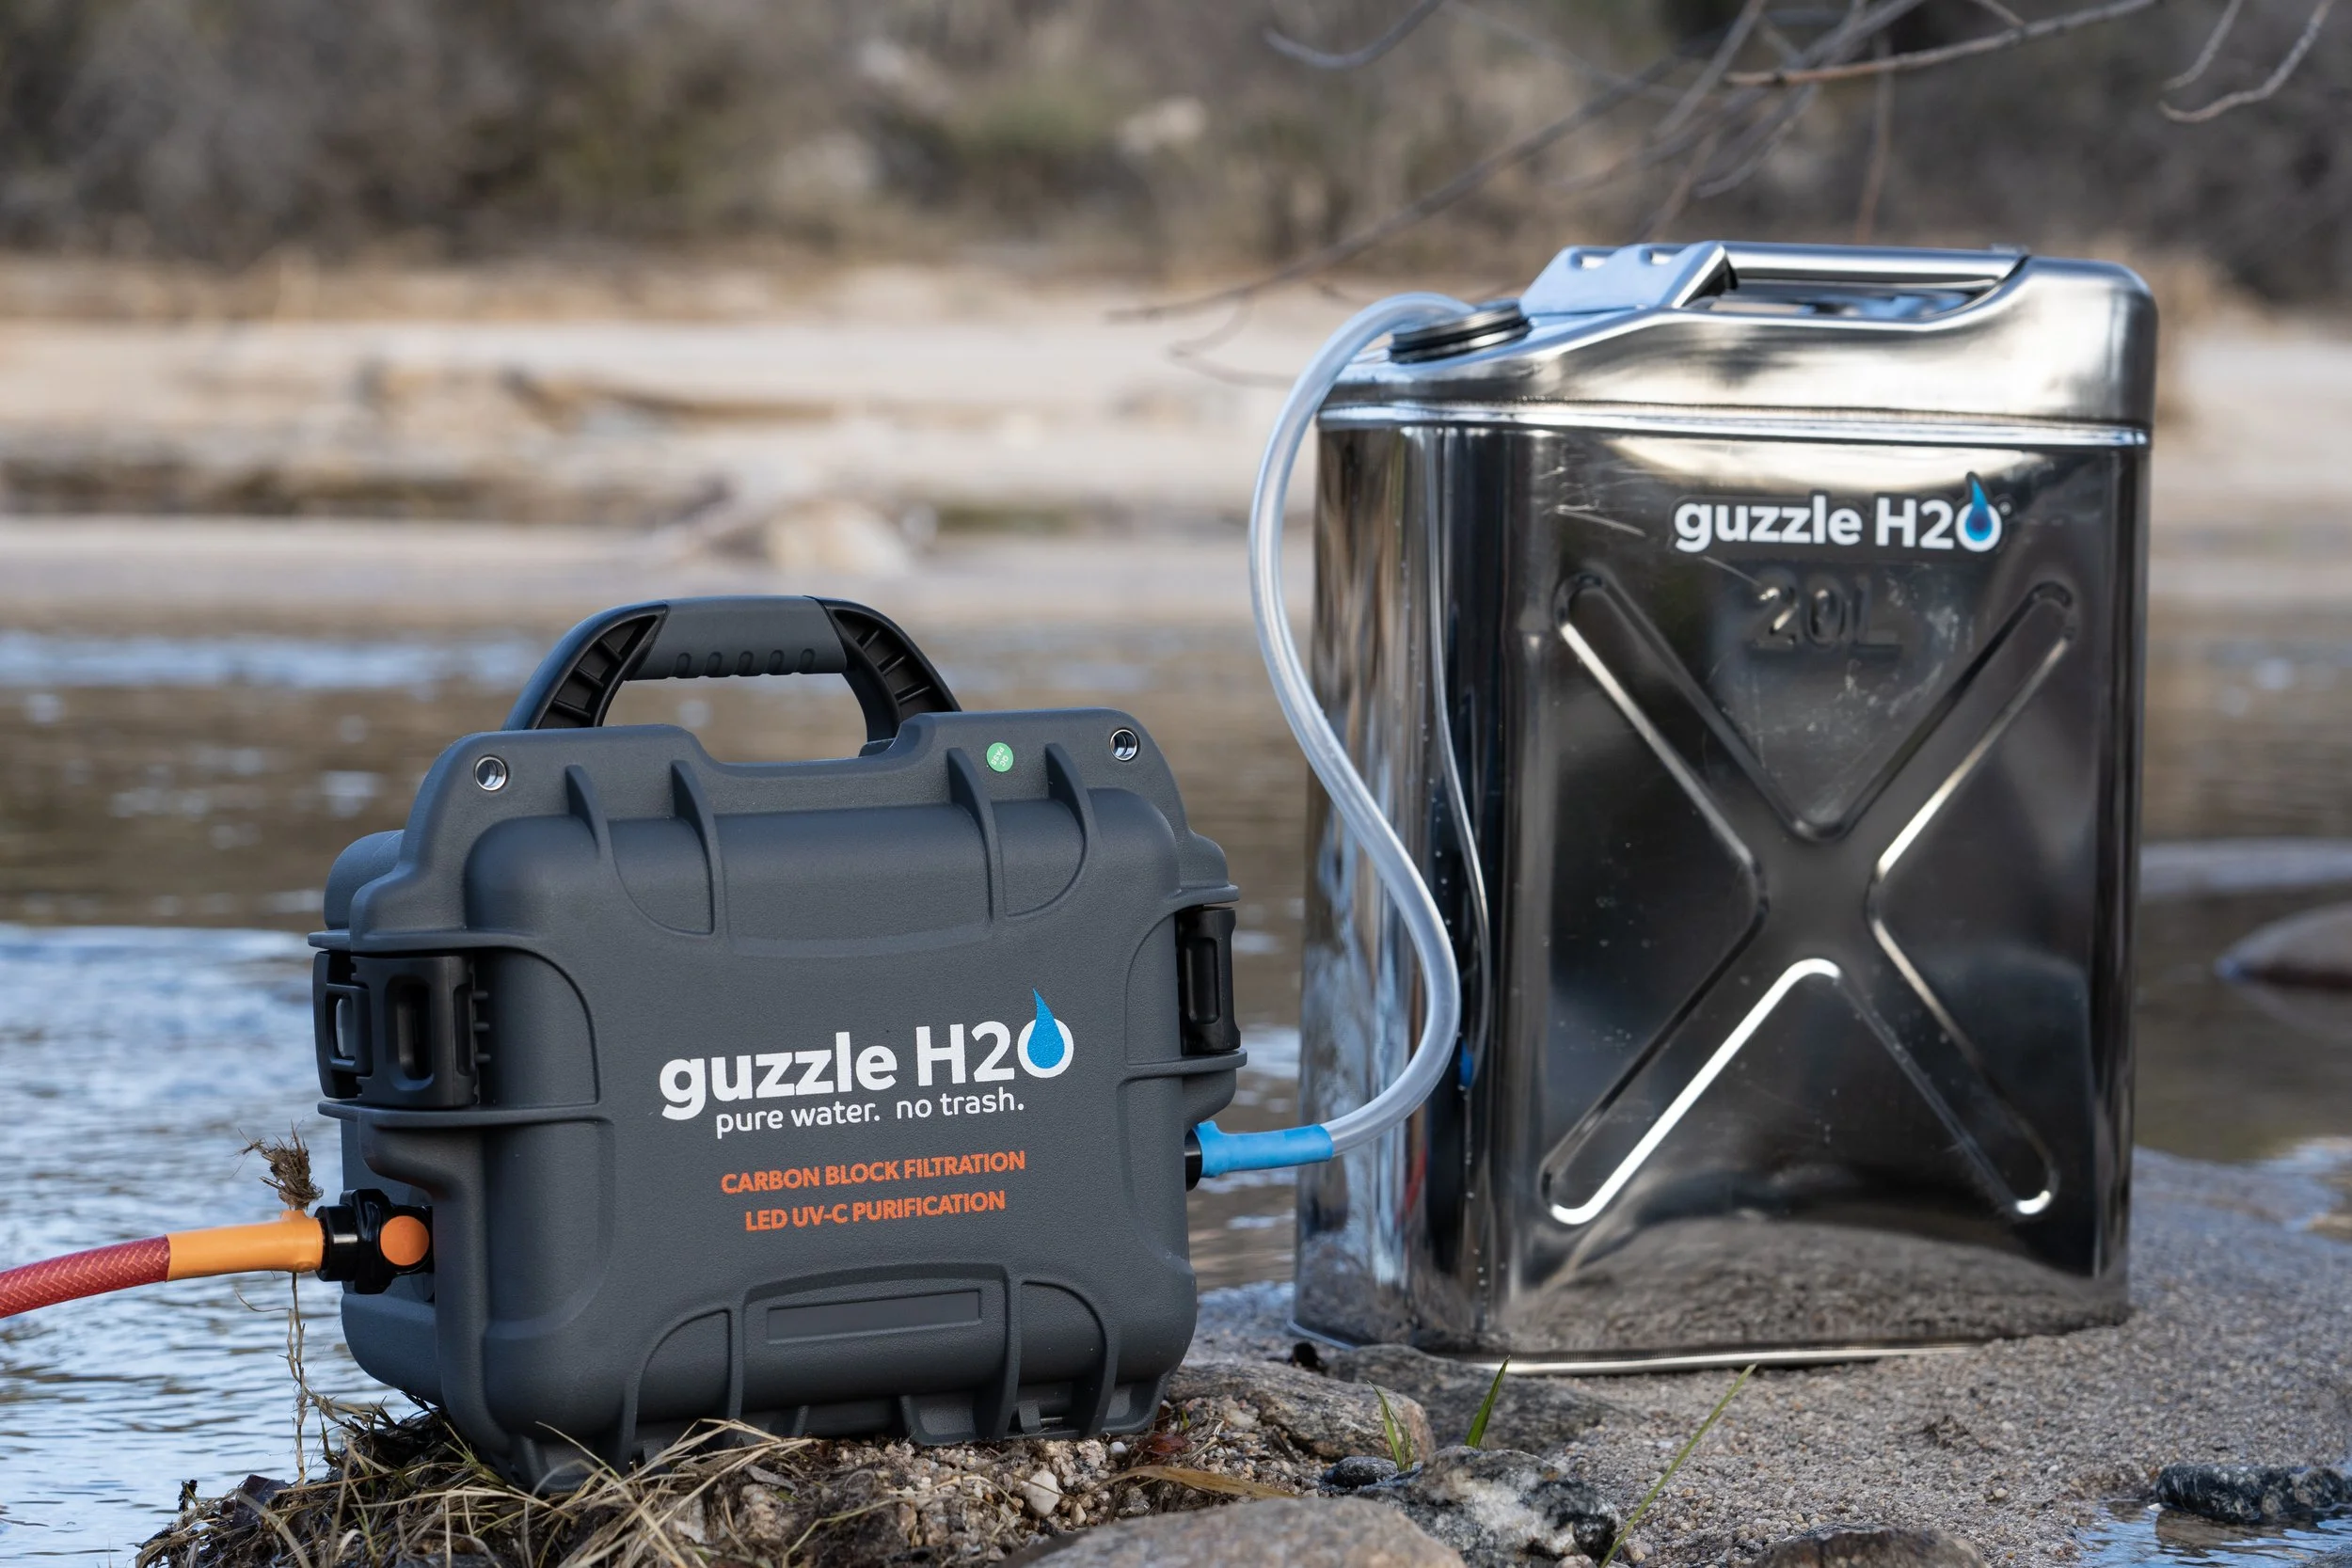
All-in-one, fast purification. (The nifty stainless-steel jerry can is optional.)
Like it or not, the days are long gone when we could go a-wandering, knapsack on our back, and dip our Sierra Club cup into any lake or stream we came to. (And to be frank, the Sierra Club cup was a really lousy design anyway.)
Depending on which studies and statistics you believe, anywhere from 60 to 80 percent of the surface water—lakes and streams—in the U.S. is significantly contaminated with something not good for you, from E. coli to mercury. There are probably a few creeks at 12,000-feet-plus in the Rockies that are still as pure as God intended them, but everywhere else you’d be wise to ensure the water you use from natural sources has been purified, or at least filtered.
What’s the difference? In general, a filter is designed to remove such waterborne pathogens as protozoa (e.g., Giardia and Cryptosporidium) and bacteria (e.g., Salmonella and E. coli). A purifier will kill these organisms as well as viruses. Until recently, consumer-grade water filters could not block the passage of viruses, which average just .02 microns in diameter compared to the relatively huge size of bacteria (.2 to 1 micron) and protozoa (2 to 50 microns). The historically accepted methods for killing viruses included exposure to UV light, treatment with iodine, and boiling. Today several companies produce filters capable of blocking viruses, so the distinction has become somewhat blurred.
Do you need a purifier? At this time, for travel in North America, probably not, as viral contamination of surface water is relatively rare here (potential exceptions include, for example, lakeshores with heavy human activity). However, if your plans include exploration of developing-world countries, it’s definitely worth considering, as viral pathogens such as hepatitis A and E, norovirus, adenovirus, and enteroviruses, among others, might be present. And, after all, there’s no such thing as water that’s too pure.
There are dozens of filters on the market—including those capable of blocking viruses—suitable for backpackers and canoeists, who might need no more than a gallon or two per day. The MSR Guardian Purifier (the pump version) is one such. For overland travelers who have bulk water tanks in their vehicles, and who use that water for washing dishes and perhaps showering, and who thus might go through three, four, or more gallons per day per person, the work and time involved in hand-pumping a liter or two per minute would get old really fast.
One leisurely but effective solution is MSR’s Guardian Gravity purifier, which comprises a gravity-fed filter capable of eliminating viruses (NSF P248 standard), fed by a 10-liter hanging bag. The system produces only about a half-liter per minute (and it must be cleared of silt and debris in advance), but if you’re in camp for a few hours you can easily produce 20 or 30 liters of pure water. Of course you need to set a timer or keep an eye on the unit to know when to refill, and topping it up more frequently helps push water through the filter (slightly) more quickly. But otherwise it’s completely passive.

Want something faster than that? I’ve recently been using what might be the best high-output water-purification system I’ve ever tried.
The Stream from Guzzle H20 (Okay, I would have picked a different company name) comprises, in a compact Pelican-like case about ten by twelve by eight inches, a primary, easily replaced .5-micron carbon-block filter, a 12V pump powered by an LiFePO4 battery, and a transparent capsule incorporating an LED UV-C light source. The carbon-block filter removes chlorine taste and odor, and reduces or eliminates NSF 41 contaminants, VOCs (volatile organic compounds) lead, and mercury. The UV-C light inactivates protozoa, bacteria, and viruses with 99.99-percent efficiency, according to third-party testing. And the Stream produces an astounding .75 gallons per minute in pumping mode, or 1.1 gpm with a pressurized source such as a municipal tap. The LiFePO4 power source will process 32 gallons on a single charge in pumping mode.

What this means is that the Stream could completely refill our Land Cruiser Troop Carrier’s 29-gallon tankage (24-gallon chassis tank plus jerry can) with purified water on a single charge and in about 38 minutes—significantly less if sourced from a municipal tap. No other system I know of comes close.
Using the Stream couldn’t be simpler. The inlet hose plugs into a quick disconnect fitting on one side of the case; the outlet hose into a similar fitting on the other side. The inlet is color-coded red (in fact the entire hose is red); the outlet blue to avoid confusion. Stick the 1-micron pre-filter of the inlet hose into the source, hold the outlet hose over your container, and hit the switch. You’ll be surprised at the rate of flow—the thing fills a standard water glass in a few seconds.

I opted for the “Overland bundle,” which includes an extra carbon-block filter and a 30-foot outlet hose, so you don’t have to park right next to a source if you have built-in tanks in your vehicle. I also got the significantly larger “Guide” prefilter to clear up the murkiest swamp water.

With this setup I would have felt completely comfortable exploiting natural or municipal water sources anywhere I have traveled on any continent. I was impressed with the thought behind the system, the quality of the components and assembly, and the speed—and taste—of the output.
As you might imagine, the Stream is a significant investment. The standard model is $1,195; the Overland bundle is $1,288, and the Guide prefilter is $65. However, given that safe drinking water is arguably the number one concern on any trip, you might consider it a bargain. I do.
The difference between a good tool and a bad tool . . .
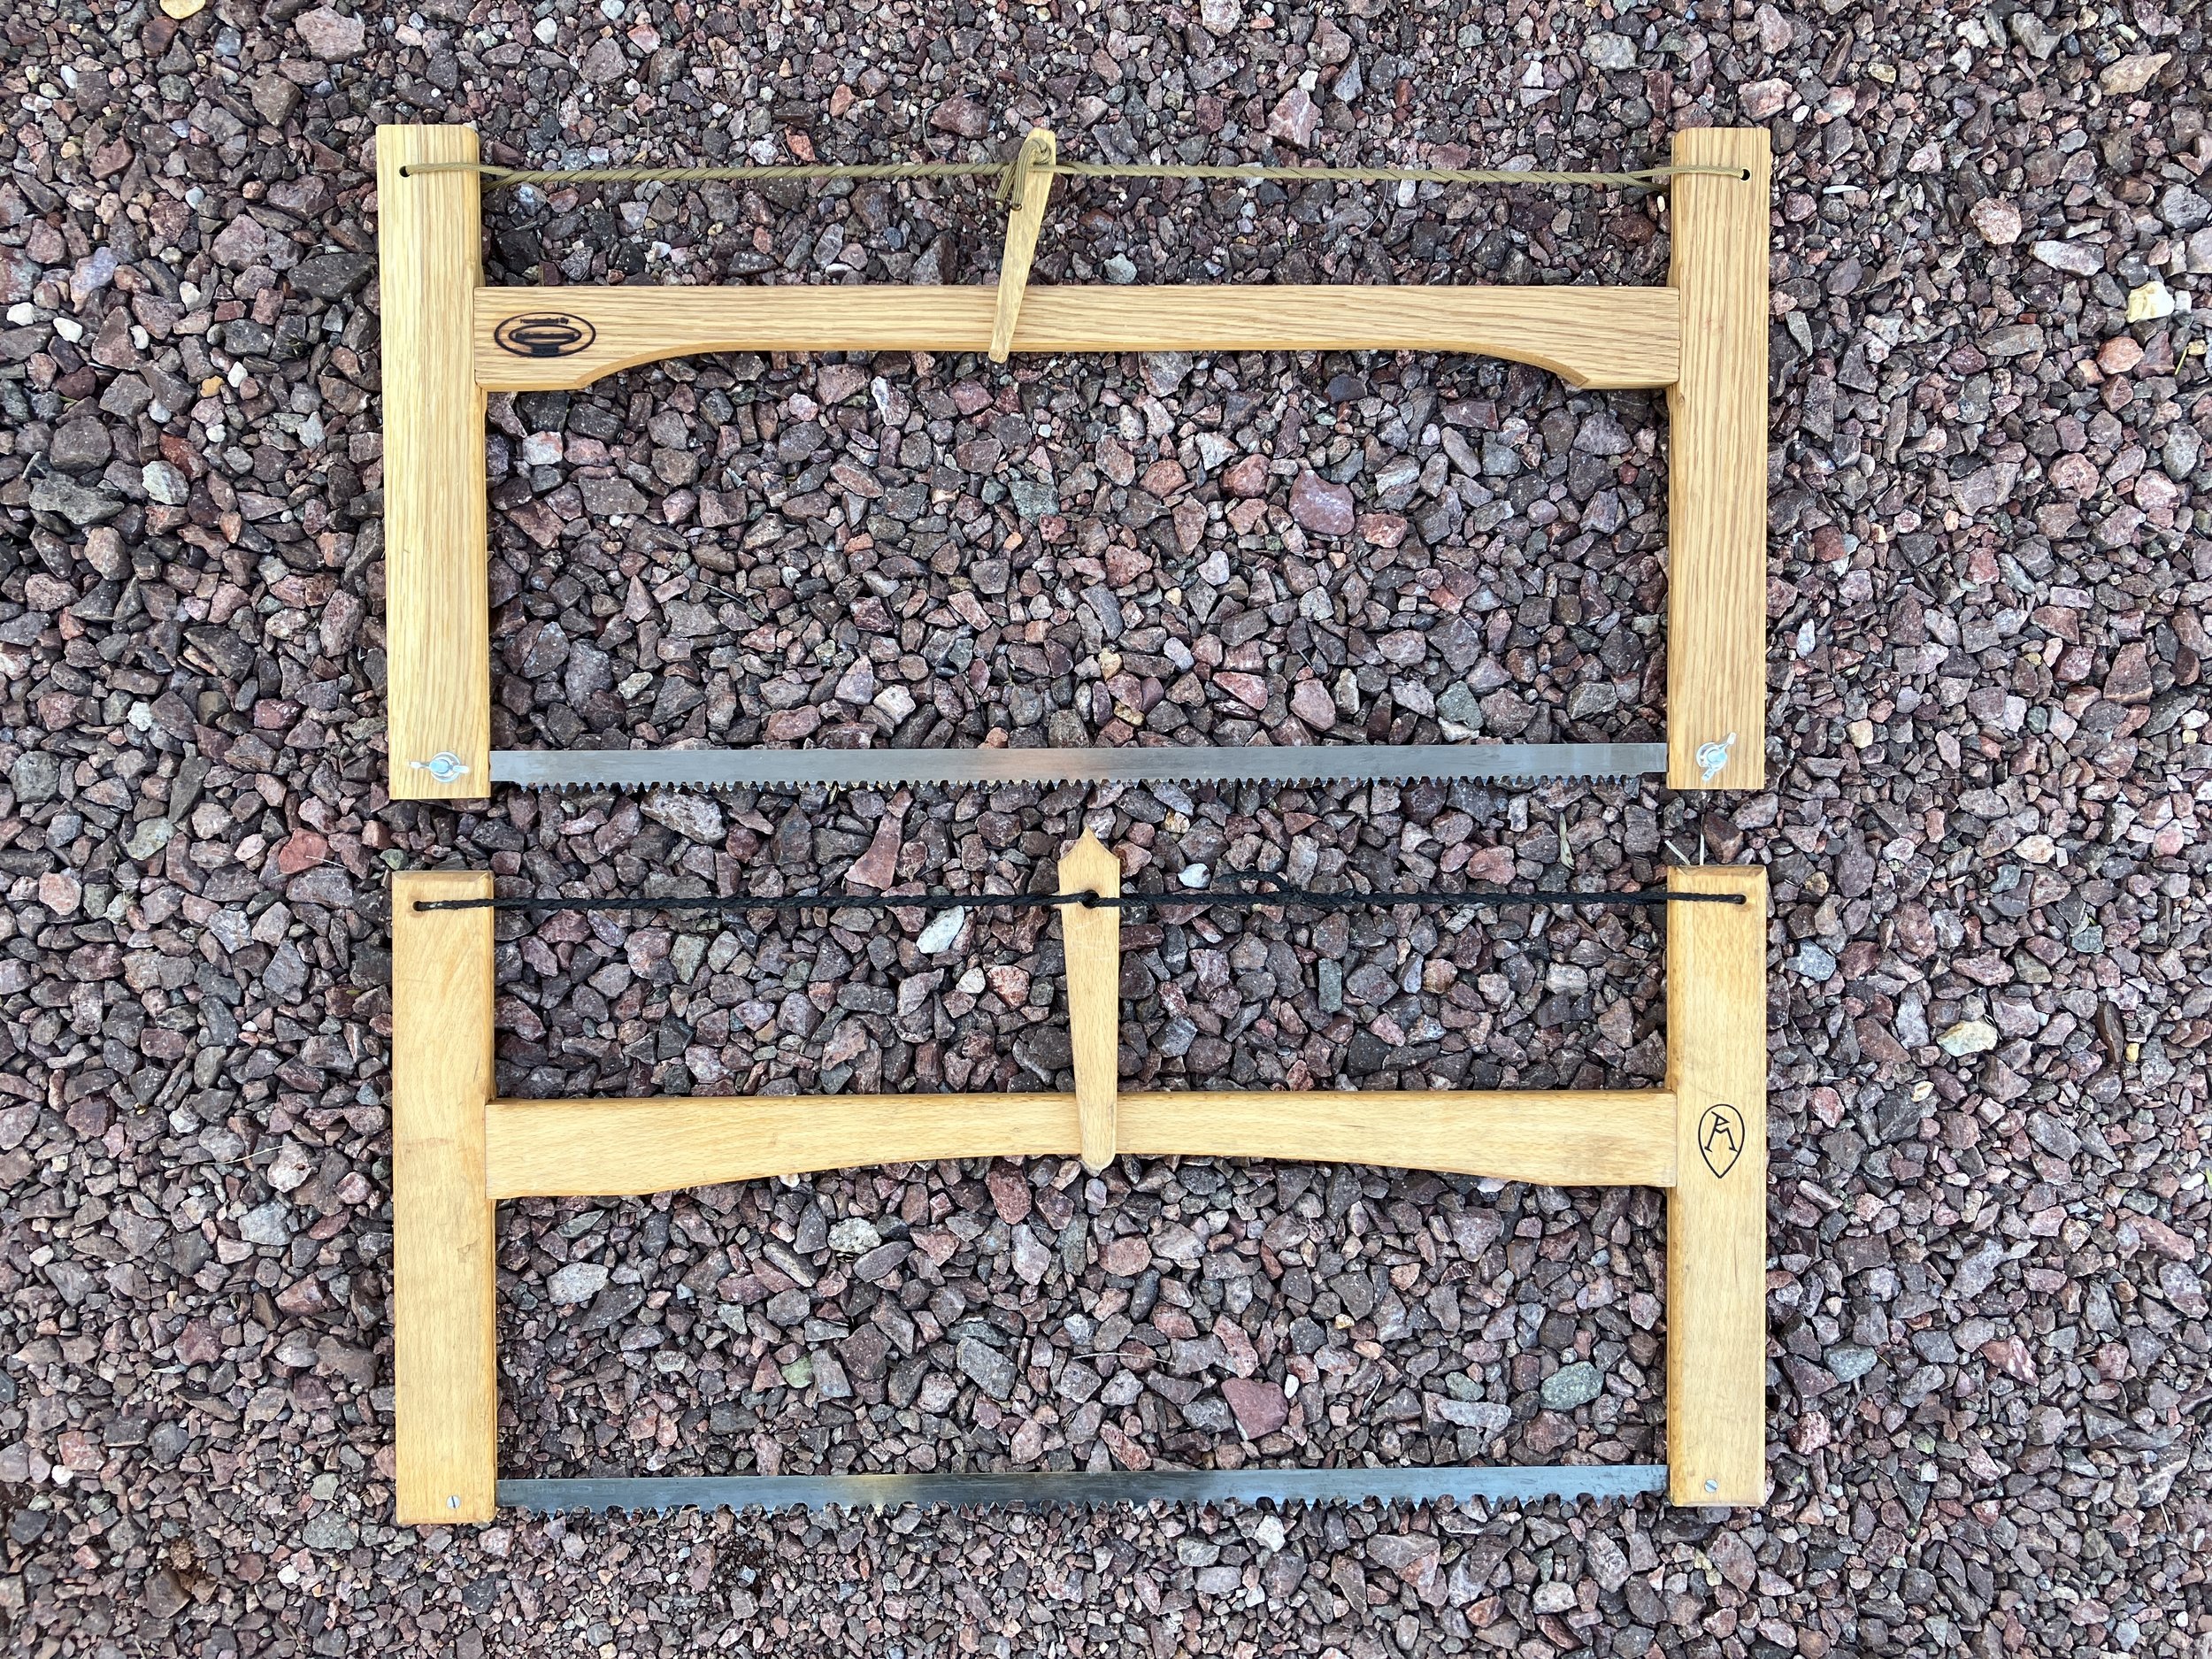
. . . can sometimes be measured in millimeters.
I bought the lovely, collapsible wood bow saw on the bottom from the Ray Mears Woodlore shop in England some years ago. Made for Mears by a local bowyer, it quickly became a favorite—so much so that last year I decided to buy another as an extra. However, the product had disappeared from the site.
A quick search located a seemingly identical product from another English online shop, so I ordered that one, and then set it aside for over a year. A few months back, however, I thought I’d try it out to compare to the “original.”
And . . . it compared poorly. In fact, no matter how much twisting I applied to the “Spanish windlass” tensioning mechanism, the blade torqued and bound maddeningly in every cut. A brief side-by-side comparison revealed why: The crossbar on the new saw was positioned significantly higher than on the Woodlore model, vastly reducing leverage and the resulting tension applied to the blade by the windlass.
Theoretically, the copy should be able to saw through a thicker log, given the extra clearance above the blade; in reality this is a moot point since the thing can barely get through any log.
At some point I might try to modify the new saw by drilling and chiseling a new mortise for the crossbar lower on the frame, but for now it sits idle.
If you’re intrigued by the beauty and efficiency of the Woodlore saw, I did find another here that appears to be constructed properly, and an even more beautiful model here.
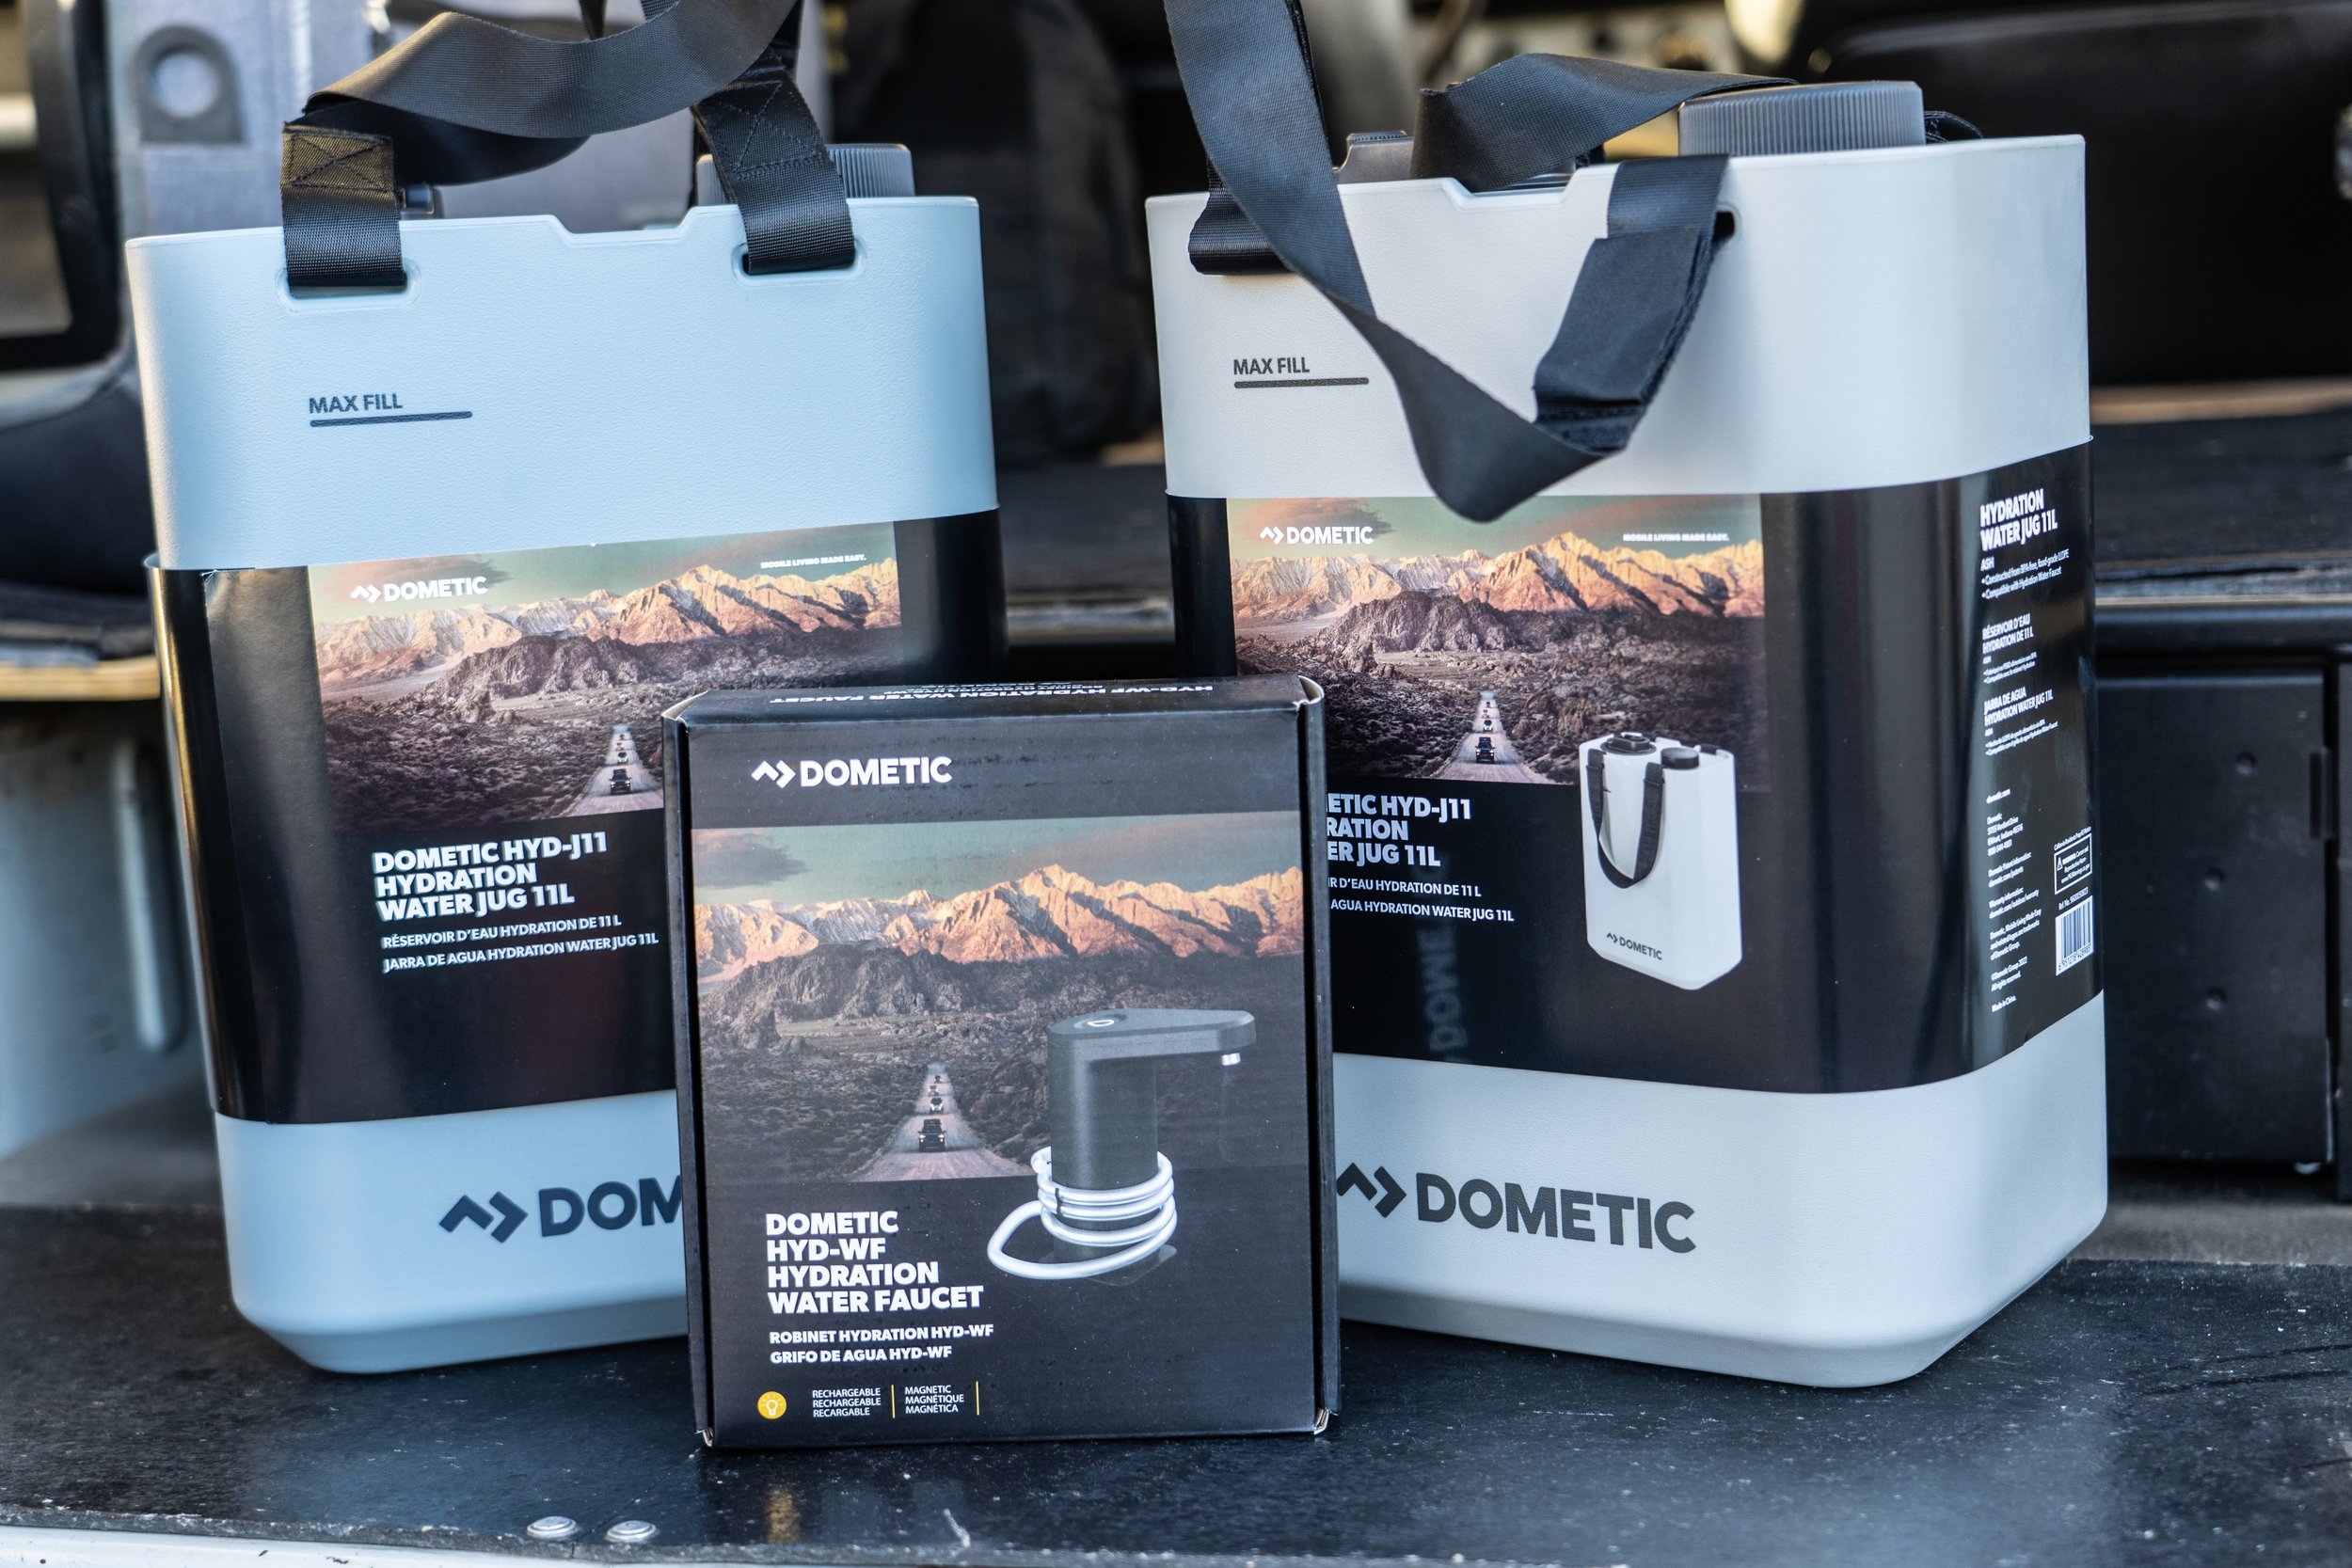
Dometic's brilliant GO Hydration Jug
Despite being lucky enough to have reviewed hundreds—possibly thousands—of products over the last 35 years, from utensils to Unimogs, I’m not the least bit jaded. I still love doing it, and I still get excited whenever a box shows up at our mail depot with some new bit of kit to try.
I am, however, harder to impress than I used to be. And I’ve noticed that certain types of product—lightweight stoves, backpacking tents, binoculars, 12V fridges, and camp seating come immediately to mind—tend to go a long time between genuine innovations.
Until recently that was the case with portable water containers. You had your blue steel NATO can—my longtime standby—the Scepter, the Reliance, and a host of generic plastic five-gallon/20-liter clones. The Lifesaver can stood out for its purification function, but otherwise it was pretty much a standard H2O jerry can. The Rotopax was innovative in terms of its shape and mounting hardware, but (very) expensive as a system, and again more or less just a container. (It’s also, through no fault of the company, become something of a caricature as a de rigueur external accessory to announce that you are driving an OVERLANDING VEHICLE.)
Then, at this spring’s Overland Expo West, I was introduced to Dometic’s new GO Hydration Water Jug. Two minutes into the rep’s spiel, I knew it was different. Revolutionary might be too strong a word, but it’s got genuinely clever innovation in every feature. After the show, for the first time in a long time, I actually pestered my contact at Dometic to get a review sample. It took a while because it seemed others had been impressed too: the units frequently sell out.
Why was I so impressed? Let’s look at the product and the thinking behind it.
First, the designers realized that a full five-gallon jerry can of water, which weighs 45 pounds give or take depending on the container, is an awkward thing to carry, not so much due to the weight as the awkwardness of having the weight all on one side. So they essentially cut the dimensions of a jerry can in half. Turn a Dometic jug on its narrow side and stack another on top of it. The two take up just about the same space as a single standard jerry can, and in fact will fit in many jerry can holders. Yet each jug holds 11 liters, 22 for a pair. That’s 5.8 gallons, more even than a NATO can. Despite that, two full Dometic jugs, one on each side, are far easier to carry than a single jerry can with less capacity. One-and-a-quarter inch (removable) webbing straps help with comfort.
Upright, the jug is stable, and two grooves in the top rim facilitate securely strapping it down (or you can use the carrying straps).
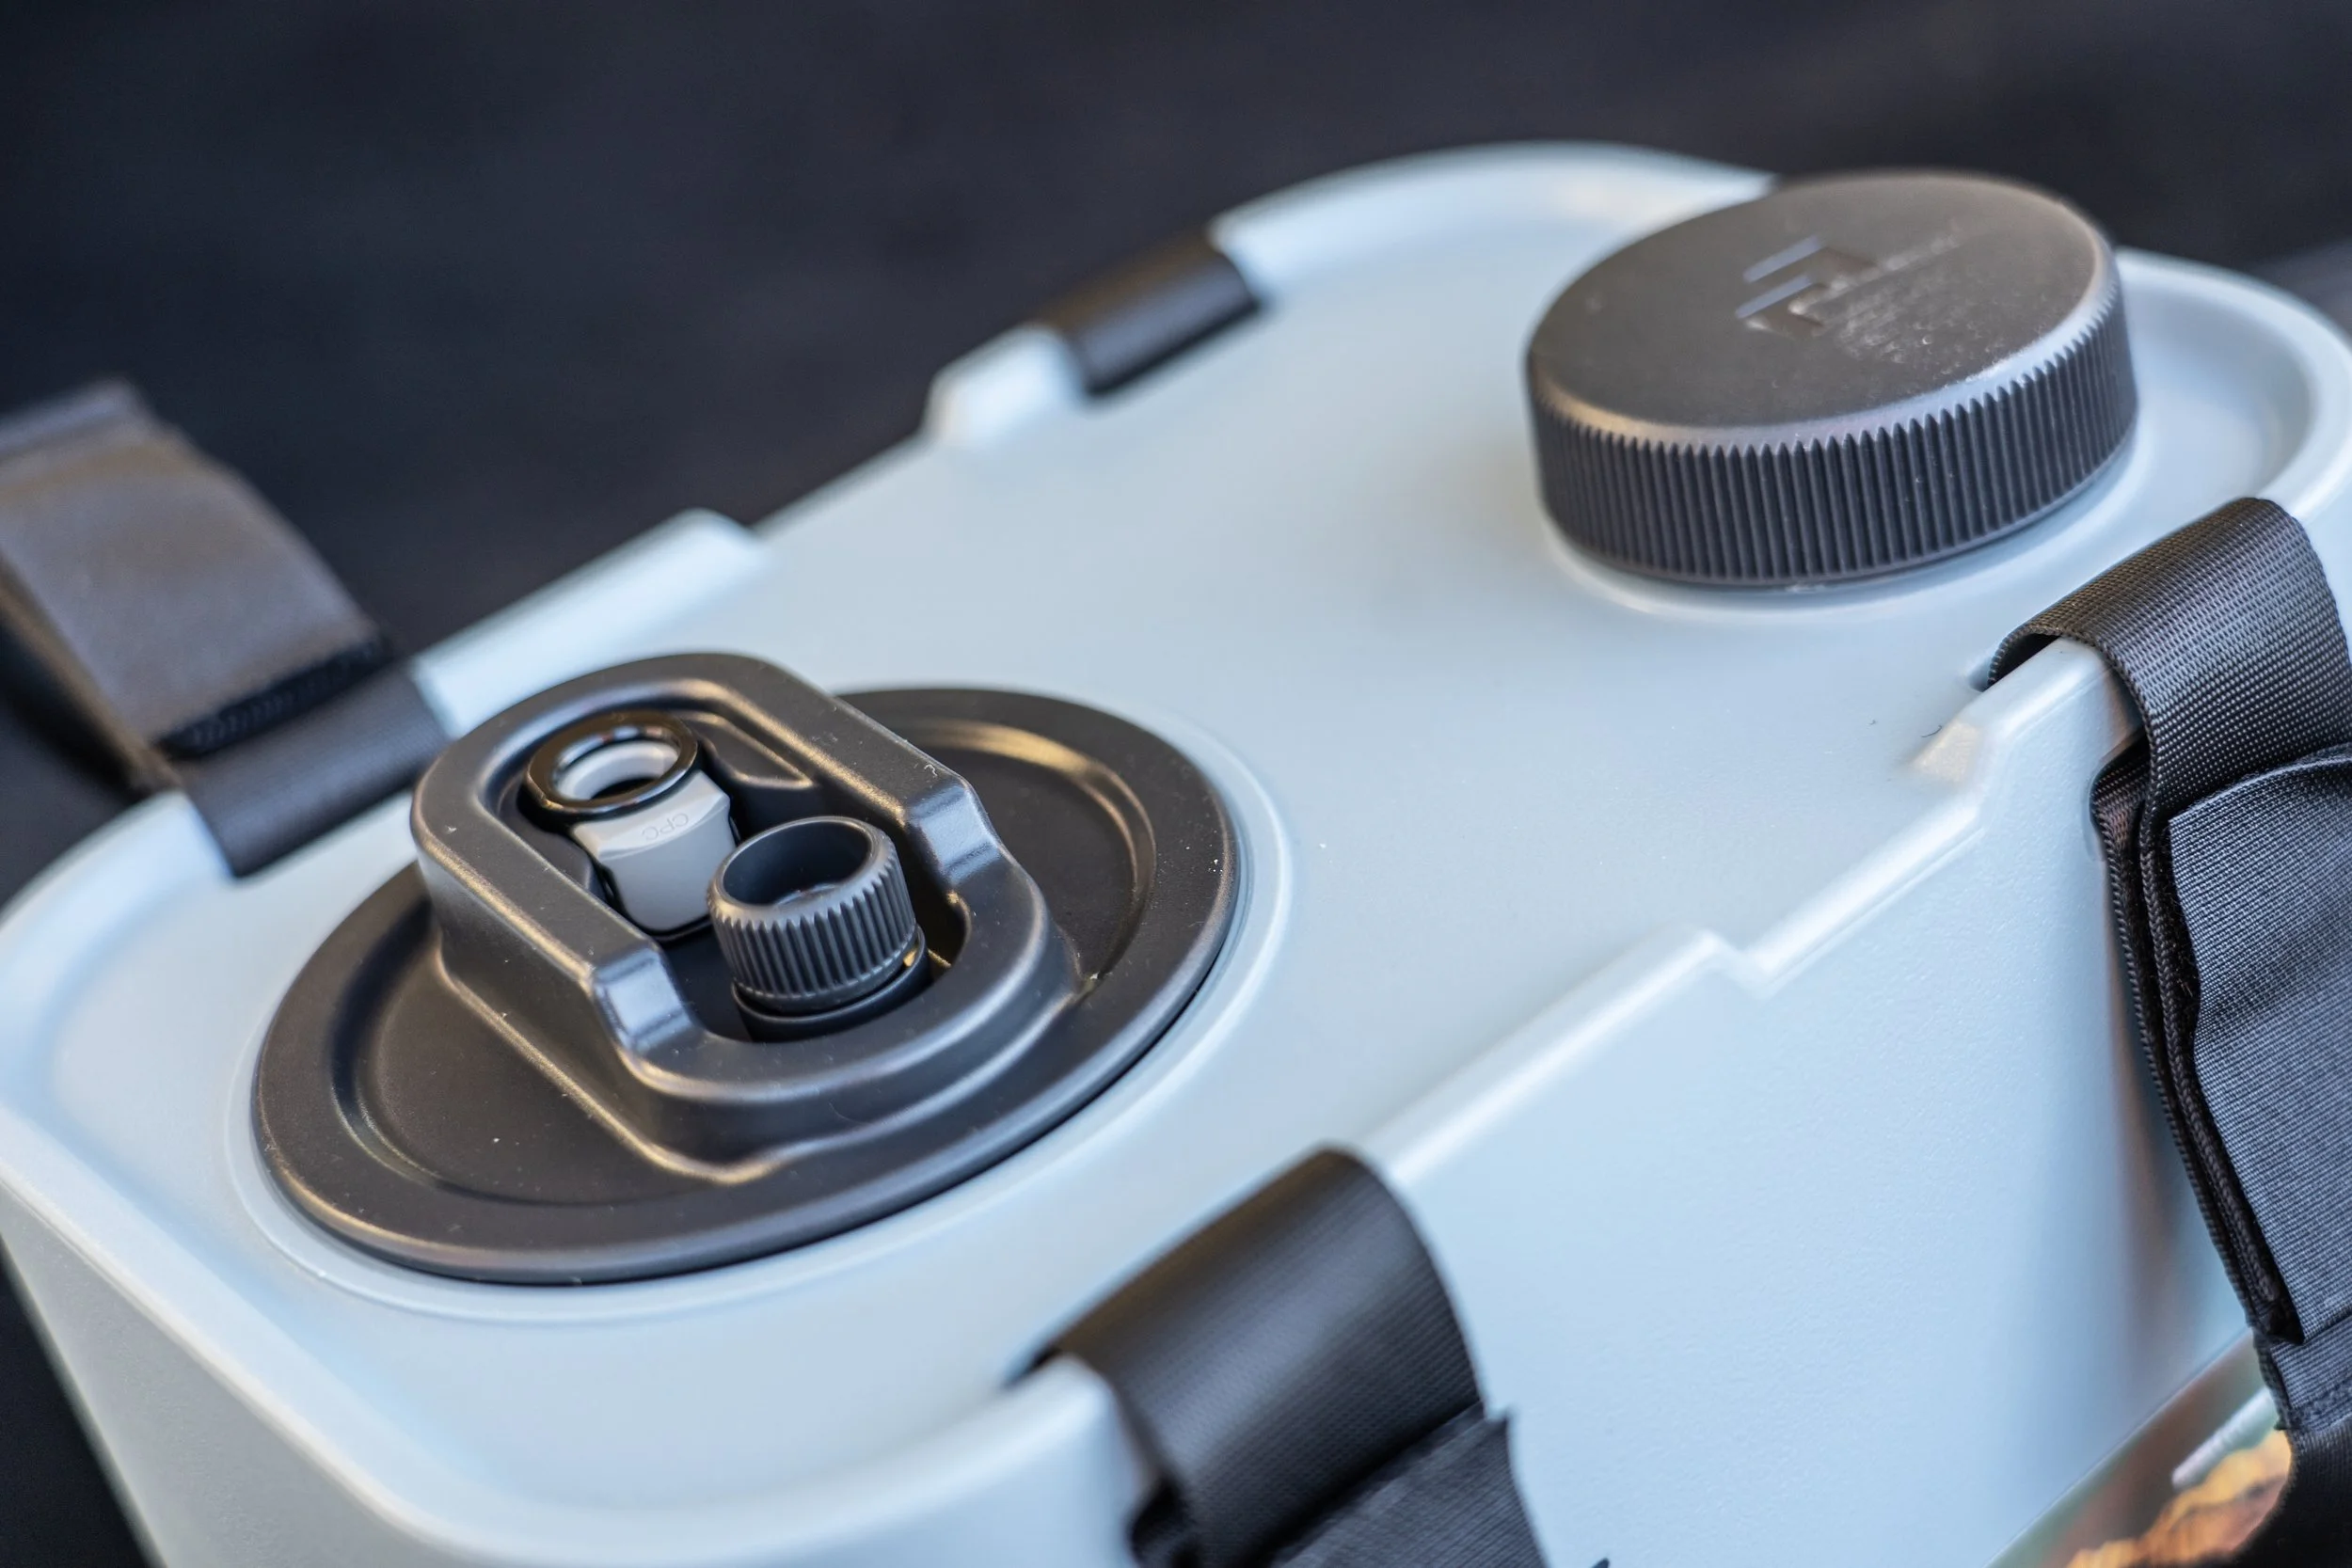
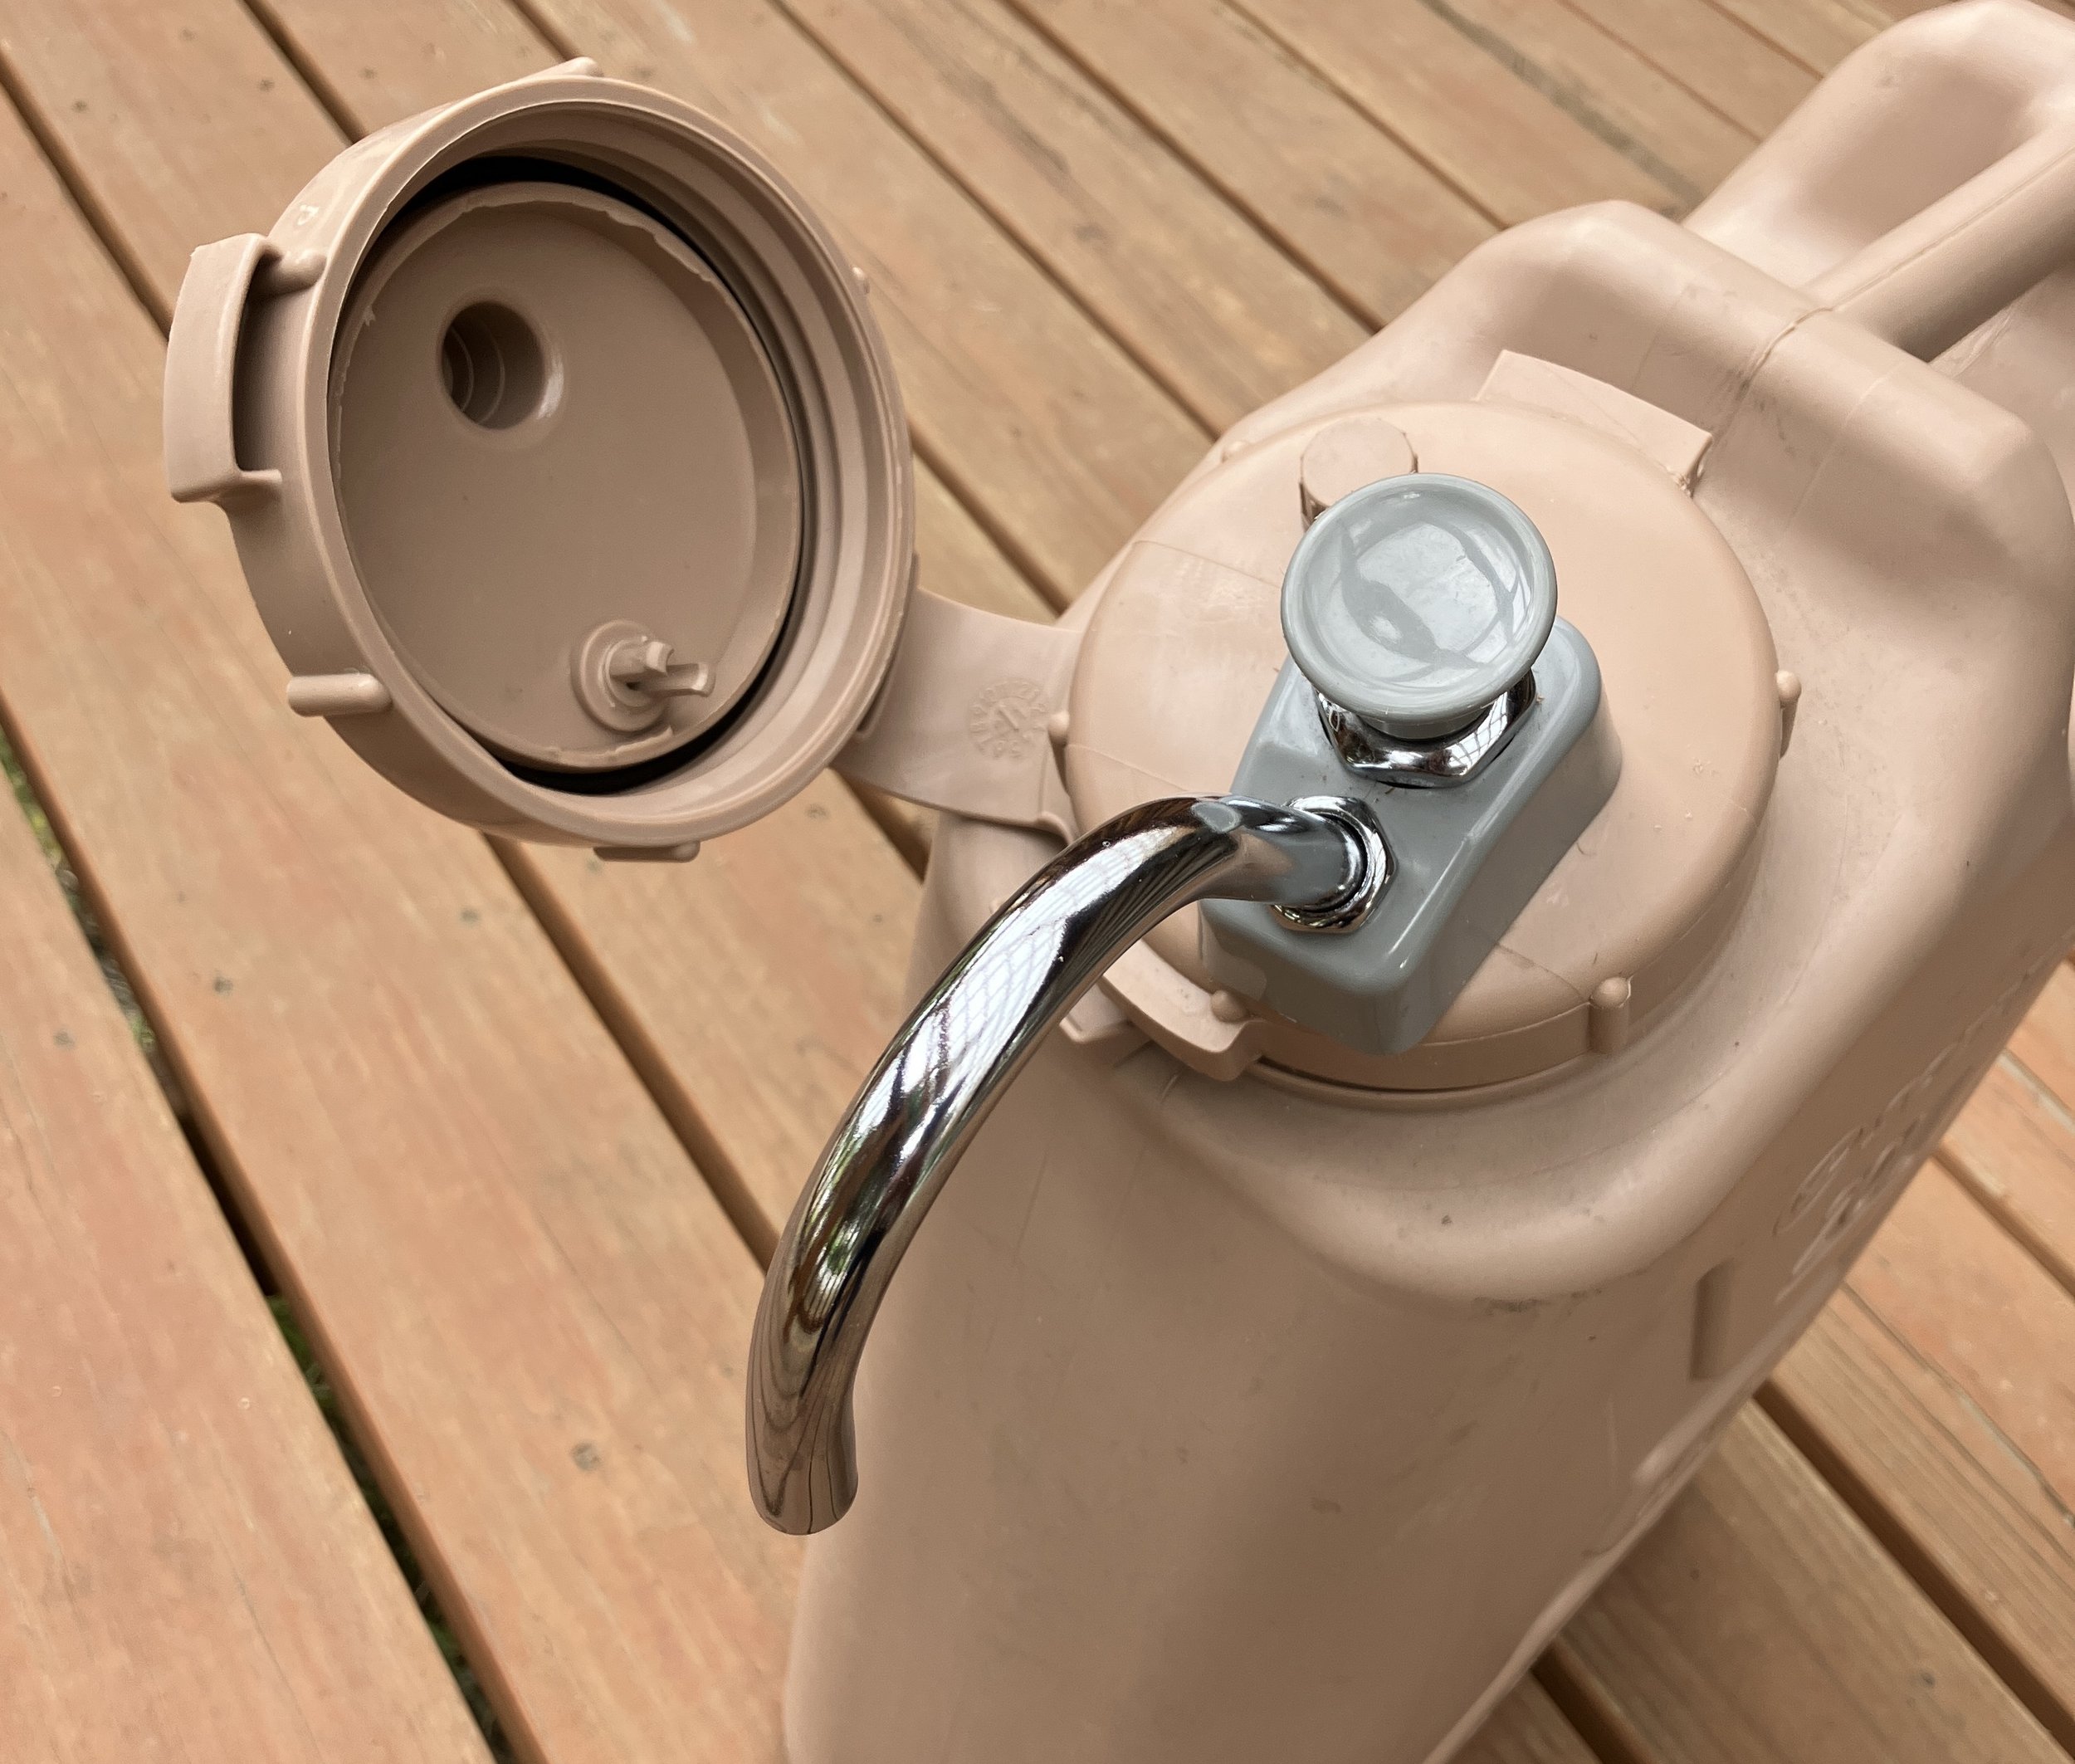
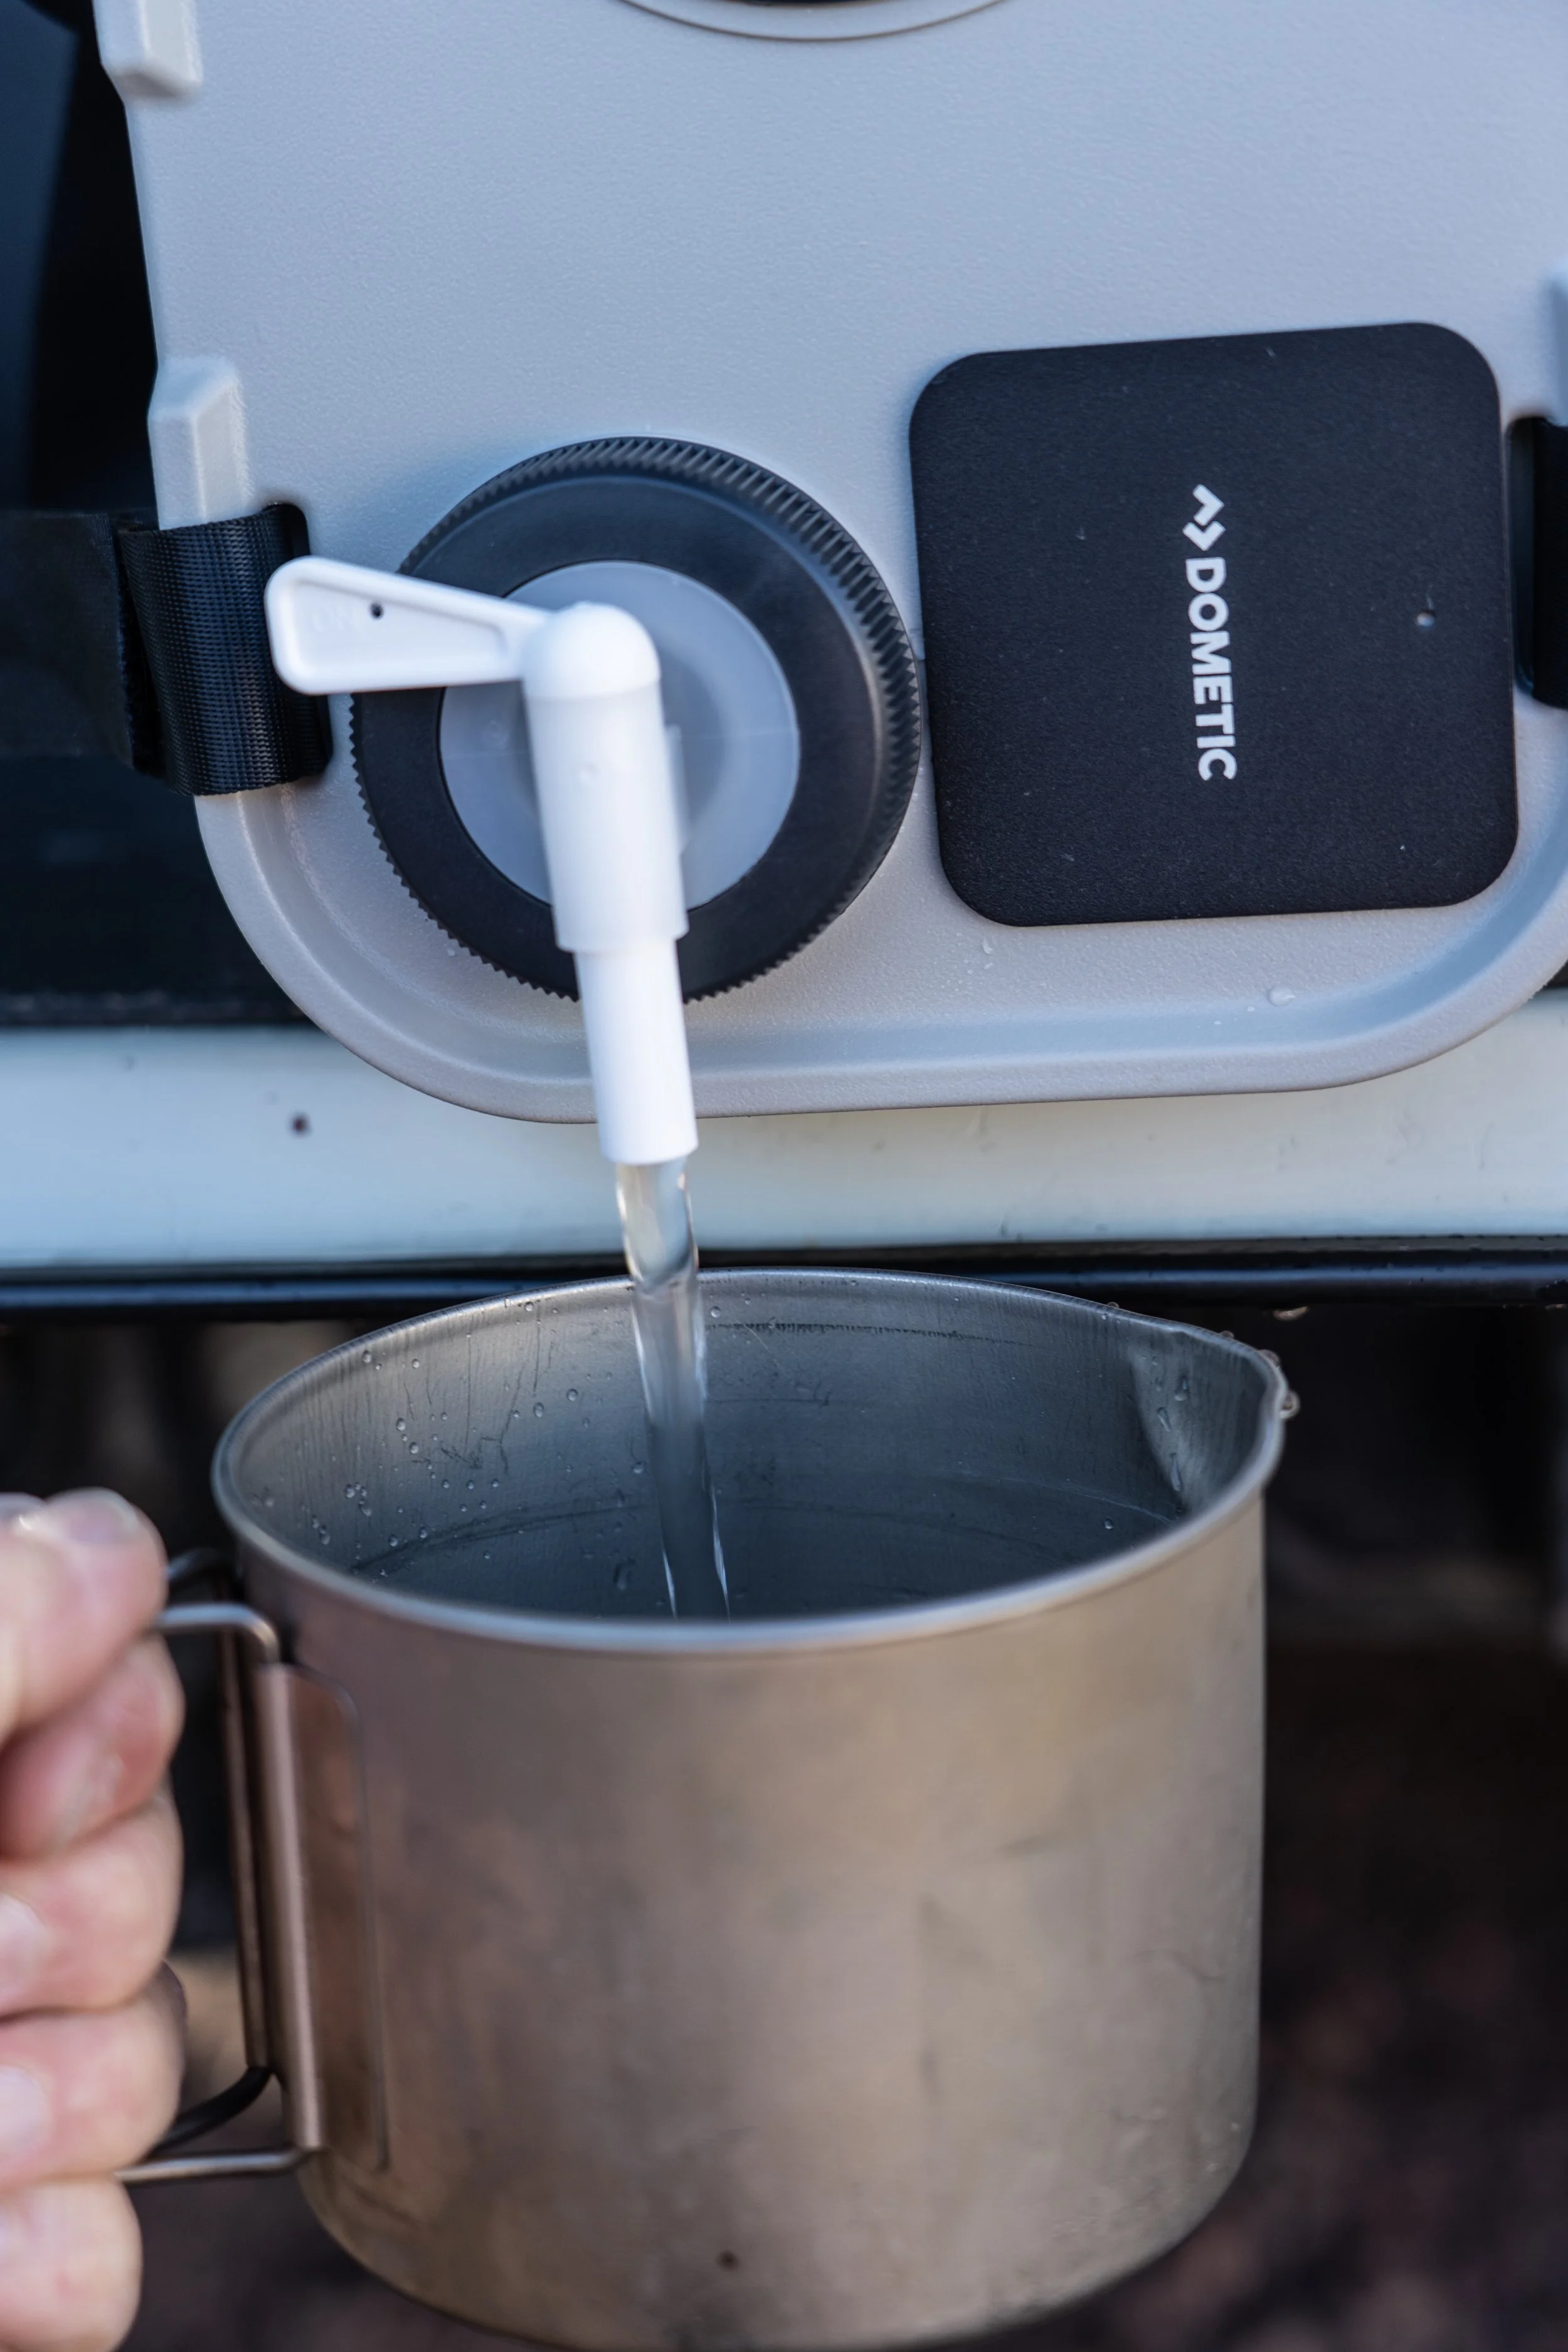
There are two openings in the top. The smaller one is, cleverly, a standard 63mm Nalgene size and thread, which means you can screw any one of a number of water filters directly onto it to fill the can with filtered/purified water. Remove the cap and you’ll see a rubber flow control plug, which allows you to tip and fill small containers without spillover. A groove in the bottom of the can provides a secure grip for your bottom hand. Remove the flow control to quickly empty or fill the jug. In addition to the cap, the Dometic jug comes with a twist-valve replacement cap, to allow simple gravity feed with the can on its side.
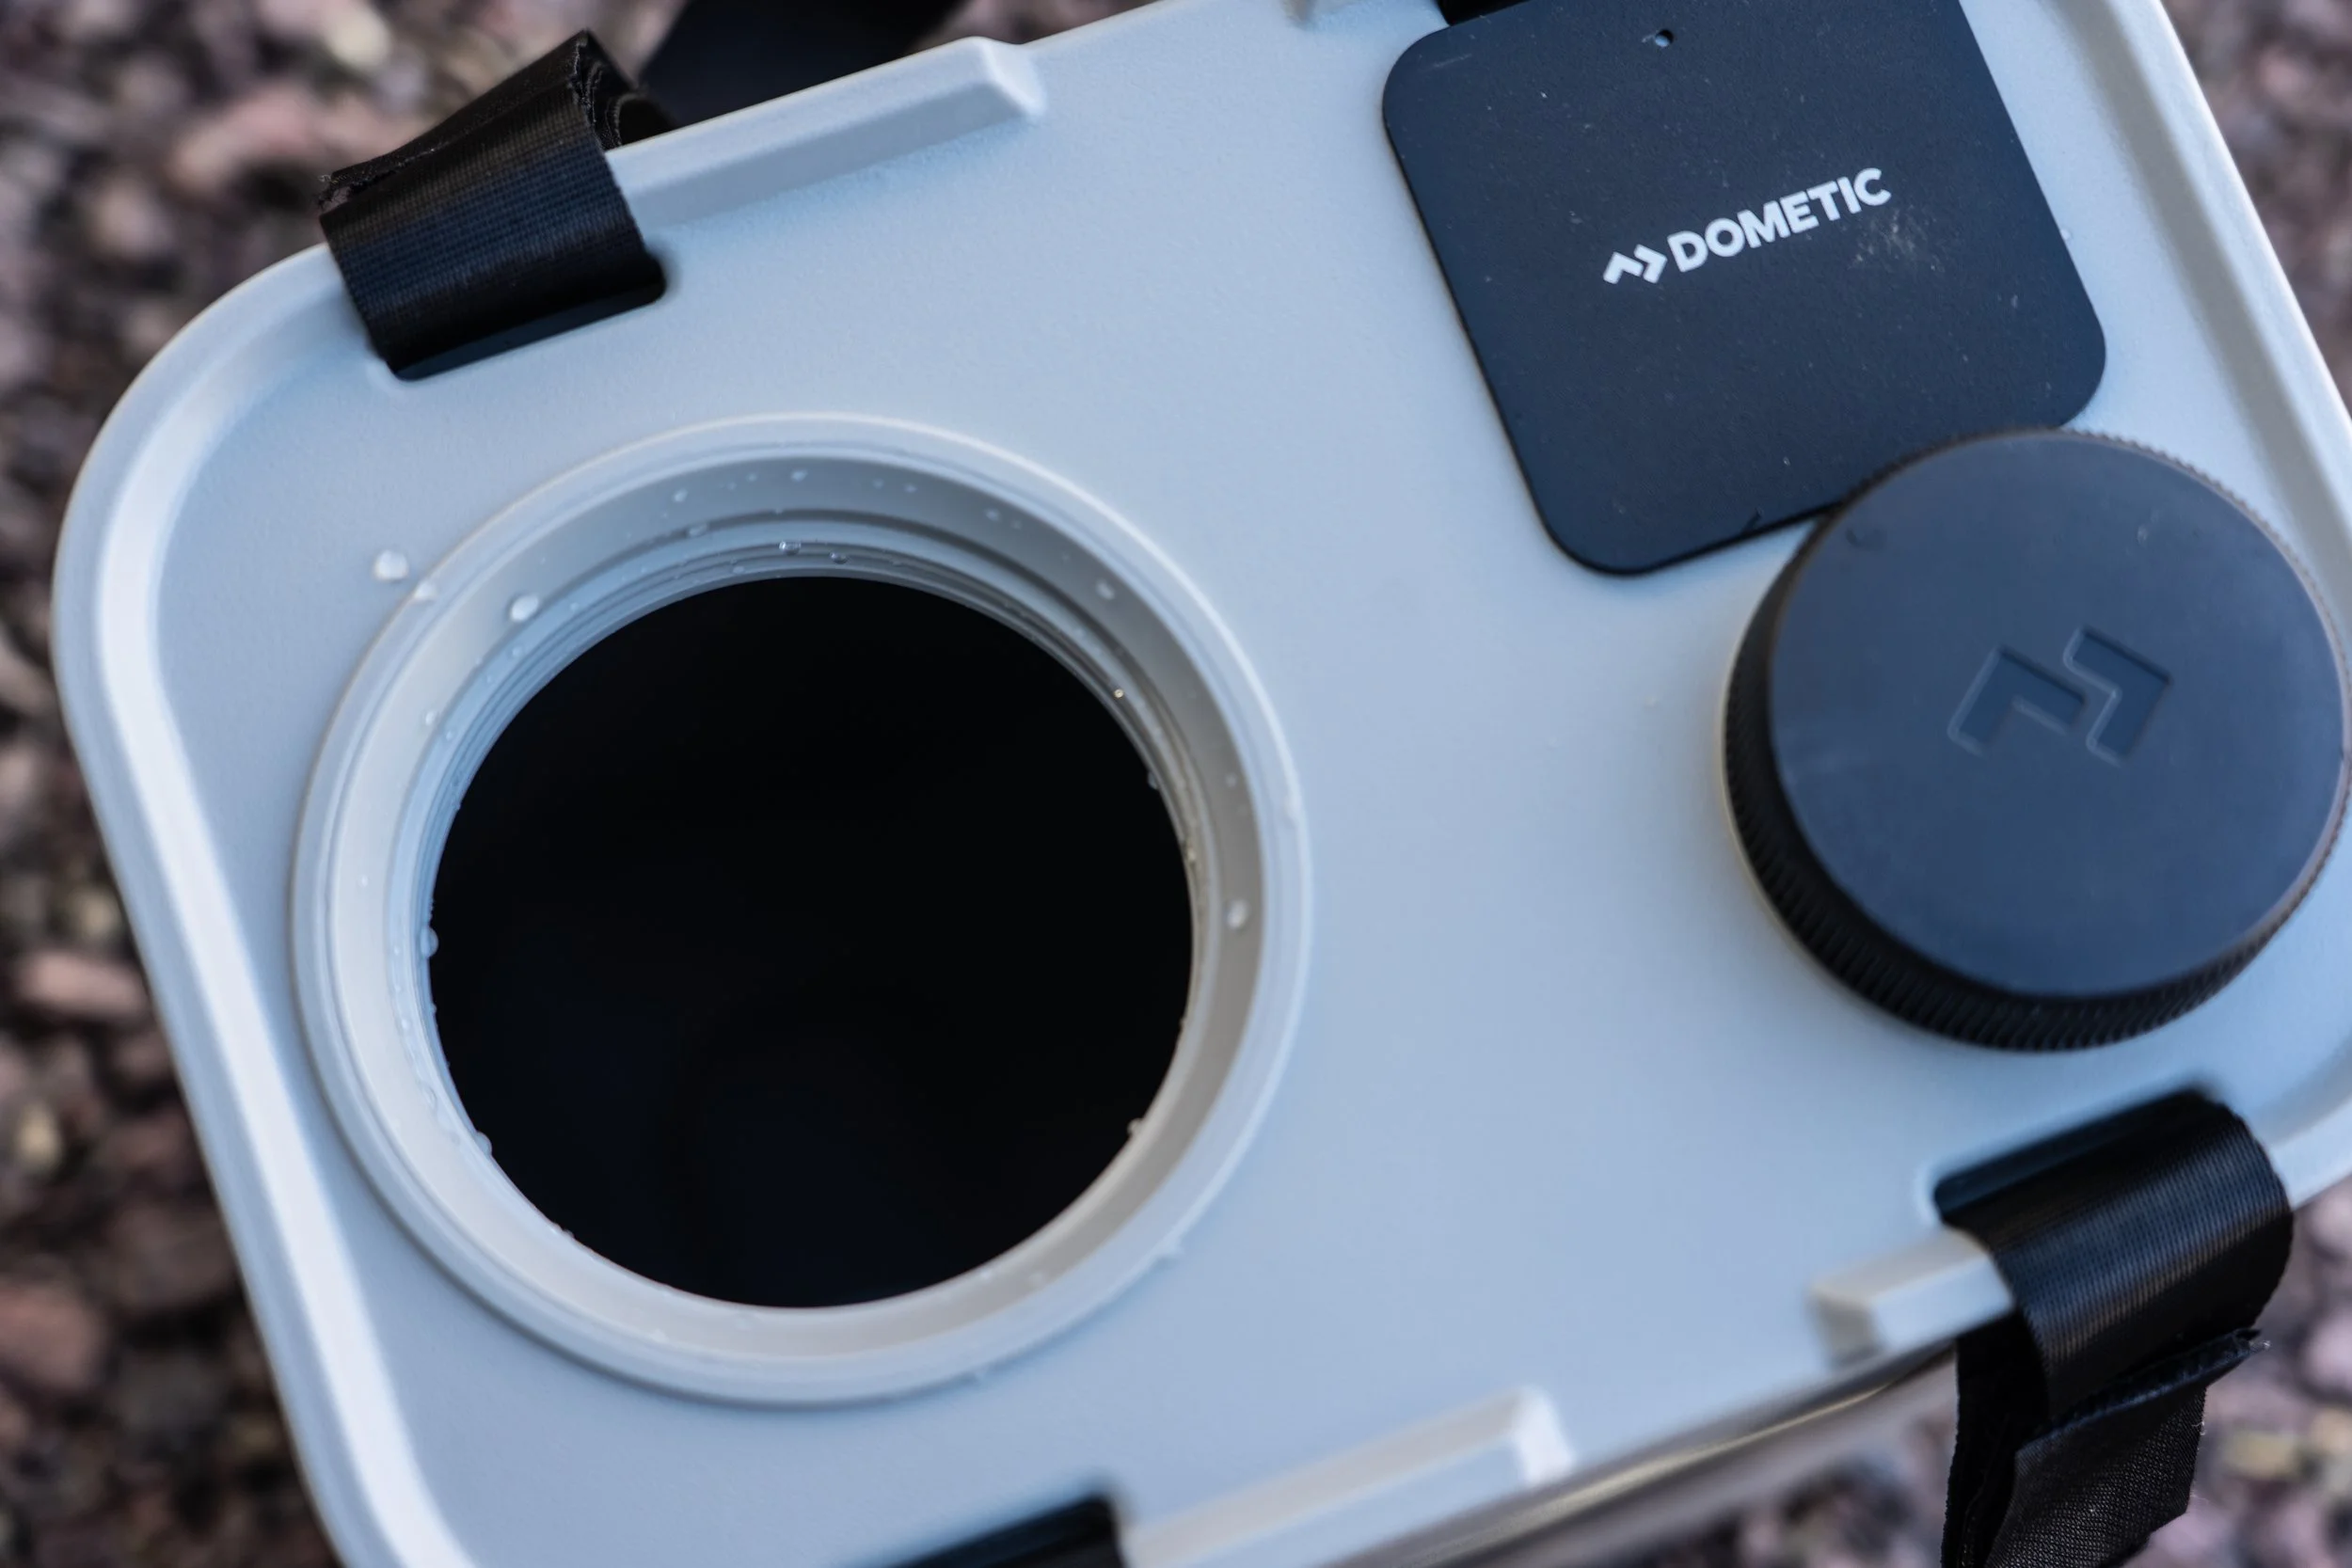
The other, larger cap, unscrews to reveal an opening large enough to insert your hand and forearm for scrubbing when necessary—something few if any other water containers allow. It’s big enough to allow filling the can from a bucket with little if any spillage. The cap itself incorporates a screw-down breather, to avoid vacuum lock when dispensing from the tap or pump, and a CPC quick-connect fitting that is connected to a silicone feed tube which reaches the bottom of the can.
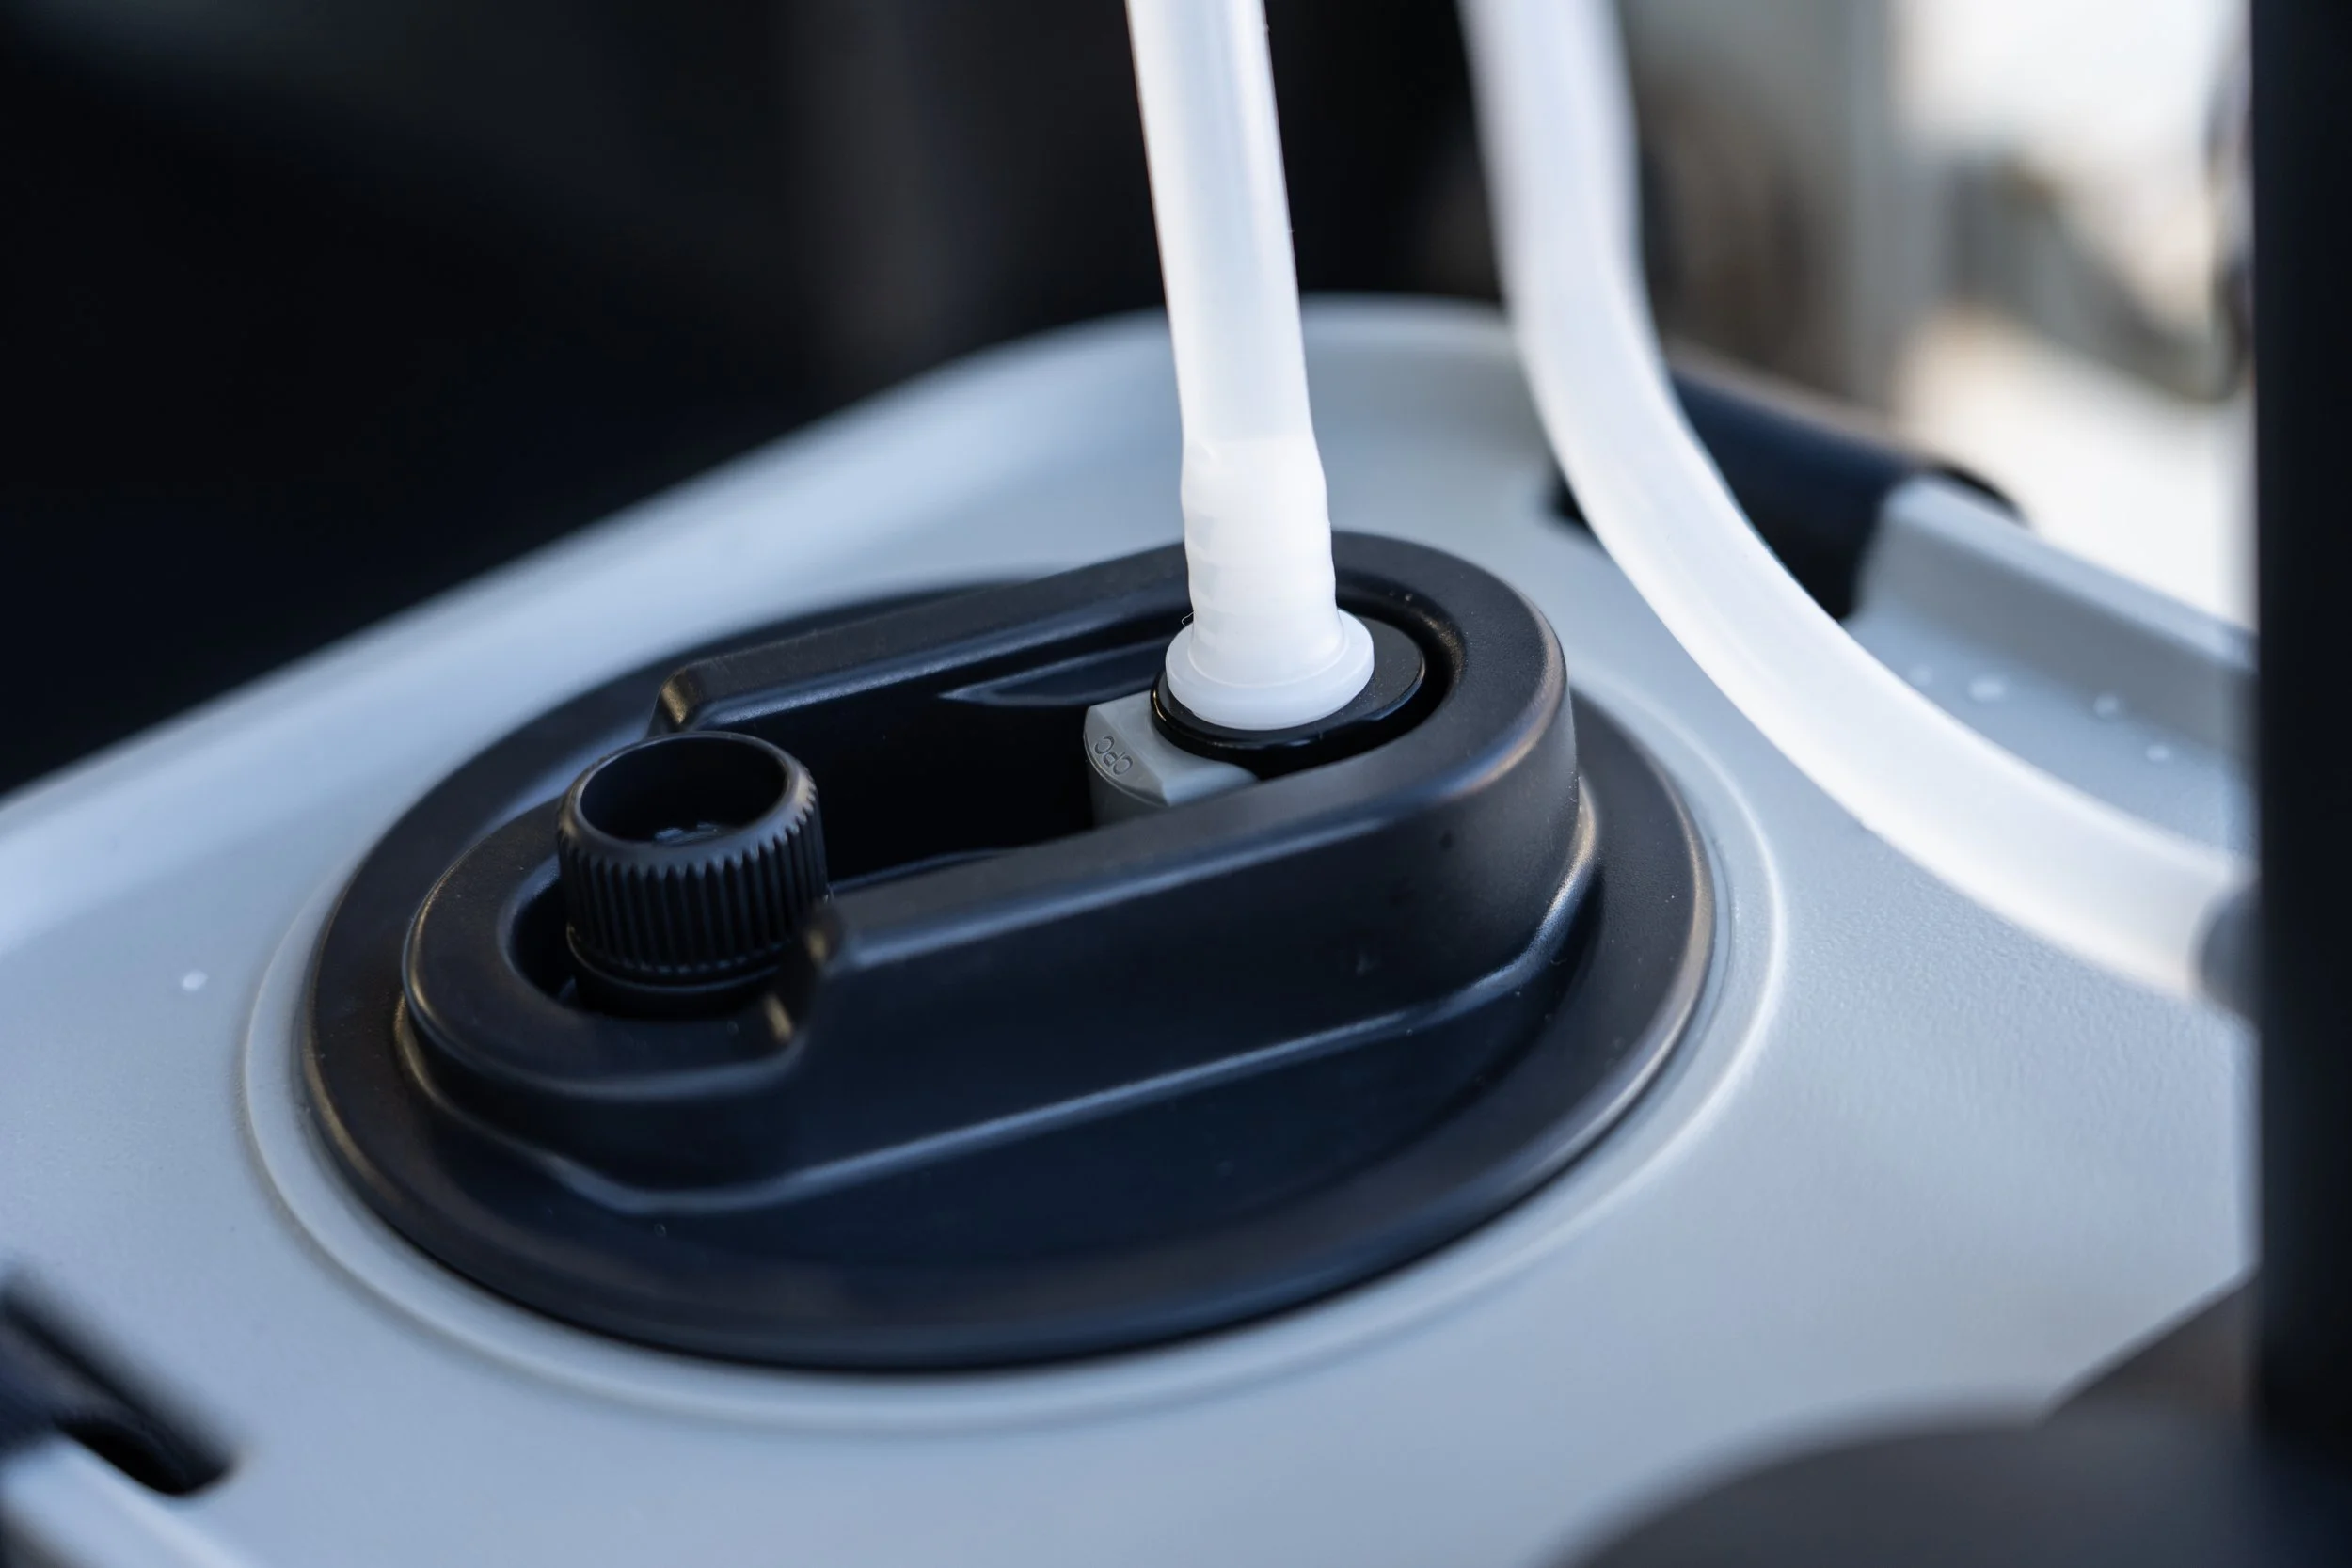
The fitting is used with the Dometic can’s nifty option: a USB rechargeable pump that dispenses water with a double tap on a touch-sensitive switch, and automatically shuts off after one liter or one minute, in case you set it to fill a pot and wander off and forget because you’ve just noticed the black bear rummaging through your Dometic fridge. The pump has a magnetic base, and comes with two plates which you can affix with adhesive pads to the can itself or anywhere else. The pump will also obviously stick to a steel bumper, tailgate, or the edge of a truck bed. (Land Rover and newer Ford pickup owners will need to use the stick-on plates.) An LED lights up the spigot area in the dark. Nice.

The Dometic Hydration Jug is made of food-grade (did they need to tell us that?) LDPE, and these things are stout. I stood on top of one that was erect, then I stood on it laying on its side. It didn’t squeak. Yeah, I’m probably lighter than the average American these days at 150 pounds or so, but you get the picture.

See why I was impressed? And in use, every feature functions just as it’s supposed to. The rechargeable pump is neat, but you don’t really need it; the included twist valve and gravity feed works just fine, especially given the breather.
A single Dometic Hydration Jug would be worth having even if you already have bulk water storage in your vehicle. Having a portable 11 liters of water with either a spout or a lighted pump would be handy in many situations—carry it to a picnic table if you’re transiting and staying at Jellystone Park. In fact, with the pump you could easily rig one of these as an impromptu shower.
Dometic has released a flurry of well-designed new products in the last year. The GO Hydration Jug is one of the best. Highly recommended.
Find Dometic here.
Hint: When using “Search,” if nothing comes up, reload the page, this usually works. Also, our “Comment” button is on strike thanks to Squarespace, which is proving to be difficult to use! Please email me with comments!
Overland Tech & Travel brings you in-depth overland equipment tests, reviews, news, travel tips, & stories from the best overlanding experts on the planet. Follow or subscribe (below) to keep up to date.
Have a question for Jonathan? Send him an email [click here].
SUBSCRIBE
CLICK HERE to subscribe to Jonathan’s email list; we send once or twice a month, usually Sunday morning for your weekend reading pleasure.


Overland Tech and Travel is curated by Jonathan Hanson, co-founder and former co-owner of the Overland Expo. Jonathan segued from a misspent youth almost directly into a misspent adulthood, cleverly sidestepping any chance of a normal career track or a secure retirement by becoming a freelance writer, working for Outside, National Geographic Adventure, and nearly two dozen other publications. He co-founded Overland Journal in 2007 and was its executive editor until 2011, when he left and sold his shares in the company. His travels encompass explorations on land and sea on six continents, by foot, bicycle, sea kayak, motorcycle, and four-wheel-drive vehicle. He has published a dozen books, several with his wife, Roseann Hanson, gaining several obscure non-cash awards along the way, and is the co-author of the fourth edition of Tom Sheppard's overlanding bible, the Vehicle-dependent Expedition Guide.