
Overland Tech and Travel
Advice from the world's
most experienced overlanders
tests, reviews, opinion, and more
One-Case Toolkit – Episode 3 – Tool Rolls and Cases (Online Workshop)

This is part three of the One-Case Toolkit series online. Please note we had some bandwidth and camera-quality technical issues on this recording, so parts of the over-head camera show-and-tell stutter a bit, but the information is solid!
Assembling a quality set of tools for a field repair kit is only half the job. For tools to function efficiently and make repair jobs easier, they need to be stored properly, in a way that protects them, reduces noise, and above all keeps them organized and logically accessible. In this segment Jonathan will discuss ways to do that, from Pelican cases to Wolf Packs to Zarges boxes, and a variety of tool rools.
An interactive Q & A session is included.
Length: 1 hour, including Q&A
Resources from the Episode:
Company websites:
http://www.adventuretoolcompany.com
http://www.blueridgeoverlandgear.com
Tool Storage Products:
Step22 Pangolin $145
Step22 Stingray box $85
ATC Wrench Roll $60
ATC Shop Roll $100
Blue Ridge Tool Bag $136
Blue Ridge Recovery Bag $70
7POverland sells their recovery kit in this bag https://7p.io
Socket rails: Amazon—Casoman 6-piece ABS socket organizer ($19.97)
Tools mentioned:
Hammer – https://www.parktool.com/category/tools
Ground cloth – Rescue Essentials QuikLitter https://bit.ly/2N56HmM
and https://www.blueridgeoverlandgear.com/collections/tools/products/trail-creeper-multi-mat

One-Case Tool Kit – Episode 2 – Wrenches and torque wrenches (online workshop)
Part two in Jonathan’s series on his legendary One-Case Toolkit.
Don’t even think about using pliers on that nut. Aside from a socket, a wrench is the only proper way to fasten or remove a nut of bolt without damaging it. But what wrenches should you carry? How big should you go? What about ratcheting wrenches and box wrenches? We’ll also discuss torque “wrenches,” and why you should have and use one regularly.

RESOURCES FROM THE WORKSHOP:

OVERVIEW: THE CONTENTS OF THE ONE-CASE TOOL KIT
From the workshop chat, some of the products and tips mentioned by viewers:
Knipex pliers wrench solves most of the stated issues with adjustable size.
The original style beam torque wrenches weren't (aren't) ratcheting. That's probably where the name got set.
With a beam torque wrentch , one can measure the torque as one removes the fastener, in case the torque specifications are not available. I use it to measure torque while removing head bolts on a engine with a blown head gasket to pinpoint which head bolts are less tight and /or which cylinder could have issues.
I learned today to get a torque adaptor in order to save space. Thank you. Axle nuts may go up to 250 ft. lbs.
Okay, on a R1200GS the Rear wheel drive to swinging arm, M12 x 1.5 is 100 Nm (74 ft-lbs)
In aircraft accident investigation the torque to remove fasteners is routinely measured
Engine crankshaft pulleys will approach 250 ft-lbs also.
I believe break away torque when loosening a nut is typically higher than the original tightening torque. So I’d be careful trying to determine appropriate torque that way.
Tech engineer here, a good factory torque spec will assume a level of cleanliness and thread treatment. more friction in the threads mean you need more torque to achieve a given tension. most anti seize will lower friction and thus torque required compared to dry. but if manual says to anti seize and torque to x, hopefully the engineer already accounted for it and you don’t need to adjust.
http://www.torque-rod.com/
My experience with the torque rod is they are not very accurate. I was tested them on a machine in my lab, I would not trust them.
For fasteners without factory specs available, there are tables of standard torques that have different values for different thread lubrication conditions. Bossard has a good fastener handbook PDF you can find online for metric ones.
I love my Knipex pliers, very durable and user friendly. Always get More tools.
I've seen some tables where based on fastener size there are (typical) applicable torque specifications. There's a DIN standard, if my memory's not wrong.
‘Load indicating washer’ are the ones that squirt at right torque. Hardish to find in metric sizes in small QTYs in US

One-Case Tool Kit– Ep. 1 – Ratchets-Sockets (Online Workshop)
Jonathan’s One-Case Toolkit is legendary. His tool classes regularly sell out at Overland Expo. This free online workshop aired September 12 launches a series dissecting the contents of the One-Case Tool Kit, beginning with what he calls “the most important tool you can have:” ratchet and socket sets.
RESOURCES FROM THE WORKSHOP:
OVERVIEW: THE CONTENTS OF THE ONE-CASE TOOL KIT
From the workshop chat, some of the products and tips mentioned by viewers:
Park Tool hammer is *not* deadblow. https://www.parktool.com/product/shop-hammer-hmr-4?category=General%20Shop%20Tools#tabbed-section
Here's the soft/hard face dead blow I mostly reach for these days. I like this one. (I also have a Snap-on ball peen deadblow that gets used everywhere.)
https://www.kctoolco.com/gedore-247-h-30-combination-hammer-kombi-plus-r-30-mm/
[h/t Don Hiscock]
With that Britool set no longer available, have you found a good alternative. What would you buy if you were putting the set together today?
https://www.exploringoverland.com/overland-tech-travel/2018/10/2/the-versatile-14-inch-ratchet-
Look near the bottom of this blog post from Jonathan
FACOM is part of Stanley-Black & Decker. Really good stuff. FACOM and Proton share a lot of stuff (both premium SBD brands).
This is the Proxxon set in the article mentioned: https://www.amazon.com/Proxxon-23286-65-Piece-4-Inch-2-Inch/dp/B000VD1R8U.
Tekton 1/2 - https://www.amazon.com/TEKTON-2-Inch-6-Point-Socket-Ratchet/dp/B07P7WLYFH/
Torque adapter brand was Facom
For ODB-II…. I have a Gap IIDTool for the Land Rover and in addition to letting you know codes, you can (re) program all the ECUs and modify the suspension. Super helpful for any Land Rover owner. [h/t Troy Angrignon]
I like the ScanGuage, but it doesn’t decode, so you need a manual also. I use it as supplemental gauges; nice bonus that it reads ODBII codes. [h/t David Robinson]
Micro Start https://themicrostart.com
and
NOCO brand (similar to Microstart)

Overland Tech — Dissecting the One Case Tool Kit - Ratchet and Socket Sets (free workshop)


Jonathan’s One-Case Toolkit is legendary. His tool classes regularly sell out at Overland Expo. Join him Saturday morning, September 12 as he starts his series dissecting the contents of the One-Case Tool Kit, beginning with what he calls “the most important tool you can have:” ratchet and socket sets.
An interactive Q & A session will be included.
Length: 1 hour
Start time: 10 am Pacific Standard Time / GMT - 7
(Having trouble figuring out time zones?Use this calculator: https://www.timeanddate.com/worldclock/converter.html)
Format: online via Zoom (you will receive a log-in link)
Cost: free
Access: This workshop recording can be viewed here.
Bogert Manufacturing wheel chocks
Chocking your vehicle’s tires is one of the most basic and critical safety procedures you can follow before changing a tire, winching, or working underneath it. Yet how many of us ever use anything but nearby rocks or logs to do so? Not only are you at the mercy of what’s available (Will this work, or do I need that bigger one over there?), but if you happen to be leading a trip or are otherwise in a position of some assumed authority, it lends a rookie taint to your otherwise faultless command presence to be seen looking around for rocks.
I thought about this recently while looking around for rocks.
To make matters worse, I had a good set of chocks with me—the clever folding units made by Land Rover—but they were inconveniently stashed in a compartment under the rear jump seat of the Tacoma, which itself was under several layers of Pelican cases. So I took the lazy route.
Lessons learned: a) Have stuff like this easily accessible, and if it isn’t, b) Follow Graham Jackson’s First Rule of What to Do When There’s Trouble, which is, Slow down and brew a cup of tea, and then Jonathan Hanson’s First Rule of What to Do When There’s Trouble, which is Use the right tools. Sorry Graham. And me.
As much as I like the Land Rover chocks, their lightweight, folding construction pretty much relegated them to tire-changing and working-under duties. Thanks to the fertile mind of Richard Bogert of Bogert Manufacturing, I now have a set of heavy-duty, winching-compatible chocks.
Constructed of 3/16ths-inch steel and heavily powder-coated, the Bogert chocks take up virtually no more room than the folding ones if you stand them on edge in the corner of a cargo box. A set of them comprises not two but, properly, four, so you can anchor two wheels on both sides, or four wheels on one side if you’re on a hill. Additionally, a set of holes and slots in each chock allows you to chain two together on either end of the wheel to prevent shifting if the truck jerks back and forth under a load—nice. Each set of chocks comes with four chains, so you can anchor each pair of chocks on the inside and outside of the wheel if needed. The result is one solidly immobile truck.
The set is now stored in the “Camper Setup” Wolf Pack box that rides just inside the door of the JATAC's Four Wheel Camper. So accessing proper chocks will be as easy as picking up a rock, and my faultless command presence can remain intact.
From now until the end of June, Bogert is offering a 15 percent discount on all their superb recovery tools and accessories. Please use code K7E. Bogert Manufacturing is here.
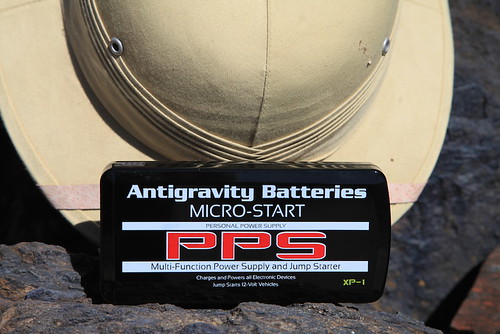
The Micro-Start XP-1
Experienced mechanics don't often sound giddy over the phone, but Dave Anderson sounded giddy when he called me from his Flagstaff, Arizona, shop, the Good Carma Garage (which really should be a radio program).
“I just bought this thing off a tool truck, and you have to get one,” he said, “You’re going to think it should be on every overlander’s equipment list—even before he buys a pith helmet.”
Dave. Such a kidder. As it happens, I own a pith helmet. And not one of those fake ones made from cork or, worse, styrofoam, either (I won’t even mention Graham’s mesh thing)—mine is a genuine pith helmet made in Vietnam from the pith of the Aeschynomene aspera, or sola plant (one of the original names for the helmet, sola topee, was later corrupted to solar topee). While they’re now little more than a Hollywood cliché, pith helmets are eminently practical—the thick fibrous material offers exceptional insulation from the tropical sun when touring one’s tea plantation or stalking a man-eating tiger with a Rigby.
Where was I? Oh, right: At Dave’s insistence I ordered a Micro-Start XP-1 from Antigravity Batteries. The zippered pouch that arrived three days later was no bigger than a calendar/day planner (remember those?). Inside was a bewildering array of adapters for charging various electronic devices from phones to laptops, and an astonishingly lightweight (15 ounces), 225-amp-hour lithium/ion battery, just one by three by six inches, which, incidentally, can also be used to jump-start your truck.
Say what?

It’s true. The pouch includes a set of battery-post clamps, and the company claims the power pack will start a V8-engined truck—not once, but several times.
Could this mean the end of jumper cables? I’ve always hated those things, and especially I hate what happens when I play good Samaritan to jump some poor bloke’s dead Malibu—in trying to help he always wants to grab the cables and hook them up in the wrong sequence—if not to the wrong terminals. I have to come off as a tyrant just to do a good deed. With the Micro-Start I’d be in complete control of the situation. And of course if your own vehicle becomes stranded you are completely removed from the need for a donor vehicle—handy if the nearest candidate might be 40 miles away.
The instructions for jump-starting a vehicle tell you to hook up the terminal clamps to the dead battery first, then plug the siamese fitting into the power pack. The reason for this is that, while the teeth of the clamps are well-surrounded by plastic, it would theoretically be possible to screw up and touch them together, resulting in the same alarming pop and flash you get when you do the same thing with jumper cables. If you were really determined and managed to clamp the teeth together, a puff of smoke would signal the death of your power source. I found it easy to remember to hook up the clamps first and then attach the battery, and virtually impossible to remember to unplug them first and then undo the clamps after use. But I never shorted anything.
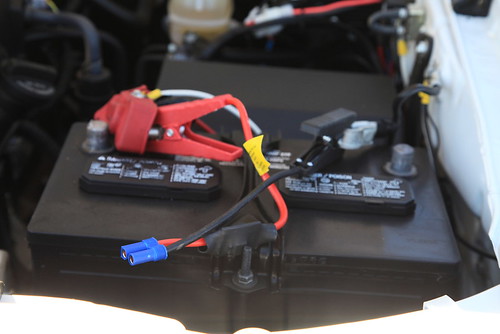 Hook up the terminal clips first, then plug in the power pack.
So how well does the XP-1 work? I disconnected our Tacoma’s battery to give it a try by clamping the leads directly to the battery cables. I wanted to video the process, and while setting up the camera I simply stashed the XP-1 battery in my back Levi’s pocket—it really is that small.
You can find more torturous demonstrations online, but the initial trial on the Tacoma went thusly:
It was impossible to detect a difference between the XP-1 and the way the truck fires with its own battery. I started it three times in a row with no trouble at all, and there were four blue LEDs left out of five on the battery’s charge indicator. Clearly there’s not only sufficient amperage inside that little brick to turn a V6’s starter motor, but to do it multiple times.
As impressive as that demonstration was, it simply confirmed the maker’s claims. Looking around for an unfair test, my eyes alighted on our 1985 Mercedes 300D turbodiesel. To start that the XP-1 would first have to power the glow plugs, then turn the hi-amperage starter necessary to crank a five-cylinder engine with 18:1 compression. After recharging the power pack and removing the cables from the 300D’s massive battery, I hooked up the XP-1, and:
Okay, so that was a bit too much to ask. (Scot Schafer at Antigravity Batteries confirms that they have a model in the works that will be configured for the much tougher task of starting diesel engines.) Rather alarmingly, there were no blue LEDs left on the charge indicator after the Mercedes experiment. Had I killed this thing 15 minutes after first deploying it? I plugged in its 120-volt charger (there’s also a 12-volt car adapter)—and an hour later it was back at full charge. It’s a resilient piece of equipment.
If your vehicle is powered by anything up to a 400-cubic-inch gasoline V8, the XP-1 will provide you with ample starting capability. The battery will retain its charge for many months at a time; if you remember to give it a top-up every half year or so you should be pretty much immune to becoming stranded due to a bad battery. And think of the effect on the owner of the dead Malibu when you start his car with a magic box the size of a paperback. It might be a good idea to keep a few XP-1 kits in the truck to sell at an exorbitant profit . . .
The XP-1 is a bargain at around $140. A basic model, the XP-3, sans the adapters for personal electronic devices, is available for about $30 less. AntiGravity Batteries is HERE.
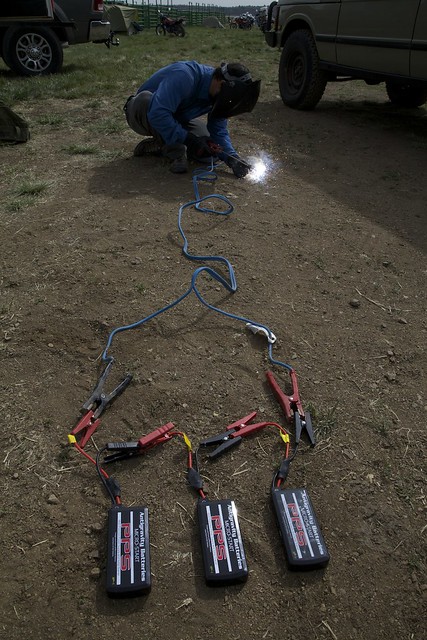
An update: While discussing the Micro-Start as we were setting up the Overland Expo, Graham Jackson, Tim Scully, and I started musing on whether one could weld by hooking up three of them in series. Taking a chance that we'd blow all three units we owned, Tim hooked them up, connected cables and a welding rod—and produced a perfect bead connecting two pieces of 1/4-inch steel. We were gobsmacked. We then hooked up two of the units to my Redi-Welder DC wire-feed unit, and again got a perfect result.
Obviously this is not something endorsed by the maker, and would quite rightly invalidate your warranty. But it showed what would be possible if a weld repair might make the difference between walking and driving out of a remote location.
Hint: When using “Search,” if nothing comes up, reload the page, this usually works. Also, our “Comment” button is on strike thanks to Squarespace, which is proving to be difficult to use! Please email me with comments!
Overland Tech & Travel brings you in-depth overland equipment tests, reviews, news, travel tips, & stories from the best overlanding experts on the planet. Follow or subscribe (below) to keep up to date.
Have a question for Jonathan? Send him an email [click here].
SUBSCRIBE
CLICK HERE to subscribe to Jonathan’s email list; we send once or twice a month, usually Sunday morning for your weekend reading pleasure.


Overland Tech and Travel is curated by Jonathan Hanson, co-founder and former co-owner of the Overland Expo. Jonathan segued from a misspent youth almost directly into a misspent adulthood, cleverly sidestepping any chance of a normal career track or a secure retirement by becoming a freelance writer, working for Outside, National Geographic Adventure, and nearly two dozen other publications. He co-founded Overland Journal in 2007 and was its executive editor until 2011, when he left and sold his shares in the company. His travels encompass explorations on land and sea on six continents, by foot, bicycle, sea kayak, motorcycle, and four-wheel-drive vehicle. He has published a dozen books, several with his wife, Roseann Hanson, gaining several obscure non-cash awards along the way, and is the co-author of the fourth edition of Tom Sheppard's overlanding bible, the Vehicle-dependent Expedition Guide.