
Overland Tech and Travel
Advice from the world's
most experienced overlanders
tests, reviews, opinion, and more
Is that . . . smoke?
Editor's note: Jim West, a captain in the Sun City Fire Department (and a U.S. team member in the 1992 Camel Trophy), kindly contributed to OT&T this excellent article on fire safety for overland vehicles (or any other vehicle for that matter). Consider the information here critical for your journeys. - J. Hanson
So, departure day is almost here. Your vehicle is kitted out with all manner of overlanding equipment. As it sits in the driveway, you go through your mental checklist: clothes . . . check; recovery gear . . . check; food . . . check; petrol . . . check; spare petrol . . . check; propane . . . check. Then it hits you—Okay, that’s a bunch of fuel; no, I mean a BUNCH. If this thing catches fire, the crew on the International Space Station will wonder what’s burning down there. In a mild panic, you rummage through the truck and, in the back of a cabinet, you find the fire extinguisher. You dust it off and take a quick look at the gauge. Green—good to go, right? Well, throttle back and take a moment to ponder the following:
When driving a vehicle into the outback, whether for a day trip or a year-long adventure overlanding through South America, serious considerations should be taken for general fire safety. The farther afield you’re traveling, the more comprehensive your plan and equipment should be.
If you have a good close look at your particular rig, you’ll find it has all the potential fire hazards of any typical motor vehicle, plus some special ones. Larger fuel tanks and more of them; fuels for cooking, heating, and auxiliary generators. Start with the obvious place—under the hood. Fuel lines should be given a close inspection for cracks, abrasions, and leaking fittings. Repair or replace any suspected problems. Onto the electrics—take a good hard look at the wiring, in general, with special attention to any aftermarket wiring, i.e. additional lighting, batteries, winches, etc. Any cracked, abraded, or melted insulation should be repaired. Also, take a quick look at all tubes and wires to make sure they are not routed too close to any heat source, such as the exhaust.
Are there any fuel or electrical lines running too close to that Borla, or the catalytic converter ahead of it?
Time to get dirty. Get yourself under that vehicle and have a good look around. Better now, in your driveway, than out in the mud. This will be the same as the under-hood inspection: fuel lines, wiring, and brake lines as well (brake fluid can be flammable.) One more thing to think about under there is the catalytic converter. They produc tremendous heat and can quite easily catch tall brush on fire. That would add some excitement to a picnic or campsite. Finally, have a good general look around the outside. If you have additional fuel mounted, make sure it is mounted properly and won’t puncture or leak while traveling down rough trails.
Time for a quick chemistry lesson. (No, we don’t get to blow stuff up, sorry.) Let’s look at the “Petrol versus Diesel” debate. As a general rule, liquids don’t burn, vapors do. If a liquid fuel is not giving off vapors, it won’t burn. Cool, but what does that mean? Petrol starts giving off vapor at any temperature higher than about minus 45ºF (-43ºC). This figure is called its flashpoint. Diesel, on the other hand, has a flashpoint of about 120ºF (52ºC) or higher. This obviously makes Diesel a much safer fuel in general. For instance, you and your best buddy (not for long) are out on a sunny 80-degree day and you need to refuel. No problemo, as it just so happens you brought an approved jerry can full of petrol and the appropriate filler neck. During said filling operation your buddy walks up with a lit sparkler (hey, it’s my story). The petrol is producing enough vapor for things to get very exciting very quickly—i.e. time for new friend, new vehicle, and a trip to the local burn unit. In the same scenario with diesel fuel and a new friend also strangely attracted to sparklers, nothing happens—zip, zilch, nada.
All right—back to that dusty extinguisher. Once a fire starts, you’re going to have to put it out, whether it’s a campfire, your rig, or that guy with the sparkler. What’s burning determines how you put it out. The most common opitons are: remove the fuel; cool the fuel below its ignition temperature; smother the fire (remove its oxygen supply); and, finally stop the chemical reaction. To properly put out a campfire, for example, you simply shovel on some dirt to smother it and then add water to cool it. A grease fire in a pan on the stove can be quickly smothered with a lid over the pan. A fire from spilled fuel might be solved by simply moving vehicles and other combustibles away and letting it burn off. FYI, a one-inch deep puddle of petrol takes about 15 minutes to burn out.
The idea here is you don't always need to use a fire extinguisher. But since you dug it out of that cabinet, let’s talk about it. Fire extinguishers are classified by what they put out: ‘A’ for combustibles, e.g, paper and wood; ‘B’ for flammable liquids, e.g., petroland diesel; ‘C’ for electrical fires; and ‘D’ for metal fires, e.g., magnesium. The most common extinguisher is an ABC type, which will be suitable for most fires you’ll encounter. A five-pound extinguisher is good for most normal-size cars and trucks. As the size of the vehicle goes up, so should the size of the the extinguisher.
What about that ‘D’ extinguisher? A lot of modern vehicles use magnesium parts, and if they do catch fire, an ABC extinguisher won’t put it out. The bad news is, ‘D’ extinguishers are bigger, heavier, and more expensive (about $300.) The (sort of) good news is, magnesium is hard to ignite. So by the time it gets burning and you need that ‘D’ extinguisher, the vehicle would be fully engulfed in flames and a total loss. So you have that going for you.
Some final thought on extinguishers: They should be inspected no less often than annually. This entails checking the pressure gauge to make sure it is in the green. Also, and as importantly, you should shake the extinguisher and feel the dry chemical powder moving up and down. If you can’t feel this movement, the powder has caked into a solid and the extinguisher will not function.
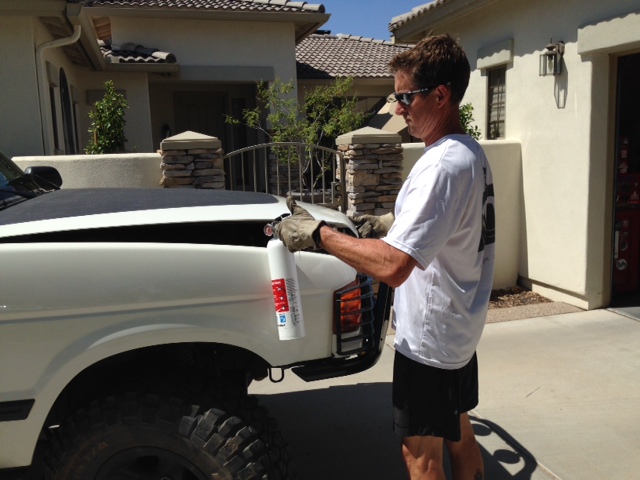
Finally, where does one put the thing? There is a very narrow window of time after a fire starts when an extinguisher is effective. Fire doubles in size every minute. Let’s just ponder that one for a minute . . . okay, the fire just doubled in size. An extinguisher should always be mounted in a readily accessible area for quick access.
Since most vehicle fires ignite in the engine compartment, it makes sense to locate the extinguisher some distance away, but quickly accessible. The mount here ensures it can't be covered by luggage.
Now we have the basics taken care of. We’ve inspected the vehicle, we’re practicing good fire-prevention safety, we have all manner of ways to put out a fire. It’s time for the hero stuff.
You’re driving happily down the trail (remembering to Tread Lightly); you hear a pop under the hood, and see what looks like smoke billowing out of the engine compartment. It could have been a heater or radiator hose. Maybe an AC line. Maybe an engine fire. How do you know? First of all, steam and freon dissipate quickly, smoke doesn’t. Second, fire is hot (rocket science, I know.) If you see the beautiful paint on your hood start turning brown and bubbling up, it’s hero time. The clock just started ticking and you have very little time to make some decisions and start to act on them. Here is a example of how it will play out if you do every thing perfectly:
- Stop the vehicle off the trail/road, preferably in an open space. Dirt, not grass—wildland fires are a bigger problem than car fires. If there’s nothing but grass, leave the vehicle on the trail.
- Turn off the ignition.
- If your hood latch is inside the car, open it immediately (the cable will burn through quickly).
- Get everyone out of the car and well away.
- Grab your extinguisher and, if at all possible, gloves—that hood is going to be hot.
- With the hood popped but not fully open give a quick burst from the extinguisher through the opening between the hood and fender. Never fully open the hood before this step. The fire could travel up the angled hood and burn you.
Displaying a regrettable lack of commitment to authenticity, Jim did not actually light a fire in the engine compartment of his Discovery. But you get the idea.
- Open the hood completely and continue to use extinguisher until fire is out. Short bursts of dry chemical are preferred because you don’t want to waste a very limited resource. The goal is to ‘blanket’ the fuel in order to smother the fire.
- Now comes a very important step: Make sure the fire is completely out and won’t reignite. This should take about ten or fifteen minutes. A good way to judge the time is to take your pulse rate. When it drops below 100 beats per minute, you should be about good.
So now what? You and your passengers should all be standing around the front of your rig, staring at the engine compartment, with that ‘deer in the headlights’ look. The extinguisher is still in your hand. You’ll find it very hard to put it down for the next 24 hours—that’s ok, you'll get over it. The engine compartment itself will be a mess of white dry chemical and melted wires and hoses. Time to break out the water can and tool kit and get to work. During the cleaning and repair process there will probably be some raw fuel leaking or just puddled in there so keep all ignition sources (i.e. sparklers) away.
Here are a few final thoughts to wrap this up:
Ninety two percent of all car fires are preventable with good maintenance (I just made that stat up but I know the percentage is really high.) The old saying ,“An ounce of prevention is worth a pound of cure” is spot on. With regards to extinguishers, if you don’t have one, get one. Actually, get two—a good one and a cheap one to practice with. The directions are right on the label and quite easy. They’re only about $20 and it’s money well spent. If you would like more training most local fire departments have classes and/or demonstrations for fire extinguisher use. And on that note, may your adventures be plentiful and safe.
Cheers,
Jim West
Filson redux . . .
Early this year I posted an article titled “Et tu, Filson?” which detailed my concerns that Filson—long one of the most reliable suppliers of high-quality expedition gear and clothing—might be headed down the same diluted and fashionized path as so many other historic outfitters (read it here).
The article produced a flurry of comments, and a surprise: a lengthy and obviously sincere interaction with a Filson customer service representative named Phil, who promised he was passing the dialogue along to marketing executives at the company, and who assured me there were many long-time employees who shared my concerns and were determined to keep serving Filson’s core customers.
My specific rant concerned Filson’s Feathercloth Shirt, which had long been my standard wear for both the Arizona desert and Africa. From a pricey but bearable $70 it morphed overnight into something called the Seattle Shirt—same item, only double the price, which made it untenable (for me, any way) as a working shirt subject to hard use and possible tears. I rued its loss, and wished aloud (and loudly) that Filson would designate some Feathercloth rendition as a real outdoor shirt, and drop the price.
And . . . voilá.
Last week I got an email from a fellow shirt wonk, Gary Haynes: “Have you seen this?” Included was a link, which, when opened, introduced me to the brand new Filson Expedition Shirt. Feathercloth, some interesting-looking features, and a sub-$100 price—right on the edge of finger-curling affordability (only given the astonishing lifespan of my earlier Feathercloth shirts).
Wow, like, Power to the People.
I called the long-time Filson public relations rep Amy Terai (a veteran in an industry that usually chews through personnel like gum), and asked for a sample.
So, let’s take a look at this thing.
First off is the Feathercloth fabric, a . . . feathery . . . but tightly woven poplin of just three ounces per square yard. At first it seems impossibly delicate, but the incredibly tight weave renders it as durable as heavier fabrics. It soaks up sweat instantly, and dries faster than you can imagine. Between May and October in Arizona, when I hang laundry out to dry I can quite literally take down the first Feathercloth shirts I put up by the time I finish hanging the rest of the load. Washed in a sink while traveling it dries nearly as quickly wrung out and hung in a window (although wringing also wrinkles it like crazy). Fans of synthetic fabrics boast about short drying times, but I’d put Feathercloth up against any of them. (Little-known practical advantage to cotton: If you stay at lodges anywhere in Africa and have your laundry done, your clothes will be ironed, quite possibly with an iron heated on a stove. Roseann has a couple of synthetic skirts with perfectly shaped iron scorch marks on them.)
So, on to other features. There are two large breast pockets, properly flapped and secured with buttons—which, unlike Velcro, will work just as well in three years as they do now. New to the Expedition Shirt are buttoned tabs for rolling up and securing the sleeves above one’s elbows—nice—and four gusseted vent holes under each arm—even nicer. The fabric under each forearm is doubled for abrasion resistance.
The collar does not button down. I prefer button-down collars to keep them from flapping in the wind and to keep the shirt looking neater, but that’s a small gripe; I often simply sew on such buttons on myself. Speaking of buttons, they seem a bit more substantial than those on my earlier shirts. On the other hand, the shirt’s seam stitching has opened up a bit, from ten per inch to nine. I’ve never had a seam blow out on a Filson shirt so I’m not sure this matters, but I wonder how much they save by turning a dial on the sewing machine.
What distinguishes the Expedition Shirt in catalog photos are the epaulets. Epaulets—something of a misnomer, as an epaulet is properly the military shoulder decoration that was held on by what we now call the epaulet—are useful at times for securing camera or binocular straps when you don’t want them sliding off your shoulder. To work effectively, though, they must be sewn through about an inch inward from the shoulder seam, otherwise the strap of whatever it is you’re securing can drag the shirt off your shoulder.
A proper epaulet . . .
The Filson’s epaulets, I noted, are properly sewn through, so I lifted the collar to check the securing buttons and . . . um . . . huh? There are no securing buttons. The “epaulet” is sewn on at both ends, rendering it nothing but a fashion item.
. . .but no!
Okay, so that’s a fail. On virtually every other count, however, the Expedition Shirt is not only a welcome new product, but an actual upgrade to the original Feathercloth Shirt, which helps make up for the price difference. Finally, it’s available in “small,” which fits me properly. I use quotation marks around “small” because I’m five nine and 150 pounds and used to be considered a solid medium. Now “medium”—which is the smallest size a great many companies offer any more—is tailored . . . no, wrong word! . . . constructed for 180-pound guys, and at the other end of the scale they just keep adding X after X to the L. If the world were fair I’d be able to buy two small shirts for the same price as an XXXXL since they probably take the same amount of fabric. And while we’re at it, the person next to me on an airline should have to pay for half my seat if he oozes over into my space. And furthermore . . .
Ah. Where was I? Oh, right: While I’m still trepidatious regarding the eventual fate of Filson, given the current ownership and the whole “lifestyle” movement (not to mention the tragic decline in so many field sports), it does seem that, indeed, there are people at Filson who want to continue the Filson tradition and serve the company’s core customers—people who actually spend time outdoors. Bravo.
Summer’s Not Over Yet: Three ways to beat the heat while motorcycling
You want to go ride, but the temperature read out on your motorcycle shows you near triple digits. Then you look at your gore-tex infused or ballistic nylon suit and wonder how you are going to be comfortable enough to do it? Body heat regulation is an important factor to consider for any ride, and a cooling vest may be the answer you are looking for.
Unlike most who are counting down the last days of summer, I live in a location where it’s hot and humid year round. I am constantly on the search for how to keep cool while I ride. In addition to consistent hydration, I have found a cooling vest to be a good solution to the heat.
When I stay local and practice slow (under 15 mph) motorcycle exercises on the weekends, I wear a Leatt Coolit vest under Klim’s solstice base layer (the high neck hides the vest), and then modular protective gear on top of that. The cut of the vest is made for a man, but does fit the curves of a woman well and true to size. All the cooling vest needs is a quick 5 min soak in the sink, a good squeeze to remove the excess water and it’s ready to wear. The vest retains water for a few hours, depending on heat, body heat, and humidity. Where I live, on average, is 80% humidity and the “coolness” lasts for about 2-3 hours during hot 90F weather. After about two hours, the vest is still damp, but has warmed up to my body temperature and lost its cooling effect. I keep cold water with me and will drench the vest again (while wearing it), but most of the time a fast lap or two around the block helps. > Read full article here.
The "ultimate" tent stake?
Anyone who has used a tent of any size in the field has experienced the comically inadequate nature of the stakes supplied with most of them. Tent manufacturers are driven to, a) publish the lightest possible packed weight of their product, and, b) save as much as possible on the ancillaries supplied with it. As a result, the stakes you get with a tent vary from spaghetti-like round aluminum pegs the diameter of a medium-sized nail (which I have as a demonstration bent in my teeth), to, if you’re lucky with a high-quality tent such as the excellent models from Hilleberg or Terra Nova, a heat-treated, V or T-shaped DAC stake—but still no more than six inches long. The latter work acceptably in perfect grass turf, the former work acceptably nowhere. If you expect to be able to safely anchor your tent in a range of conditions and substrates, you need aftermarket stakes.
The Ultimate stake on top, with a high-quality but too-small factory stake below
Thirty years ago, Black Diamond Equipment produced something they called the Chouinard T-Stake. It was made in two sizes, eight or nine and a half inches, from 2024 T3 heat-treated aluminum. We bought a dozen or so. If I’d known then what I know now, I’d have taken out a loan and bought a hundred. T-Stakes proved virtually indestructible, and the holding power was superb. My old Marmot Taku survived numerous howling Chubascos on Sea of Cortez islands anchored with just one upwind T-Stake; our North Face VE25 sat unperturbed through an arctic storm on the Beaufort Sea coast that the VHF radio said was gusting past 60 mph.
Sadly, tent stakes have a way of evaporating. It’s so easy to miss one after taking down a tent that used eight or ten or more with various guylines. Over the years our original supply of T-Stakes has dwindled to the point where we only have six or seven, jealously hoarded and thus rarely used, which defeats the purpose. Recently I missed an auction on eBay for nine of them, in good condition, with a buy-it-now price of a hundred bucks. I’m glad I missed it, because I would have been tempted.
You’ve gathered that I’ve yet to find a fully comparable stake, and you’re right. I’ve never encountered the combination of reasonable weight and size with that much strength. But I might just have come close. In doing some research for another publication, I literally stumbled upon something called the “Ultimate” stake, at, of all places, Campmor.
Ultimate stake on top, a well-used Chouinard T-Stake below
Made from 6061 T6 aluminum, and available in a stout nine-inch length and an even stouter twelve-inch, the Ultimate stake certainly looks the part. A central U-shaped body is backed up by a substantial gusset—no bending this one with my teeth. At the top are both a hook and a hole for tent loops or guylines (the hook also helps when pulling the stake out). Campmor says they’re made in the U.S., but I found not a trace of branding on the four nine-inch versions I ordered to try. I don’t know if Campmor has them made or is simply retailing them. That’s weird.
The machining on the Ultimate stakes is definitely a step down from the superior anodized finish on the T-Stakes—although, at $3.49 each for the nine-inch size, they’re only a dollar more than the larger T-Stake cost 30 years ago. I plan to take a Dremel to the hook and hole to round off the sharp edges and reduce chafe on guylines and stake-out tabs. Presumably the Ultimate stake is designed to be inserted with the U-shaped edge toward the tent. This gives the stake less cross-sectional area than the large T-Stake and about the same as the small one (although I suppose the U shape might enhance resistance over a flat stake). I wonder if in soft soil using it sideways might be more effective, given the broad gusset.
I tested the resilience of the Ultimate stake by hammering one repeatedly into compacted Arizona Sonoran Desert soil—used for centuries by residents to make bricks, literally. It held up just fine, the most obvious signs of use being a slight peening on top. My experiences with other stakes, especially the T-Stake, leads me to believe this sort of stabilizes over time, whether from work hardening, simple expansion of the contact area and resultant dispersal of impact force, or some combination of the two.
Great—time for test-to-destruction. I chose a patch of asphalt in town and started hammering the Ultimate stake into it—or rather, at it, because penetration was minimal. However, the “weak point” of the stake revealed itself: the point right at the hook, where the gusset narrows. The neck began to bend backwards at that point. A demonstration beyond reasonable expectations, but it did point out where one of these would fail if you seriously abused it.
"Weak point"revealed: note bend at neck
So is the Ultimate stake the ultimate stake? Given the astonishing condition of my 30-year-old Chouinard T-Stakes, none of which shows the slightest sign of bending, I’d have to say no. However, it’s a damned good stake. Available here.
Hint: When using “Search,” if nothing comes up, reload the page, this usually works. Also, our “Comment” button is on strike thanks to Squarespace, which is proving to be difficult to use! Please email me with comments!
Overland Tech & Travel brings you in-depth overland equipment tests, reviews, news, travel tips, & stories from the best overlanding experts on the planet. Follow or subscribe (below) to keep up to date.
Have a question for Jonathan? Send him an email [click here].
SUBSCRIBE
CLICK HERE to subscribe to Jonathan’s email list; we send once or twice a month, usually Sunday morning for your weekend reading pleasure.


Overland Tech and Travel is curated by Jonathan Hanson, co-founder and former co-owner of the Overland Expo. Jonathan segued from a misspent youth almost directly into a misspent adulthood, cleverly sidestepping any chance of a normal career track or a secure retirement by becoming a freelance writer, working for Outside, National Geographic Adventure, and nearly two dozen other publications. He co-founded Overland Journal in 2007 and was its executive editor until 2011, when he left and sold his shares in the company. His travels encompass explorations on land and sea on six continents, by foot, bicycle, sea kayak, motorcycle, and four-wheel-drive vehicle. He has published a dozen books, several with his wife, Roseann Hanson, gaining several obscure non-cash awards along the way, and is the co-author of the fourth edition of Tom Sheppard's overlanding bible, the Vehicle-dependent Expedition Guide.