
Overland Tech and Travel
Advice from the world's
most experienced overlanders
tests, reviews, opinion, and more
A compressor for the Boss air bags
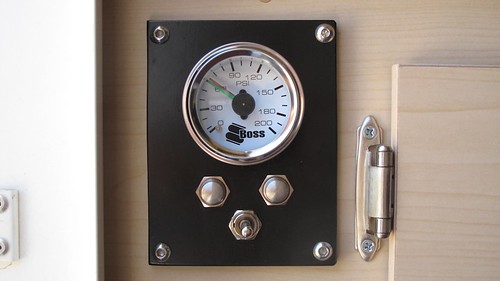 The bottom switch adds air to both bags simultaneously. The two buttons above bleed air individually to level side to side.
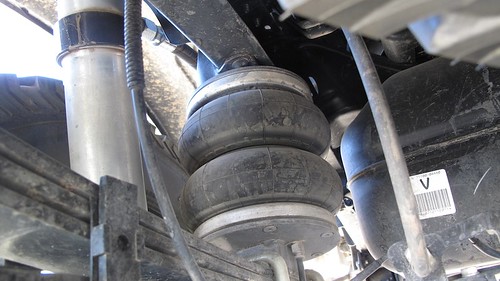
The Boss air bags I installed to level the JATAC (see HERE) have been working perfectly so far. We recently drove into Mexico’s Sierra Madre to retrieve some trail cameras we had set up to survey mammal populations on a remote property owned by the Catholic Church. The last 12 miles requires four wheel drive, and several sections flexed the suspension past its limit so we wound up with one wheel in the air. The Boss bags took it in stride.
When I installed the bags I temporarily hooked up a simple manual-fill arrangement. But the kit came with a very fine compressor and a remote switch and gauge, so last week I installed the complete system to give us push-button control of the bags.
We decided to install the switches and gauge in the camper rather than the cab of the truck, since it’s easier to check the level back there. It also gives us the capability to quickly tweak both the fore and aft and side to side level of the camper when parked. The question was, where to mount the gauge/switches, as well as the fairly bulky compressor. I located what seemed to be a perfect spot for the controls just inside the camper’s door on the left, above the two switches that control the LED interior footlights and the exterior floodlamps. Since the battery compartment is right behind this spot, that would simplify wiring.
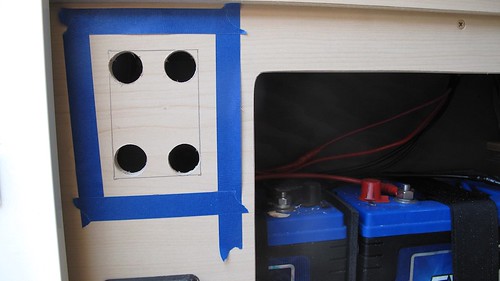 Pilot holes prior to cutting the opening. Painter's tape prevents scratching.
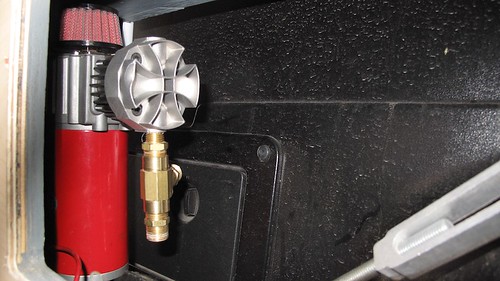
The compressor was more problematic, but eventually I located a spot I thought would work, inside the access port for the left rear turnbuckle that secures the camper to the truck. At the back, inside the hatch, the compressor barely fit vertically against the outside wall of the battery compartment—again minimizing the wiring run.
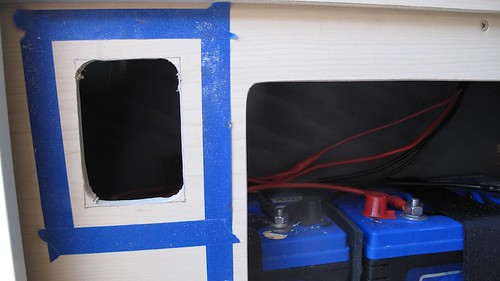
The Boss controls come mounted in a steel panel designed to be attached to the underside of a dash, and that wouldn’t work for this application. I had some 1/4-inch-thick high-density plastic sheet lying around, so I cut a panel from that, drilled it for the gauge and switches, and painted it black with Krylon formulated for plastic. Then I trepidatiously took a jigsaw to the camper’s cabinet and opened a spot for the assembly. The result looked decent and is effortless to access for adjustment.
The compressor took much more winkling, especially because I wanted it secured properly so we’d never have to worry about it vibrating loose. With the help of a sidewinder drill and a bit of blood loss I was able to mount it to the plywood battery compartment wall with stainless bolts and fender washers. I ran the air lines down through a hole I drilled in the bed inside one of the stock little storage compartments. (Doing so confirmed that the fiber-reinforced material Toyota uses on their composite beds is tough stuff indeed; it felt and smelled like drilling through thick fiberglass.)
With everything hooked up, adjusting the level on the truck is as simple as pushing a switch. The way the system is designed, both bags fill at once, and you then use individual buttons to deflate one or the other bags to even them side to side. The clever gauge has two needles, one red and one green. You hook them up so nautical running-light rules apply: red for port (left) and green for starboard.
I won't say having to climb under the truck with a compressor to fill the Boss bags manually was exactly . . . hell . . . but the complete system sure makes it easy.
A Hi-Lift jack mount for the JATAC
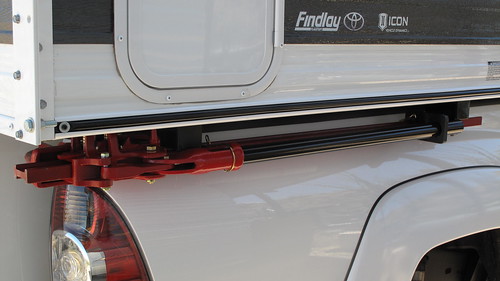
The Hi-Lift jack is a useful tool, but it’s also a pain to carry securely on a vehicle, especially if you want to keep it reasonably accessible. I’ve seen many mounts that achieved one but not the other—and too often, safety loses out to convenience. Sadly I had neither a camera nor a cell phone with me a few years ago when I spotted a Hi-Lift mounted horizontally on top of a bull bar on a truck, just above hood level—and secured with a pair of tightly wrapped bungee cords. The imagery of what could happen if that truck were smartly rear-ended was . . . colorful, not to mention what could happen to an innocent person if Mr. Thatoughttaholdit rear-ended someone else. For reference, a 30-pound Hi-Lift mounted on a vehicle that comes to an abrupt halt from 30 mph exerts a force of 903 foot-pounds of energy on whatever is holding it to that vehicle.
I see a lot of Hi-Lifts bolted to roof racks—secure, safe but for the modest impact on CG, and more likely to stay free of road grime, which can quickly foul the Hi-Lift’s mechanism. It’s not a bad spot if you can access it without climbing. Also good are dedicated mounts on rear tire carriers (as opposed to the ones that bolt behind the spare tire, which are a pain). I suppose a properly engineered mount atop a bull bar is okay; it’s certainly handy there. But I’ve never seen one that didn’t impede forward vision and access to the engine compartment. And on a strictly personal note, it looks just a little too, well, Moaby, if I may coin a word.
Mounting a Hi-Lift on the JATAC presented its own challenges. The roof is out of reach and devoted to solar panels. We’ll be installing a Hi-Lift-compatible winch bumper up front soon, but that was rejected for the reasons stated above. And we’ve also decided not to install a rear bumper with big swingaways, to hold down mass at the back of the vehicle. What did that leave us?
I asked Tom Hanagan at Four Wheel Campers about fabricating a mount that would bolt to the rear wall of the camper, directly through the vertical aluminum frame members, to hold the jack vertically to the right of the door. He thought it could work, but was hesitant to sanction the idea unequivocally. And that location would still hang the mass off the back of the vehicle.
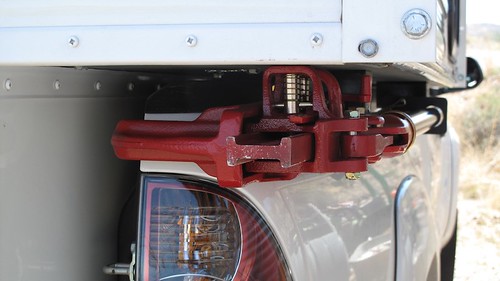
Then, while walking around the truck stroking my chin and pondering, I noticed the area where the camper overhangs the truck’s bed on each side. I held up a Hi-Lift to the spot, and it tucked in as though designed to ride there. The location would be completely out of the way yet quickly accessed, and while the weight would still be toward the back, it was significantly forward of a rear wall mount. I decided to mount it on the passenger side, to compensate for the weight of the truck’s fuel tank and the camper’s water heater, both of which are on the driver’s side.
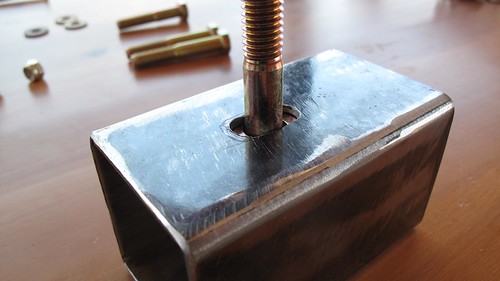
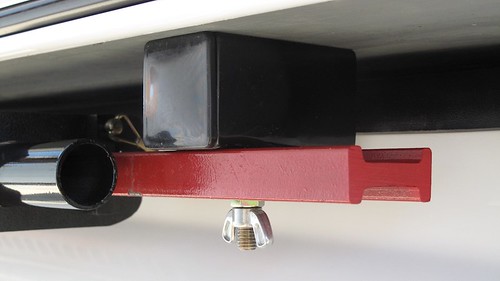
I used two short lengths of two-inch-square steel tube for the brackets. First I located the spots I’d drill through to hang the brackets—one in the propane tank compartment, one behind the fridge inside the camper. I used two 1/4-inch grade 8 bolts with fender washers to anchor each bracket through the plywood (which fortuitously is double thickness in the propane compartment, where the heaviest part of the jack would be). To secure the jack to the brackets, I used a 3/8ths-inch grade 8 bolt on each one. The bolt was too long to slide into the tube and down through the hole I drilled, so I drilled an adjacent hole and made a slot to get the bolt through. I tack-welded each bolt in place, and welded a short piece of thicker steel under each bolt as reinforcement. On the rear mount I extended the reinforcing strip forward and drilled a hole through it, to secure a padlock through the mount and the standard of the jack.
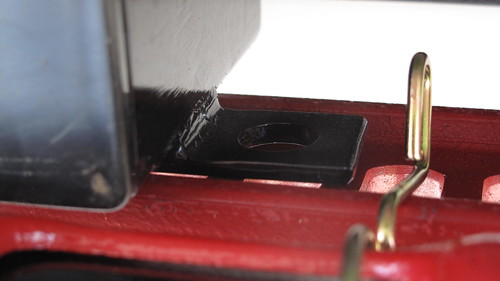
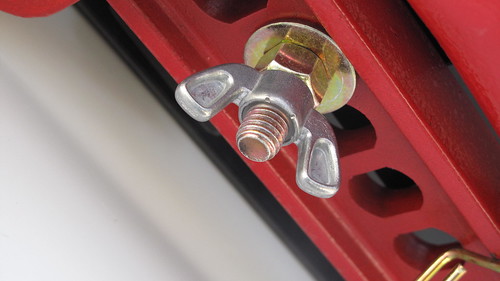
Positioning the mounts laterally was tricky. I wanted the jack tucked all the way under the camper, but needed clearance to drop it free of the mounting bolts without scraping the sheet metal of the truck’s bed. With a bit of winkling, I got them just about right. One needs to be cautious and not just yank the jack free; it must be twisted slightly to get in or out without hitting the lifting mechanism on the back of the bed, but it’s easy to do single-handed. To secure the jack to the bracket I use a grade 8 nut to hold the weight, and a nylock wingnut to keep it snug.
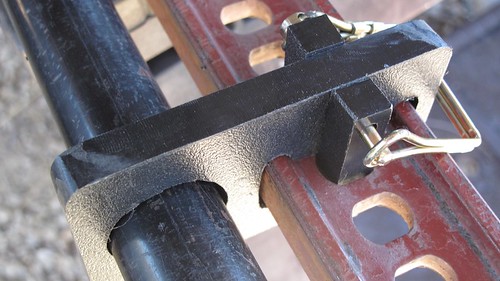
 The next issue was to ensure the jack’s operating handle stayed secure while driving. I have a stock rubber handle keeper, which slides over the handle and the standard, but it can migrate when subjected to vibration. So I fabricated a modified version from some half-inch-thick polyethylene I had around, and cut two polyethylene pieces that lock the keeper in place via a spring clevis pin. Done.
With the jack’s base plate in place, the right turn signal is just slightly obscured from above and behind the truck. It would only be an issue if someone in a semi was close behind us, but we’ll keep the base plate in our recovery kit anyway, and thus avoid potential legal issues as well. With that gone, one needs to be absolutely certain that the selecting lever of the jack is in the “lift” position, otherwise the entire lifting mechanism could migrate off the back of the standard while driving (or be propelled off it in an accident). Not good. I’ll use some sort of secondary arrangement as backup, likely a short bolt and wing nut. (Note here: A Hi-Lift should always be stored with the lever in the lift position anyway.)
So far the arrangement works perfectly. The jack is totally out of the way, yet easy to retrieve. In terms of safety, the mount should be secure through any but the most catastrophic impact: The force applied by the brackets to the floor of the camper would be in sheer; with four grade 8 bolts securing the assembly I’m sanguine.
Next task: to mount a front bumper on the JATAC that will properly accept a Hi-Lift jack for recovery purposes.
An update for the Safe Jack
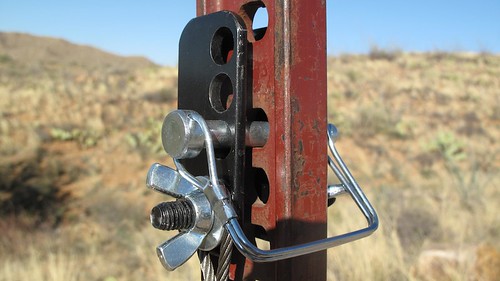
If you've read THIS entry, you know I was impressed by the Safe Jack stabilizer for the Hi-Lift Jack. In many scenarios it vastly increases the utility and safety of the Hi-Lift, and the base plate on its own makes a fine replacement for the old orange plastic ORB base in soft sand or mud.
I've been using the tool for a couple months now, and remain impressed. However, like almost any new product, I noticed potential for improvement. The design of the upper clevis precluded the jack's handle from resting against the standard, so the spring clip that holds the handle vertical when the jack is unattended would not engage. (I've been carrying a strip of One-Wrap Velcro to secure the handle when needed.) The clevis also limited somewhat the upper travel of the jack's foot.
Apparently Richard Bogert of Bogert Engineering noticed the same issues, because he recently sent me a redesigned upper clevis. The new piece now attaches to the front of the standard rather than the rear, and the eyebolt tensioner is gone. This increases travel, and allows the handle to touch the standard, engaging the spring clip. A new clevis pin with a wire latch simplifies attachment, and two side-mounted wing nuts adjust tension if necessary. The new piece even saves weight compared to the old one, and on the front face is a section of UHMW polyethylene to protect the vehicle should the tool come into contact with it.
If you own a Safe Jack with the original clevis, Bogert will send you the updated version for fifteen bucks. That's barely more than postage alone would cost. Of course new Safe Jacks will all be equipped with the updated part.
It's an excellent upgrade, and makes a good tool even better. Production should be underway within a week; check with Bogert Engineering HERE.
Lifeproof's Total Water Protection Program
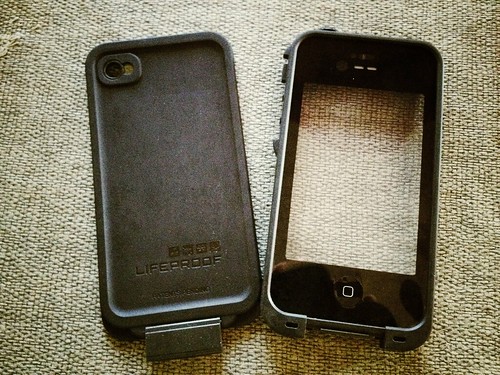
Since being seduced into the world of phones that cost more than lunch, I've come to count on the peace of mind afforded by the Lifeproof case I got for my iPhone 5. It adds shock resistance, protection against rain or even dunking, and a much more secure grip on the phone—the last of which which lessens the chance that you'll need the first two.
Now Lifeproof is adding even more peace of mind with their Total Water Protection Program, a guarantee that as far as I'm aware is the first of its kind. For one year you get free one-time repair or replacement of your iPhone or iPad if it sustains accidental water damage while in a Lifeproof case. That's a pretty bold step, and an indication of the confidence the company has in the product.

It's particularly impressive given how compact and unobtrusive the Lifeproof case is to begin with. Within a few days I'd forgotten my phone was even enclosed, and I have no trouble at all operating the phone through the screen.
For more information, see the Lifeproof website HERE.
Kaufmann Mercantile

My first encounter with Kaufmann Mercantile was nearly my last.
A friend sent me a link to a page on their site that featured a slingshot. Cool—except this slingshot was made from the natural fork of a buckthorn tree branch, its air of Tom Sawyer Americana yours for $21.
What?
No one buys a treefork slingshot, I spluttered. A treefork slingshot is something you make yourself when you’re 10 years old, using a cut-up bicycle inner tube as propulsion. I made one, and used it to essentially random effect before discovering the relative deadliness of the Trumark Wrist Rocket*.
I nearly clicked off the site, but some sort of morbid curiosity induced me to read further. Turns out the buckthorn is an invasive species in Minnesota, and the trees are regularly cut down to stumps by community service groups. A fellow named Bill Pine makes slingshots from the offcuts.
Well . . . okay. I still was of the opinion that red-blooded kids should make their own damn slingshots, but at least the philosophy behind these was commendable. So I forced myself to look beyond the nearby “handmade wooden rope swings” (don’t get me started . . .)—and wound up spending a good half hour browsing through a fascinating hodgepodge of high-quality odds and ends, from sturdy wire crates built in a century-old factory in Texas, to handmade ceramic growlers, to riveted aluminum lunch boxes from Canada, to Sheffield-made cabinet-maker’s screwdrivers (or should I say “turnscrews”). I could have dropped a thousand bucks effortlessly in that time—yet, unlike so many twee boutique online catalogs, the Kaufmann site also had loads of interesting items under $20. Clearly the founder of the company, Sebastian Kaufmann, wasn’t just interested in expensive stuff; he simply liked good stuff, especially if it’s unique.
So . . . sigh . . . now I’m on Kaufmann’s insidious emailing list, and rarely a week goes by without some temptation.
Recently I had them send me a couple of intriguing items: a pair of elkskin work gloves with, unusually, the smooth, outer side of the leather turned in, and a so-called EDC (Every-Day Carry) keychain kit, about which more in a minute.

The gloves are made in Centralia, Washington, by a company called Geier, who’ve been doing it since 1927. Like deerskin, elkskin is soft and somewhat elastic, but considerably thicker and more durable. Most significantly, turning the smooth outer surface of the leather inside creates what is simply the most comfortable work glove I’ve ever used, and I go through a lot of gloves where we live. Ordinary full-grain cow-leather gloves, with the rough surface in, can become work-hardened—especially if they’ve gotten wet during use—and offer less than perfect protection against friction. The Geier/Kaufmann gloves should stay pliable until worn completely through. They can even be washed safely with soap and warm water.
I used them for some Hi-Lift jack demonstration, and also for shoveling and pick work. In both situations the feel of the tool through the glove was excellent—critical for safe operation, particularly on the jack—but I could feel no hot spots whatsoever through the slightly springy leather. The suede exterior surface is grippy enough so I didn’t need to squeeze unduly hard to maintain a safe hold.

I did find one contra-indicated use: The suede is not as resistant as smooth leather to constant friction, for example when respooling winch line (even synthetic). I’d recommend either the smooth-out Geier elkskin glove or one of their cowhide (or bison!) gloves for such use.
Alexis at Kaufmann also suggested I try one of their EDC keychain kits, and what an immediately useful trinket that turned out to be. It comprises a mini pry bar, one standard and one phillips screwdriver, an Uncle Bill’s precision tweezer in a little clip, and a curious little stainless-steel lozenge that looks like it could be a container for medication.
I used the mini pry bar within days for removing paint can lids and those nasty big staples that secure shipping boxes. The screwdrivers take a surprising amount of torque if you use the keychain as a grip and lever—I removed door-hinge screws as an experiment, with no trouble. The tweezer: I live in cactus country, ‘nuff said.

And the lozenge? Unscrew it, and it reveals what I have to say is the cutest lighter I’ve ever seen. It takes standard lighter fuel, has an O-ring to prevent fluid getting out and water getting in, and lights every time. The one caution is, you don’t want to leave it burning for more than about 15 seconds, or the whole thing gets alarmingly hot.

Looking at the lighter, I was reminded of the spark generator in the SOL Origin survival kit (reviewed HERE), with which I was less than impressed. Aside from the fact that it was billed as something that could save your life, it was also described as waterproof—a claim I hadn’t tested. I wondered how the survival tool would stack up against this little trifle of a lighter, so I dunked them both in a glass of water for 15 minutes. Afterwards, the “survival tool” would barely produce a flicker of a spark—I might have been able to ignite a bucket of gasoline, but natural tinder? Forget it. The little lighter, on the other hand, fired right up. Drop me in the middle of the forest and there’s no question which of these I’d rather have with me. As with the other items in the EDC kit, it’s available separately, and I can think of places to keep two or three of them handy. (The pry bar too is especially useful as a keychain accessory—it prevents you from pressing your Swiss Army Knife's screwdriver into tasks for which it was not designed.)

Kaufmann Mercantile is HERE, but I absolve myself of responsibility for the consequences if you go.
*New York state apparently finds them too deadly: wrist-braced slingshots are illegal there. I am not making this up.
Hint: When using “Search,” if nothing comes up, reload the page, this usually works. Also, our “Comment” button is on strike thanks to Squarespace, which is proving to be difficult to use! Please email me with comments!
Overland Tech & Travel brings you in-depth overland equipment tests, reviews, news, travel tips, & stories from the best overlanding experts on the planet. Follow or subscribe (below) to keep up to date.
Have a question for Jonathan? Send him an email [click here].
SUBSCRIBE
CLICK HERE to subscribe to Jonathan’s email list; we send once or twice a month, usually Sunday morning for your weekend reading pleasure.
Overland Tech and Travel is curated by Jonathan Hanson, co-founder and former co-owner of the Overland Expo. Jonathan segued from a misspent youth almost directly into a misspent adulthood, cleverly sidestepping any chance of a normal career track or a secure retirement by becoming a freelance writer, working for Outside, National Geographic Adventure, and nearly two dozen other publications. He co-founded Overland Journal in 2007 and was its executive editor until 2011, when he left and sold his shares in the company. His travels encompass explorations on land and sea on six continents, by foot, bicycle, sea kayak, motorcycle, and four-wheel-drive vehicle. He has published a dozen books, several with his wife, Roseann Hanson, gaining several obscure non-cash awards along the way, and is the co-author of the fourth edition of Tom Sheppard's overlanding bible, the Vehicle-dependent Expedition Guide.


