
Overland Tech and Travel
Advice from the world's
most experienced overlanders
tests, reviews, opinion, and more
Securing lug nuts—the pro way
Confession: I came late to the discipline of properly torqueing the lug nuts on my vehicles—and checking them regularly.
Very late.
For years I never gave them a thought except when I had a puncture or I was reinstalling a wheel after maintenance or a repair. And when I put them back on I simply cranked really hard on my T-handled lug wrench and called it good.
I had a wake-up call a few years ago, when Roseann and I were hauling a pair of Expo cargo trailers to Flagstaff. I was driving my FJ40 and pulling a 14-foot box trailer that probably weighed 3,000 pounds or so. Only a couple of days before I’d had new tires installed at a local tire store. We’d decided to go the back route to Flagstaff: from Tucson to Globe via Highway 77, then to Payson via 188, then through Pine and Strawberry on 260 and up 87 to Mormon Lake Road. We stopped in Payson for fuel, and as I pulled in at low speed I heard a distinct clicking sound coming from the left rear of the Land Cruiser. A short search led to the source: lug nuts on that wheel that were barely finger tight and the wheel was shifting fractionally back and forth.
I shudder to think what could have happened if I’d experienced a catastrophic failure on the steep, winding mountain road uphill from Strawberry. I tightened the lug nuts on that wheel, checked all the others (which were fine)—and changed my attitude. Now I include checks of the lug nuts in my normal maintenance routine, especially when traveling in the backcountry on rough roads.
While I was changing my attitude I decided to change my approach as well, and use a proper torque wrench to ensure correct and even tension on the nuts. I know, I know: I already admitted I was behind the curve on this.
Checking torque at home is easy: I have a superb Snap-on digital torque wrench worth about a zillion dollars, which a company PR rep simply gave me when I was doing another article that involved torque settings. (That rep, sadly, is no longer with the company, probably in large part due to all the tools he sent me whenever I emailed him that I had a new article coming out. It was a great ride while it lasted.)

However, the Snap-on wrench is a full 24 inches long, and simply overkill for a traveling tool kit, even though a torque wrench has many uses in the field besides tightening lug nuts. A simple mechanical torque wrench would more than suffice, but I wanted decent quality without spending, well, a zillion dollars. And I found what I needed at Tekton Tools.
I became aware of Tekton by accident when I stumbled on their booth at the west Expo last year. As a self-appointed tool connoisseur/snob (take your pick), I approached the brand like a sommelier sniffing an unfamiliar cabernet. And came away impressed.
The Tekton website offers more detailed information on the company’s tools than any other site I’ve seen—including Snap-on’s. The page for their 3/8ths inch socket and ratchet set, for example (here), informs you of not just features, but each socket’s minimum failure point compared to ANSI specifications. The country of origin—in this case, Taiwan—is also clearly stated. (The quality of Taiwanese-made tools is excellent in my experience.) They note that the set does not skip any sizes—one of my pet peeves about many sets I’ve tried. The ratchet is a fine, 90-tooth unit, and the ANSI measurements are published for that as well. Nice.

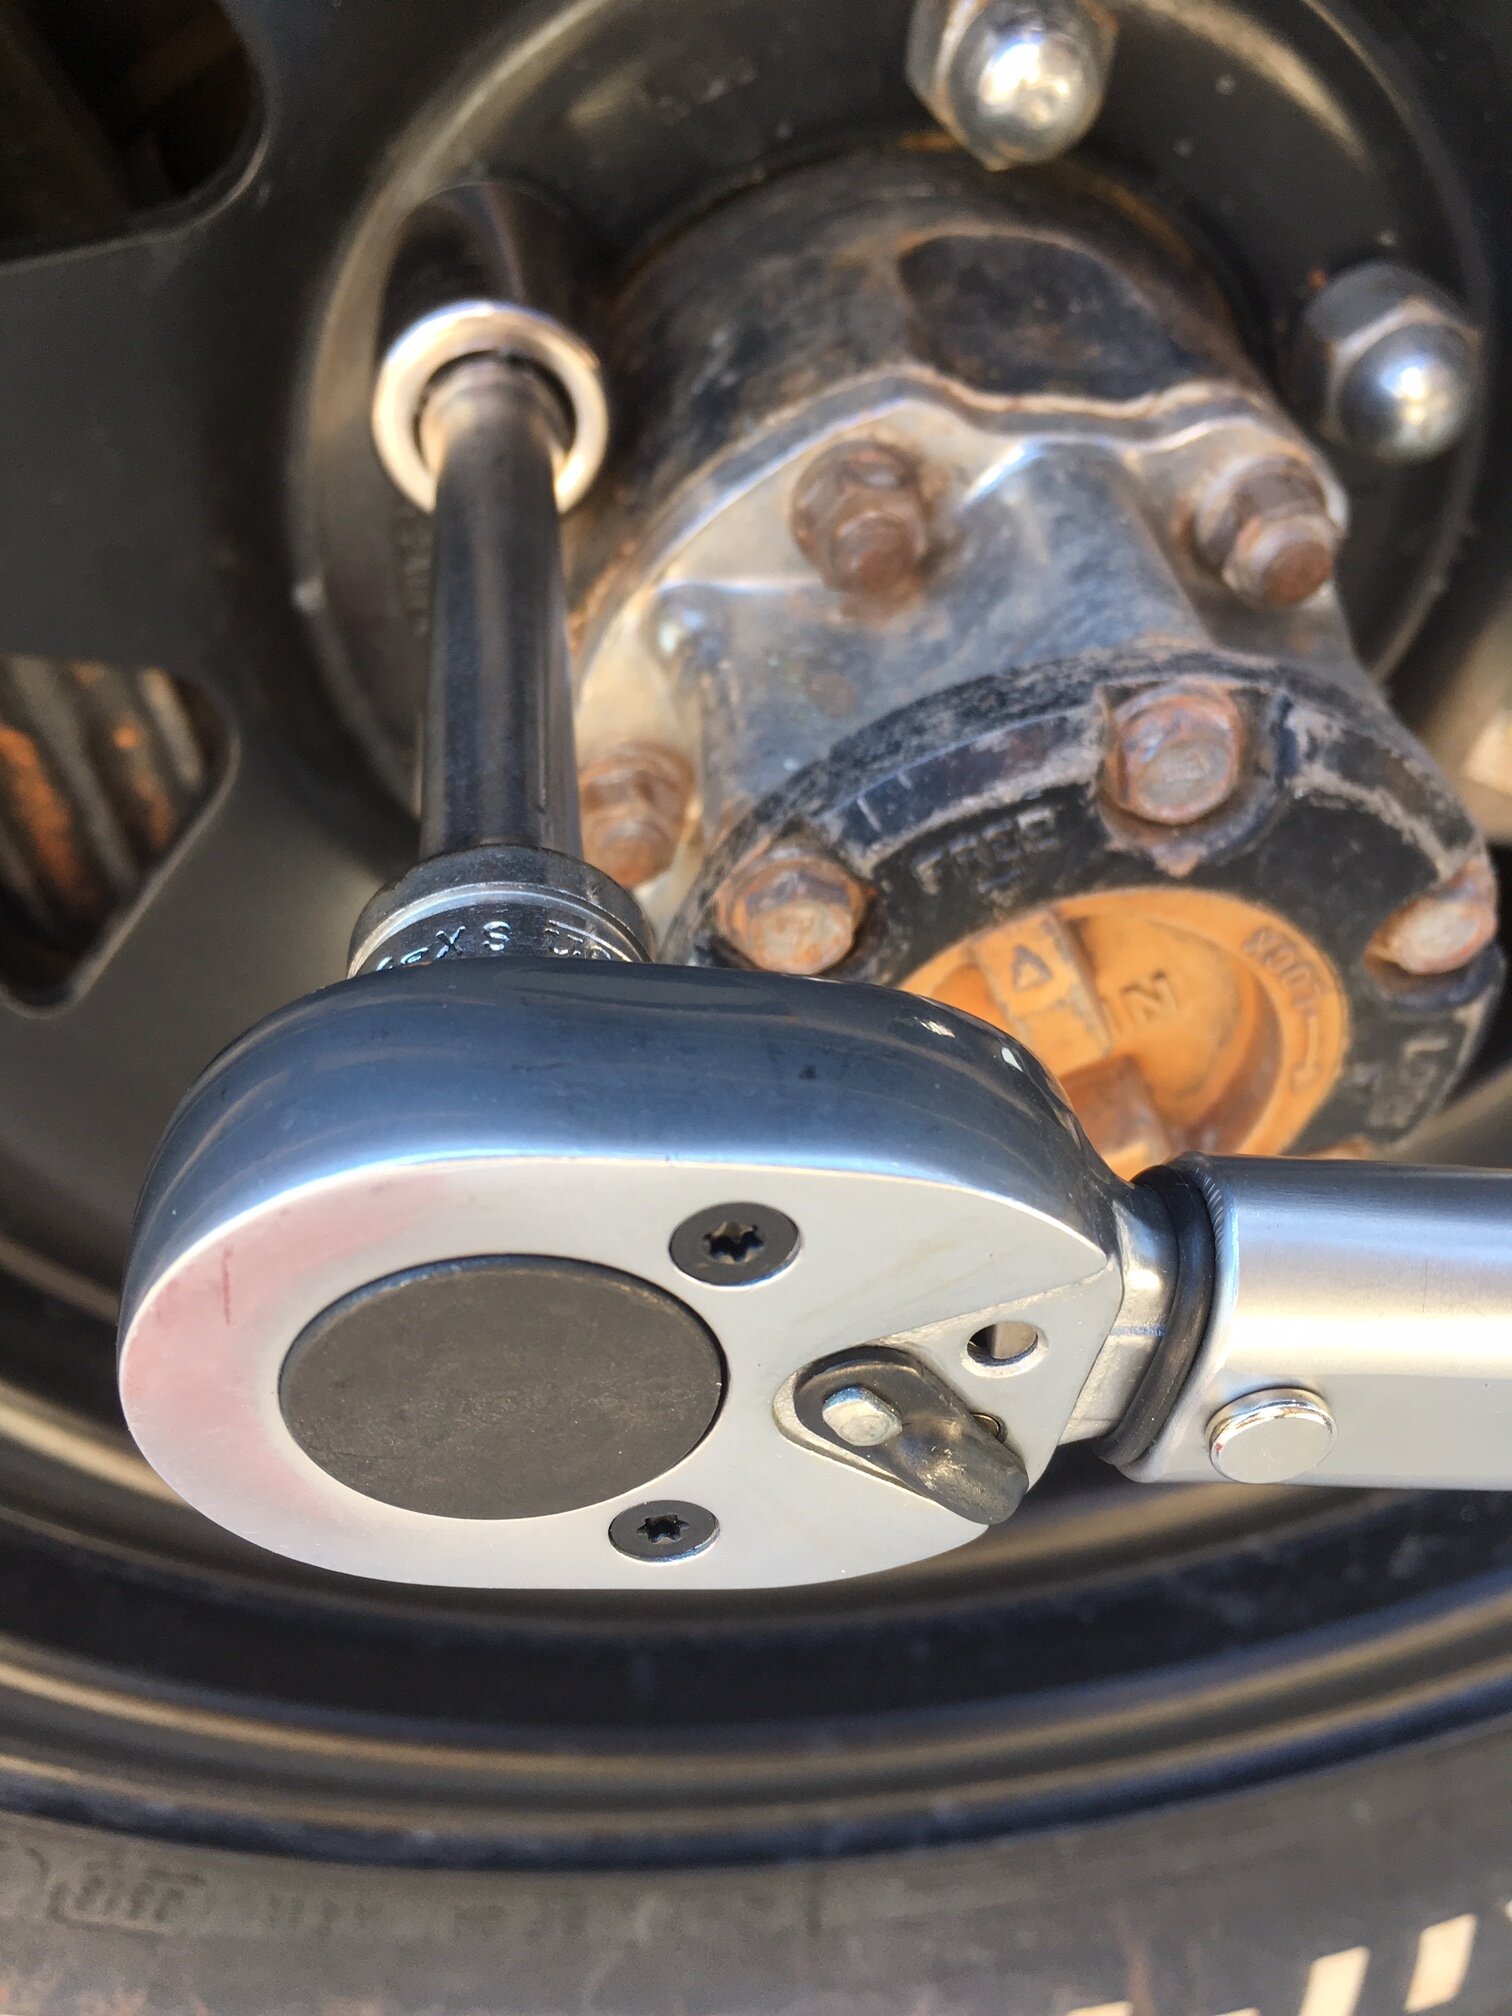
So, on to Tekton’s 1/2-inch torque wrench, which employs a simple but precise rotating handle adjustment and click/bump alert when the selected value is reached. The company claims plus or minus four percent accuracy, which is more than adequate for any task including engine assembly. In the hand it compared favorably to my memory of a similarly configured Sears Craftsman American-made torque wrench I had decades ago, which if I recall cost more even back then. The first thing I did was to compare it to the Snap-on wrench at identical settings on the same nut; the two were within the probability of error of my ability to respond to either the click of the Tekton or the beep and buzz of the Snap-on. Like all mechanical torque wrenches, it is important to reset the wrench to its minimum value in between uses to avoid stressing the mechanism and throwing off the accuracy (this is not necessary with digital wrenches). It’s also important to remember that a torque wrench—whether Tekton or Snap-on—is not a breaker bar; it should be used only for tightening nuts or bolts to a specified setting. The Tekton wrench is all-steel, so I expect it to be durable. And at $40 for the 18-inch 10 to 150 ft-lb version it is an outstanding bargain.

Back to my lug nuts. What exactly is the correct setting? Good luck obtaining the figure from your vehicle manufacturer. Obviously proper setting vary with the vehicle and the wheel size, but as a very general rule, for vehicles in the general mid-size overlanding category—Land Cruisers, Land Rovers, pickups, etc.—about 80-90 ft-lb is proper for a steel wheel. If you prefer to go by stud size, here is a chart.

Alloy wheels are more problematic. Some charts I’ve seen list higher torque than for steel wheels torque—around 100 ft-lb. Others list lower figures—70-75 ft-lb. Why the higher figure? I have yet to find a definitive answer, but possibly it is because steel wheel lug nut holes are typically raised a tiny bit and thus retain fractional elasticity to grip the nut more effectively, while alloy wheels must be clamped flat against the hub. For both steel and alloy wheels the primary effect you are achieving with tightening is to fractionally stretch the threaded lug itself, creating a powerful clamping mechanism.
Lug nuts should always be tightened (or loosened) in an alternating sequence across the wheel, thusly:

Like so many other habits I’ve adopted, being lug-nut conscientious makes me feel like I’m approaching travel in a serious, professional manner, and adds just one more layer of peace of mind to any journey.

Edit: A question came up regarding using anti-seize lubricant on lug-nut threads, as many people do who live in areas where snow and salted roads are common. While manufacturers—and thus I—recommend installing lug nuts on clean, dry threads, this chart from Fastenal shows that effective torque increases if one lubes the threads (or if those threads are zinc-plated). Note that if used, anti-seize compound should only be applied sparingly to the threads, not to any mating surfaces of the wheel or nut.

Simply brilliant: Rennstands

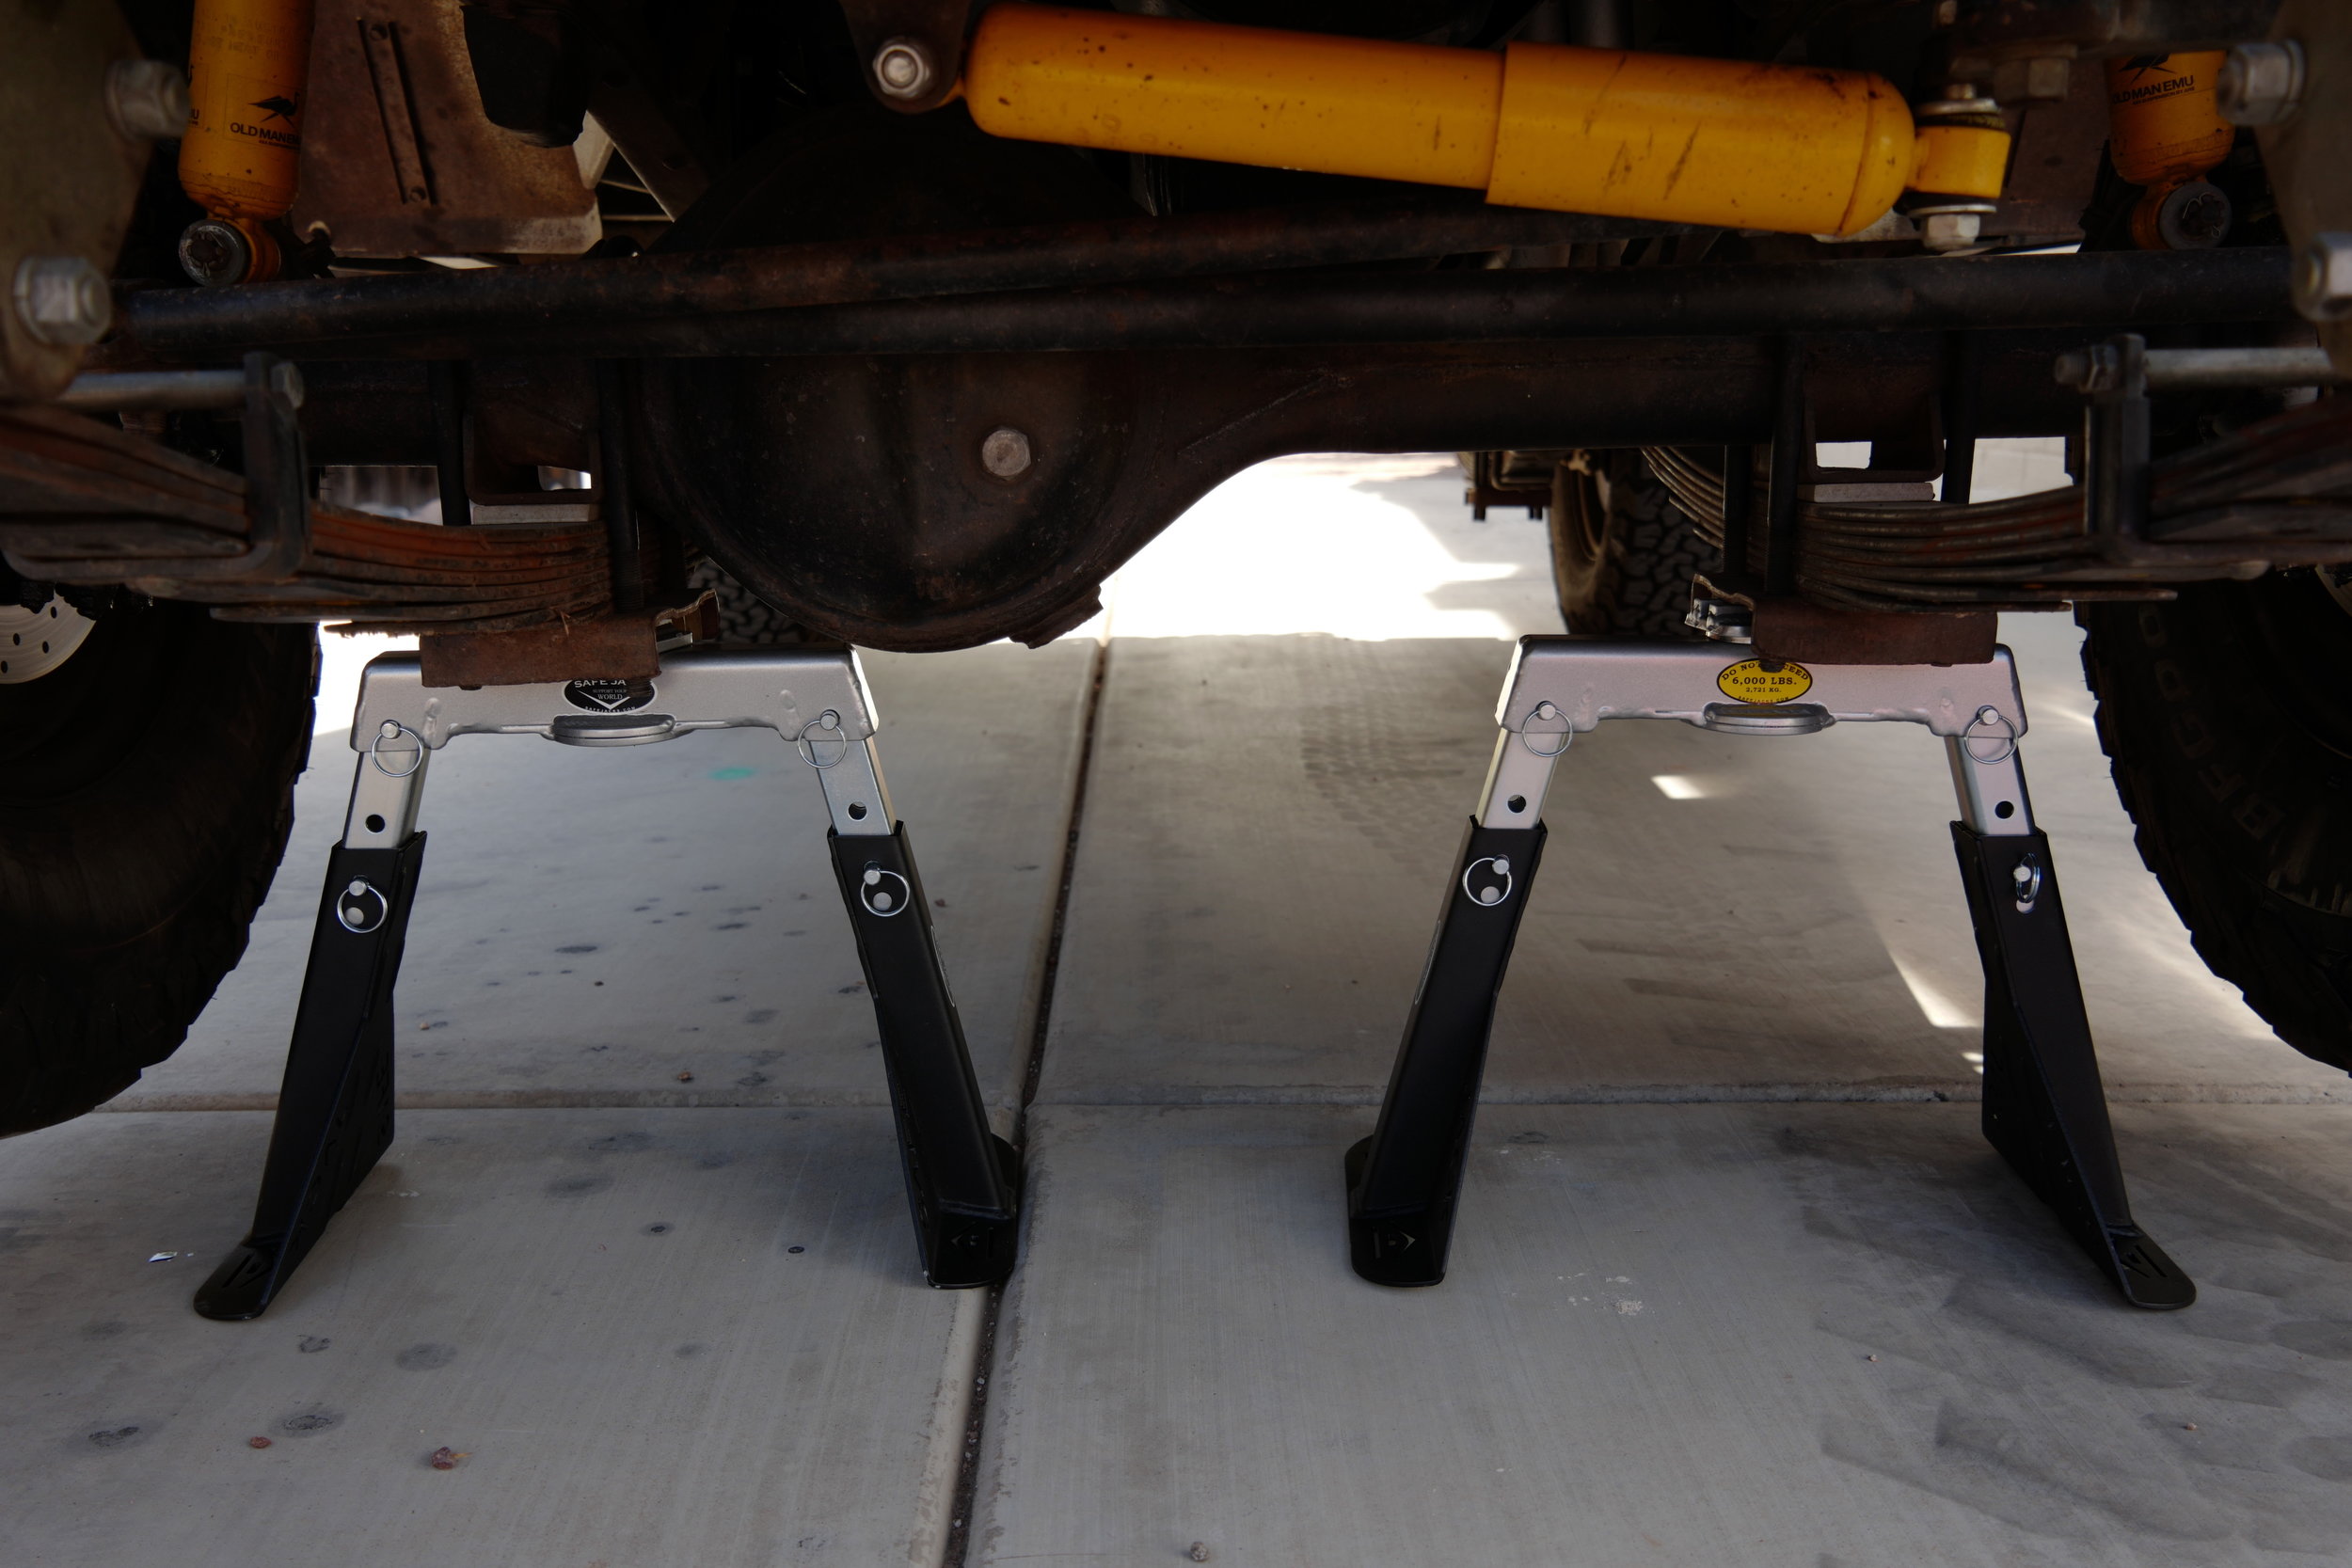
If you have ever done repair or maintenance work under a vehicle, you’ve run into this problem: You need to jack up the vehicle at the appropriate spot on its chassis or axles—but, quite frequently, that same spot is the best or even the only place to subsequently support the vehicle safely on jack stands.
On a vehicle with solid axles, such as my FJ40, this isn’t much of an issue as there is generally enough leeway to jack in one spot under the axle tube and place a jack stand adjacent to it. But on trucks with independent suspension it’s different, and if working on a unibody sedan there are often very specific spots under the pinch weld that are the only recommended spots to put either a jack or a jack stand.
Problem solved, thanks to Richard Bogert of Bogert Engineering, the same people who make the excellent Safe Jack systems. The Rennstand allows you to jack up your vehicle at the correct point and then secure it in the same spot on a three-ton stand, all in one operation.
Operation is simple. Position the Rennstand’s crossbeam on your floor jack’s pad (it will also work with a bottle jack with an adapter) and insert the appropriate cradle for your vehicle, whether a model-specific pinch-weld bracket, a flat plate, or a dished cradle. Jack up the vehicle at the appropriate spot.

Insert the Rennstand’s adjustable legs into the crossbeam’s sockets and insert the locking pins, then pull the locking pins on the lower section ot the legs, adjust them to length, and re-insert the pins. Lower the jack and you’re finished.


The crossbeam adds just under two inches to the lowest height of your floor jack, which could present issues with some sedans or sports cars if you don’t have a low-profile jack. The Rennstand is also wider than many “normal” jack stands, which I suppose might be an issue in certain situations, but not one I’ve run into. The upside of that width is that it is reassuringly stable. The three-ton working load limit (WLL) means that a pair of Rennstands will easily support the front end of a very heavy vehicle indeed (They’ve been tested to 150 percent of that according to ASME standards). The lowest setting on its legs is 11.5 inches, the tallest is 16.5. Bogert plans to introduce taller models for lifted vehicles.
Using the Rennstands on our Tacoma was eye-opening, as I’d always struggled to fit both a floor jack and standard jack stands under suitable sections of the front chassis. Not any more. In fact it made the job easier even on the FJ40. In the past I had to place the jack fairly far inboard on the axle in order to leave room for the stand. This made jacking more difficult since I was lifting more of the vehicle, and undoubtedly put more stress on the axle (not that Land Cruiser axle tubes are exactly weak).
Of course, it should be obvious that the Rennstands can be employed as standard jack stands as well.
I remember testing Richard’s early products, especially the original Safe Jack for Hi-Lift jacks, and being impressed with his imagination and ability to engineer seemingly simple solutions to problems no one seemed to be able to solve before. The Rennstand (which is patented), is yet another great idea.
You can find Rennstands here. Note that production is currently running about two weeks behind demand. If you order you’ll be placed in the queue and the stands will be shipped as soon as they’re made.
African trail hazards

The offending limb
It was Connie who alerted me, in her inimitable style, as we stopped at the entrance gate to the Moremi Game Reserve to pay the entrance fee.
“Jonathan,” she said, deadpan, “You have a stick up your butt.”
I realized even without checking that she was speaking metaphorically, so I looked at the next obvious spot—the rear of our Troopy. And there it was: a pretty stout limb as a matter of fact, wedged somewhere firmly in the vehicle’s undercarriage and dragging on the ground. Wedged so tightly as to be scoring an impressive furrow behind us. I was pretty sure I’d heard it get there, but the forest track we had followed had been littered with such limbs of various sizes, and I’d gotten used to the odd one smacking the undercarriage when a tire flipped it. The strategy with such limbs lying crosswise is to drive over the middle if possible, as this reduces the chance of flipping, but it wasn’t always possible, and many of the limbs were concealed in undergrowth.
A glance under the truck showed the limb angling up to the rear axle, where it took an abrupt bend in front of the tube and up into the chassis. I got down and slid under the Troopy, gave a yank on the limb, and . . . nothing. It was well and truly jammed in there. So I slid in all the way, and found that the end had somehow crammed its way past brake, water, and diff-lock lines to lock itself behind a frame crossmember.
And then I noticed the sheen of some sort of liquid. Uh oh.
I could see the water line from our chassis-mounted tank, and it was intact. My next, worried thought was brake line. But the brakes had felt fine as we stopped. By now Graham had crawled under as well, and said, “Gear oil.” We smelled it and sure enough. The stick had ripped off the air line fitting for our ARB diff lock, and severed the line itself. Some differential oil had come out with it.
It took some serious heaving to free the end of the limb and remove it—I’m still mystified as to how it managed to insert itself that firmly in a fraction of a second. There was no way to repair the line—it was now too short and the fitting was mangled. So Roseann found a wood skewer of the approximate inside diameter as the fitting on the diff housing; I cut a short plug from it and used Gorilla Tape to securely fasten it in place.
We drove the rest of the trip through Botswana and Namibia with the bandage in place. There was no more leakage, so the truck went into its shipping container that way. I’ll fix it properly when it arrives in Arizona. (I’ll check carefully to make sure no oil is being pumped up the air line toward the compressor, which can happen in certain circumstances with ARB lockers.)
I only forgot about the issue once, on the challenging track we took from Twyfelfontein to the Ugab River Canyon. I paused before a short but very steep and loose climb and, without thinking, hit the compressor switch for the locker.
“Uh, watcha doing?” Roseann asked. Oh, right. Of course we made the climb with zero drama and no locker.
In this case I don’t feel that I did anything wrong driving-wise, and I don’t feel that I was remiss in not having spare air line and fittings along. You just can’t predict everything. I did learn, however, to pay attention when Connie Rodman says there’s a stick up your butt.

And the damage
Life . . . and a trouble-free journey . . . is all about the details
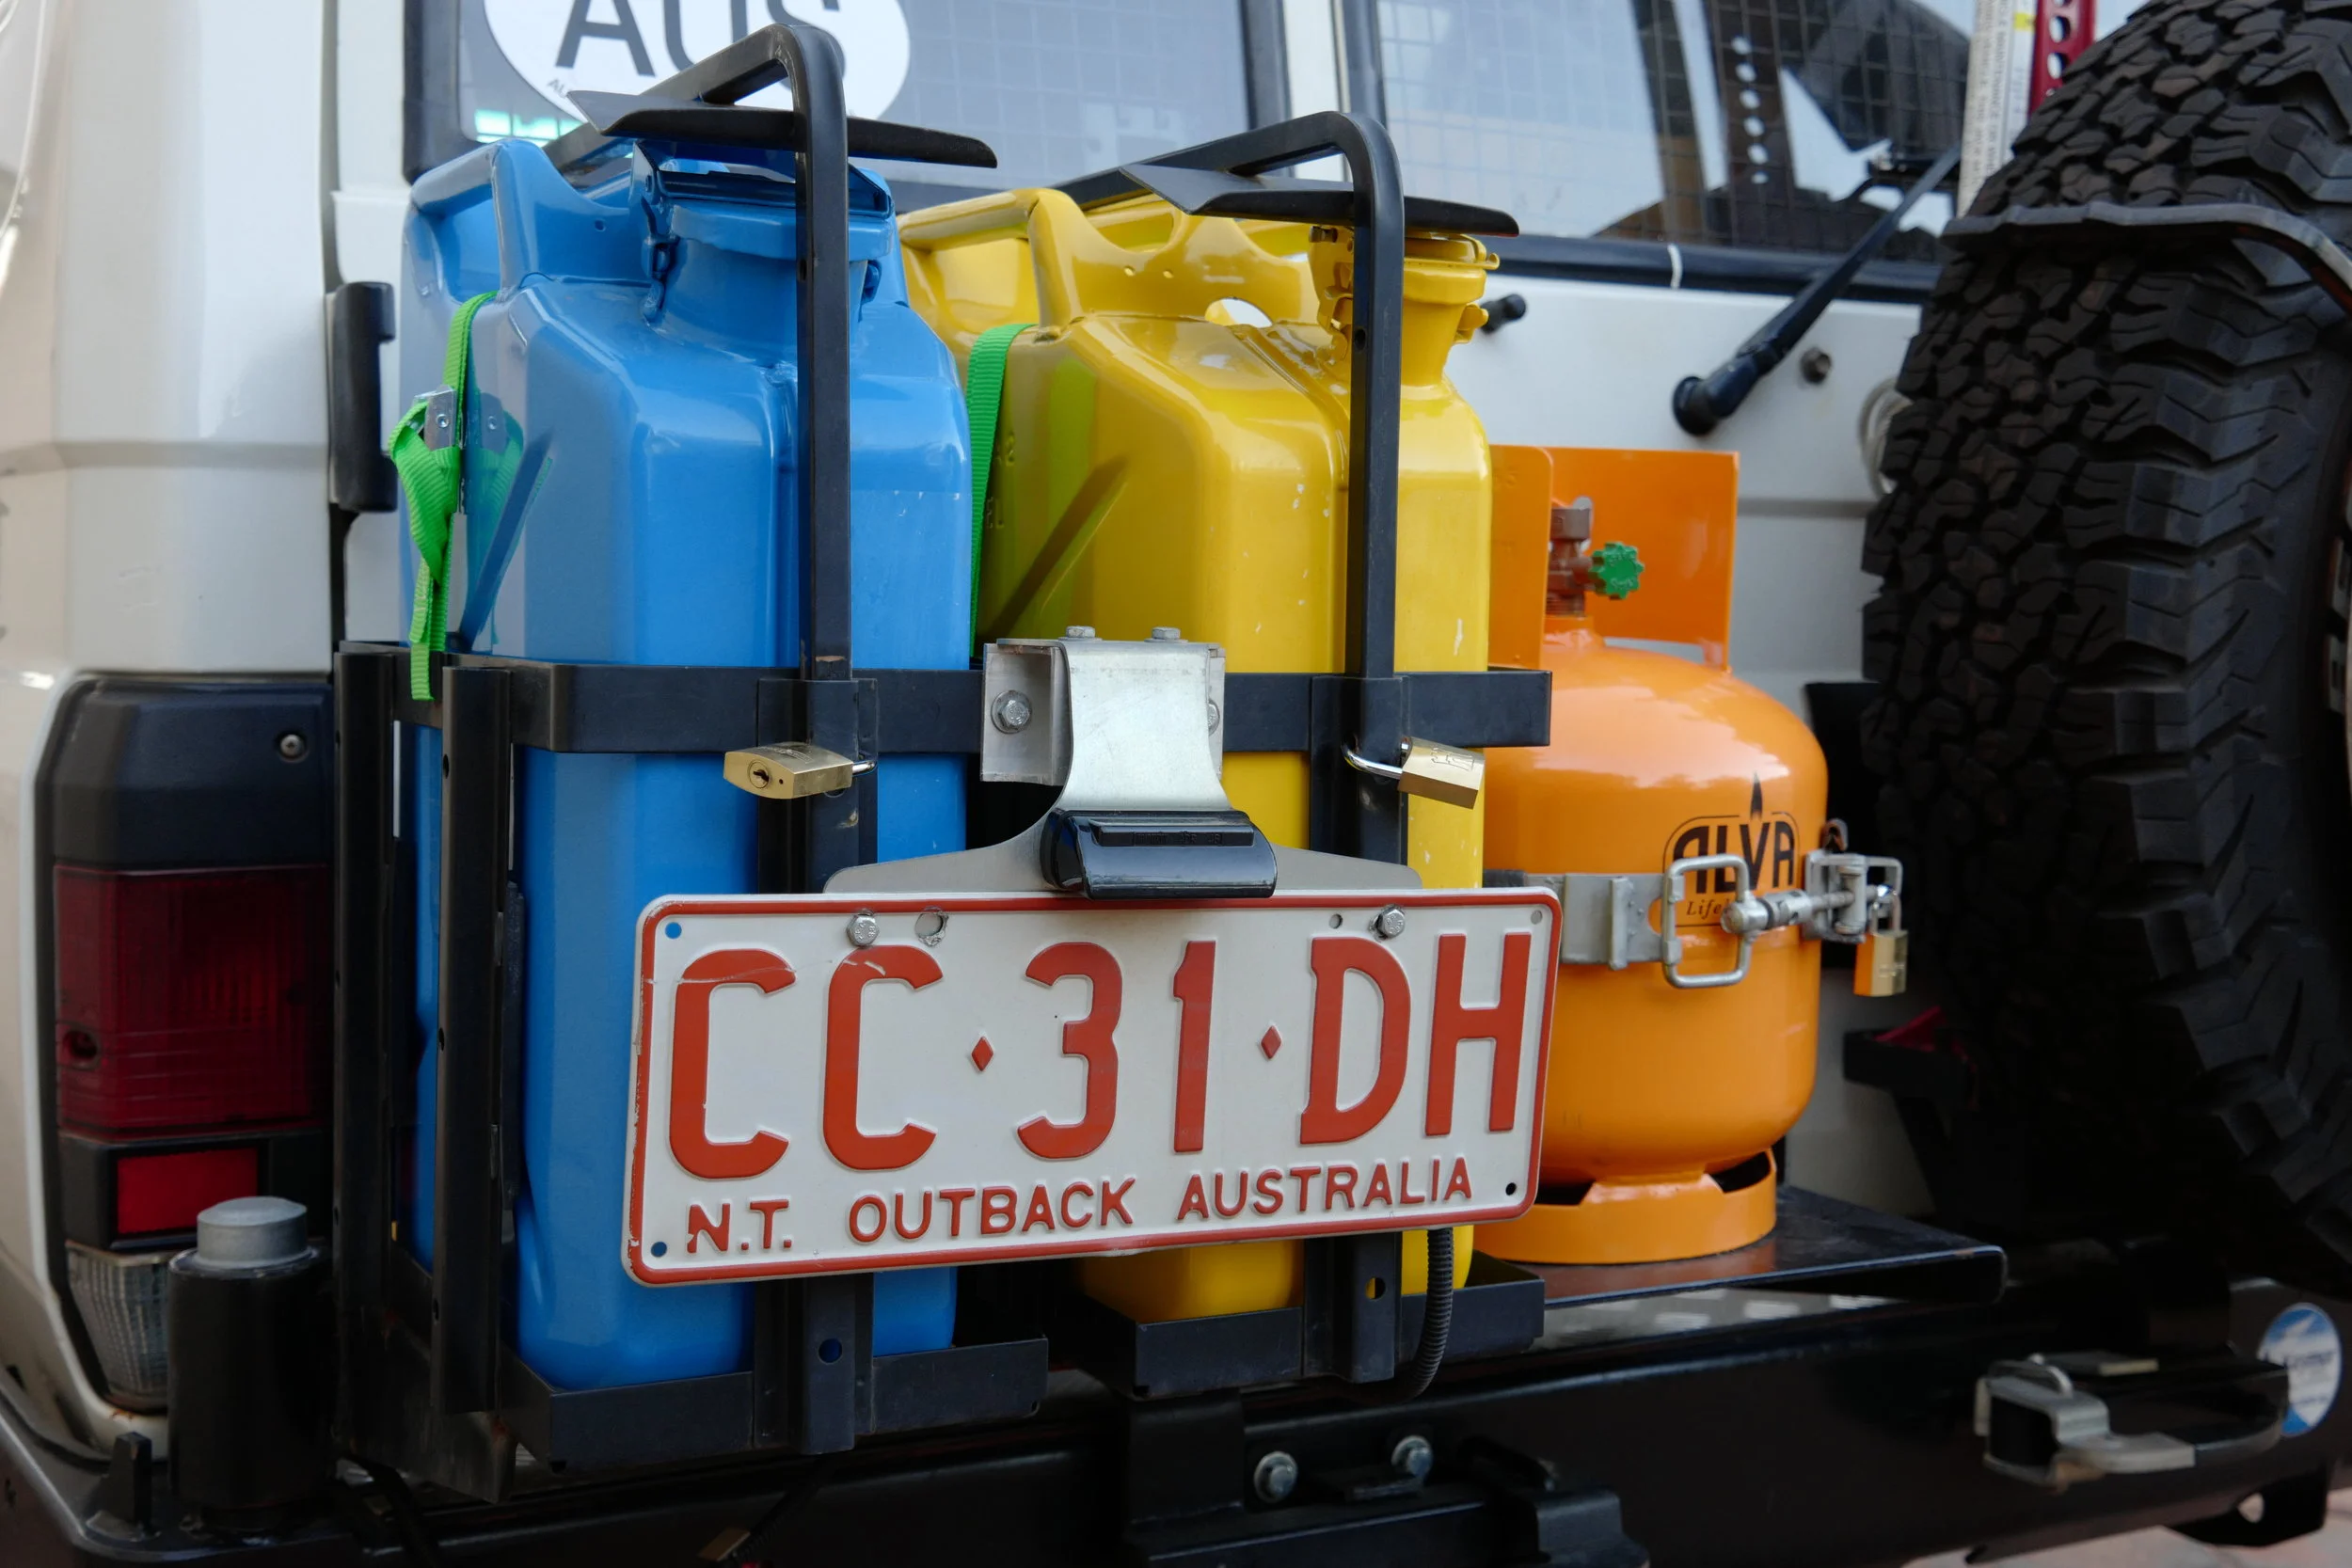
Okay, no snickering about the technicolor assemblage above. The two jerry cans are colored appropriately for their purpose—blue and water, yellow for diesel. The tangerine gas bottle is courtesy Graham Jackson, who bought it and had it filled for us in Durban while we were still en route to Africa. Not sure if that was the only color available or if he was having some fun. And the straps? Green was all they had, okay?
But that’s not the story here. The story is about the level of detail one should aim for when inspecting a vehicle before a major trip, and especially the level of detail one should aim for when inspecting a new piece of equipment or a new accessory.
Consider this double jerry can and gas bottle carrier, custom-made to fit on the Kaymar rear bumper on our Land Cruiser Troopy. It seemed more than adequate when we picked up the vehicle after its installation. The pivot rides on a heavy-duty bearing and was rock-solid. I liked the locking bars to prevent fuel or water theft. I wasn’t pleased with the sharp edges of the tie-down strap keepers, but they seemed adequate until we got the Troopy back to the states where I could modify them. Our supplier had already installed a NATO fuel can and a plastic water can in it, so we simply filled them and left on the trip, which this time was a long, long route with no fuel resupply for at least 700 miles. And we had no trouble with the carrier.
The next trip, our last in Australia, involved another long no-resupply section (have you gathered these are common in Australia?). Although we had more than enough fuel under even the most pessimistic calculations, I nevertheless filled the yellow can on the rack.
A good ways along the Anne Beadell Highway, at the Ilkurlka Roadhouse, I walked around the back of the vehicle and smelled, then saw, diesel fuel pouring in a tiny but steady stream from the bottom of the can. When I pulled out the can and looked at the bottom of its receptacle, I immediately saw why. The base of the receptacle had been assembled in such a way that it left four welds protruding above the rest of the base. One of those welds had simply ground its way through the jerry can.

It was not an issue for that trip, but it could well have been on another with more critical fuel needs. People have, indeed, died from identical issues. While we were in convoy with friends, and had satellite telephones, it still could have presented a major hassle.
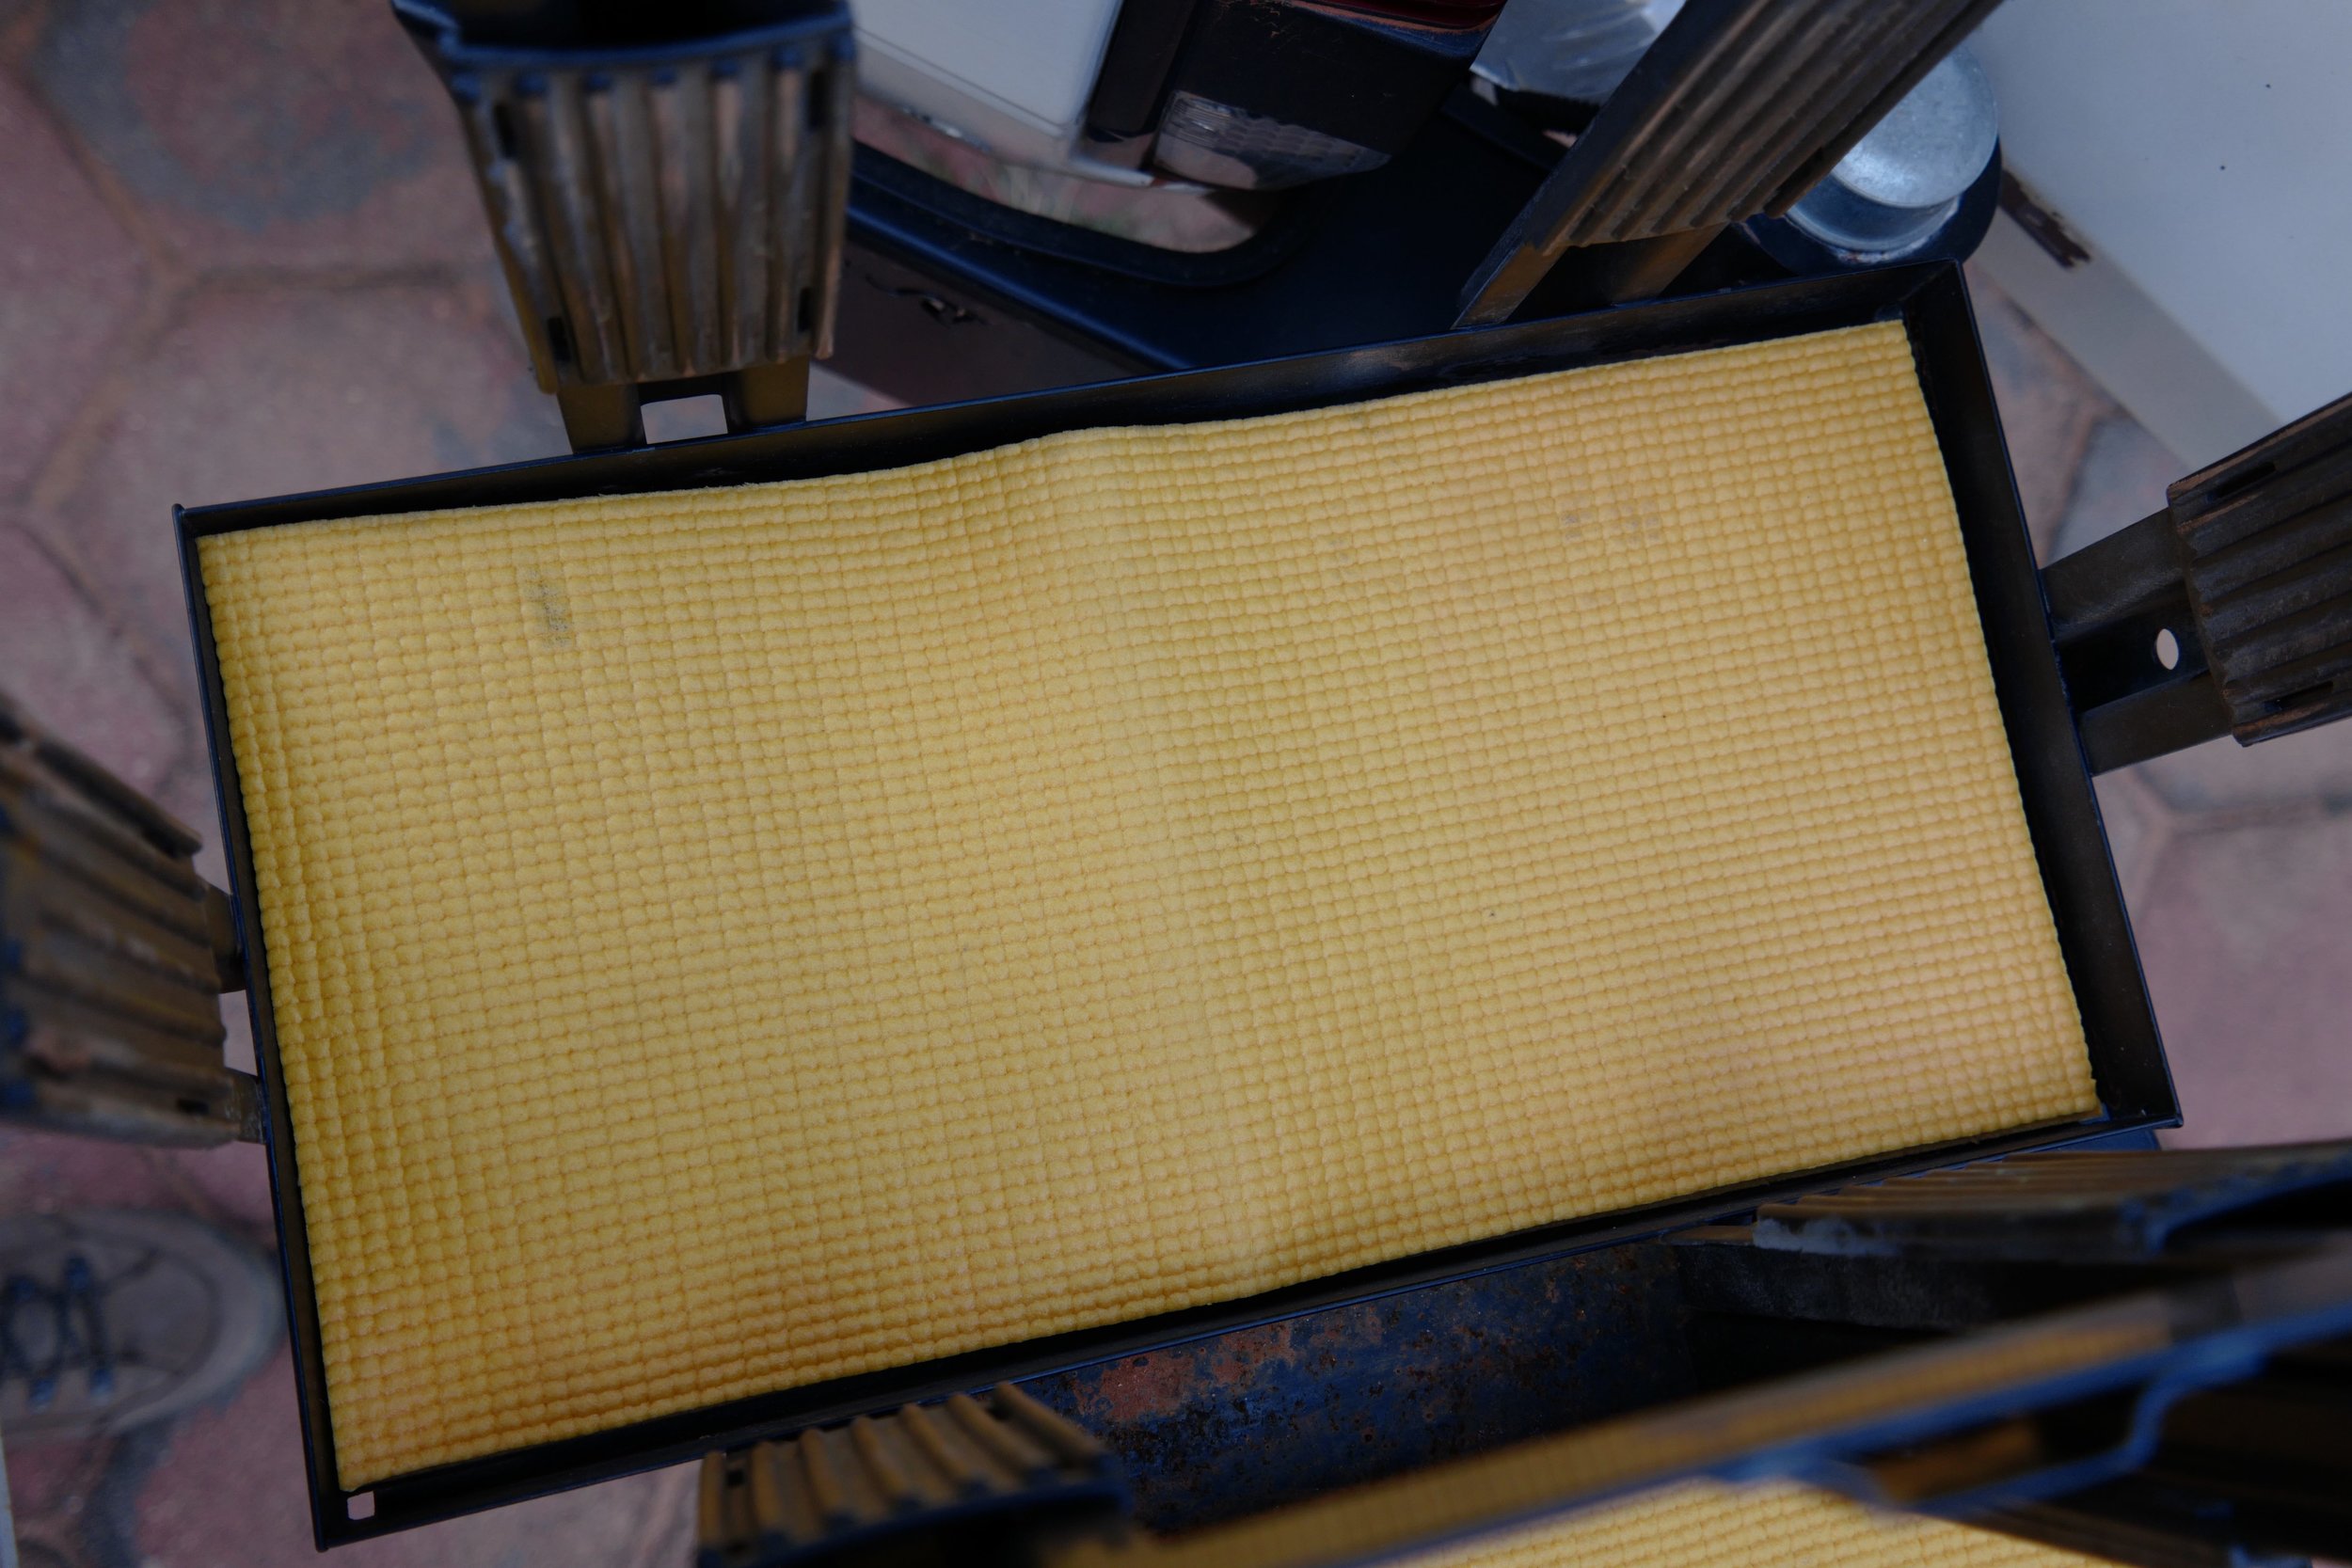
When we picked up the Troopy in Durban this week, I addressed the problem temporarily but effectively with a double layer of the yoga mat material we always carry for lining cabinets and stopping random rattles. With new jerry cans in place we were on our way.
It was a good lesson.
Repairing hubs in the field

Recently I was going through archived travel images to illustrate an article for Wheels Afield magazine. While doing so, I noticed a consistent thread running through our photos of Africa and Australia: A significant number of them were of me working on the hubs of various vehicles. There were two sequences of me rigging bodge wire fixes to keep grease caps on the rear hubs of Land Rovers, and one of me (repeatedly) tightening the nuts on the full-floating axle of a 45-Series Land Cruiser. All these, incidentally, involved the use of a multi-tool because the vehicle in question hadn’t been equipped by its supplier with adequate tools.
Then there was our last trip through Australia, during which we found that a mechanic in Adelaide had comprehensively screwed up a simple front hub and bearing service on our Troopy, leaving one loose and one reassembled incorrectly so that it would not engage. (There was also a different color of grease in each hub, leading to guesses that he had actually only “serviced”—i.e. buggered—one.)
It brought home what torture the hubs of an expedition vehicle go through on the rough tracks of the world. The number one cause of backcountry breakdowns is still (according to several sources) tire punctures, the second is battery problems. I’d bet the third is hub and wheel-bearing issues, especially if you include the assembly all the way in to the CV or Birfield.

Therefore I’ve decided that from now on, I’ll make sure our spares kit includes a complete hub servicing kit including bearings and seals. It will take up less space than a hard-cover book but could save a lot of time and grief.
I’ll also make sure I have along the correct special tools needed. In Australia when I disassembled the hubs I was faced with the external snap ring Toyota uses on these hubs.

Graham and I had a decent selection of tools with us, but nothing suited to this fiendish part. Graham finally filed the outside ends of a pair of needle-nose pliers flat, which worked pretty well. How much easier it would have been if I’d had these Knipex pliers made for the job.

Deciding which and how many spare parts is always a conundrum, and will vary with the length, remoteness, and difficulty of the journey. But a complete hub kit is compact and cheap enough to be a permanent fixture along with fuses and belts.
Factory vs. aftermarket
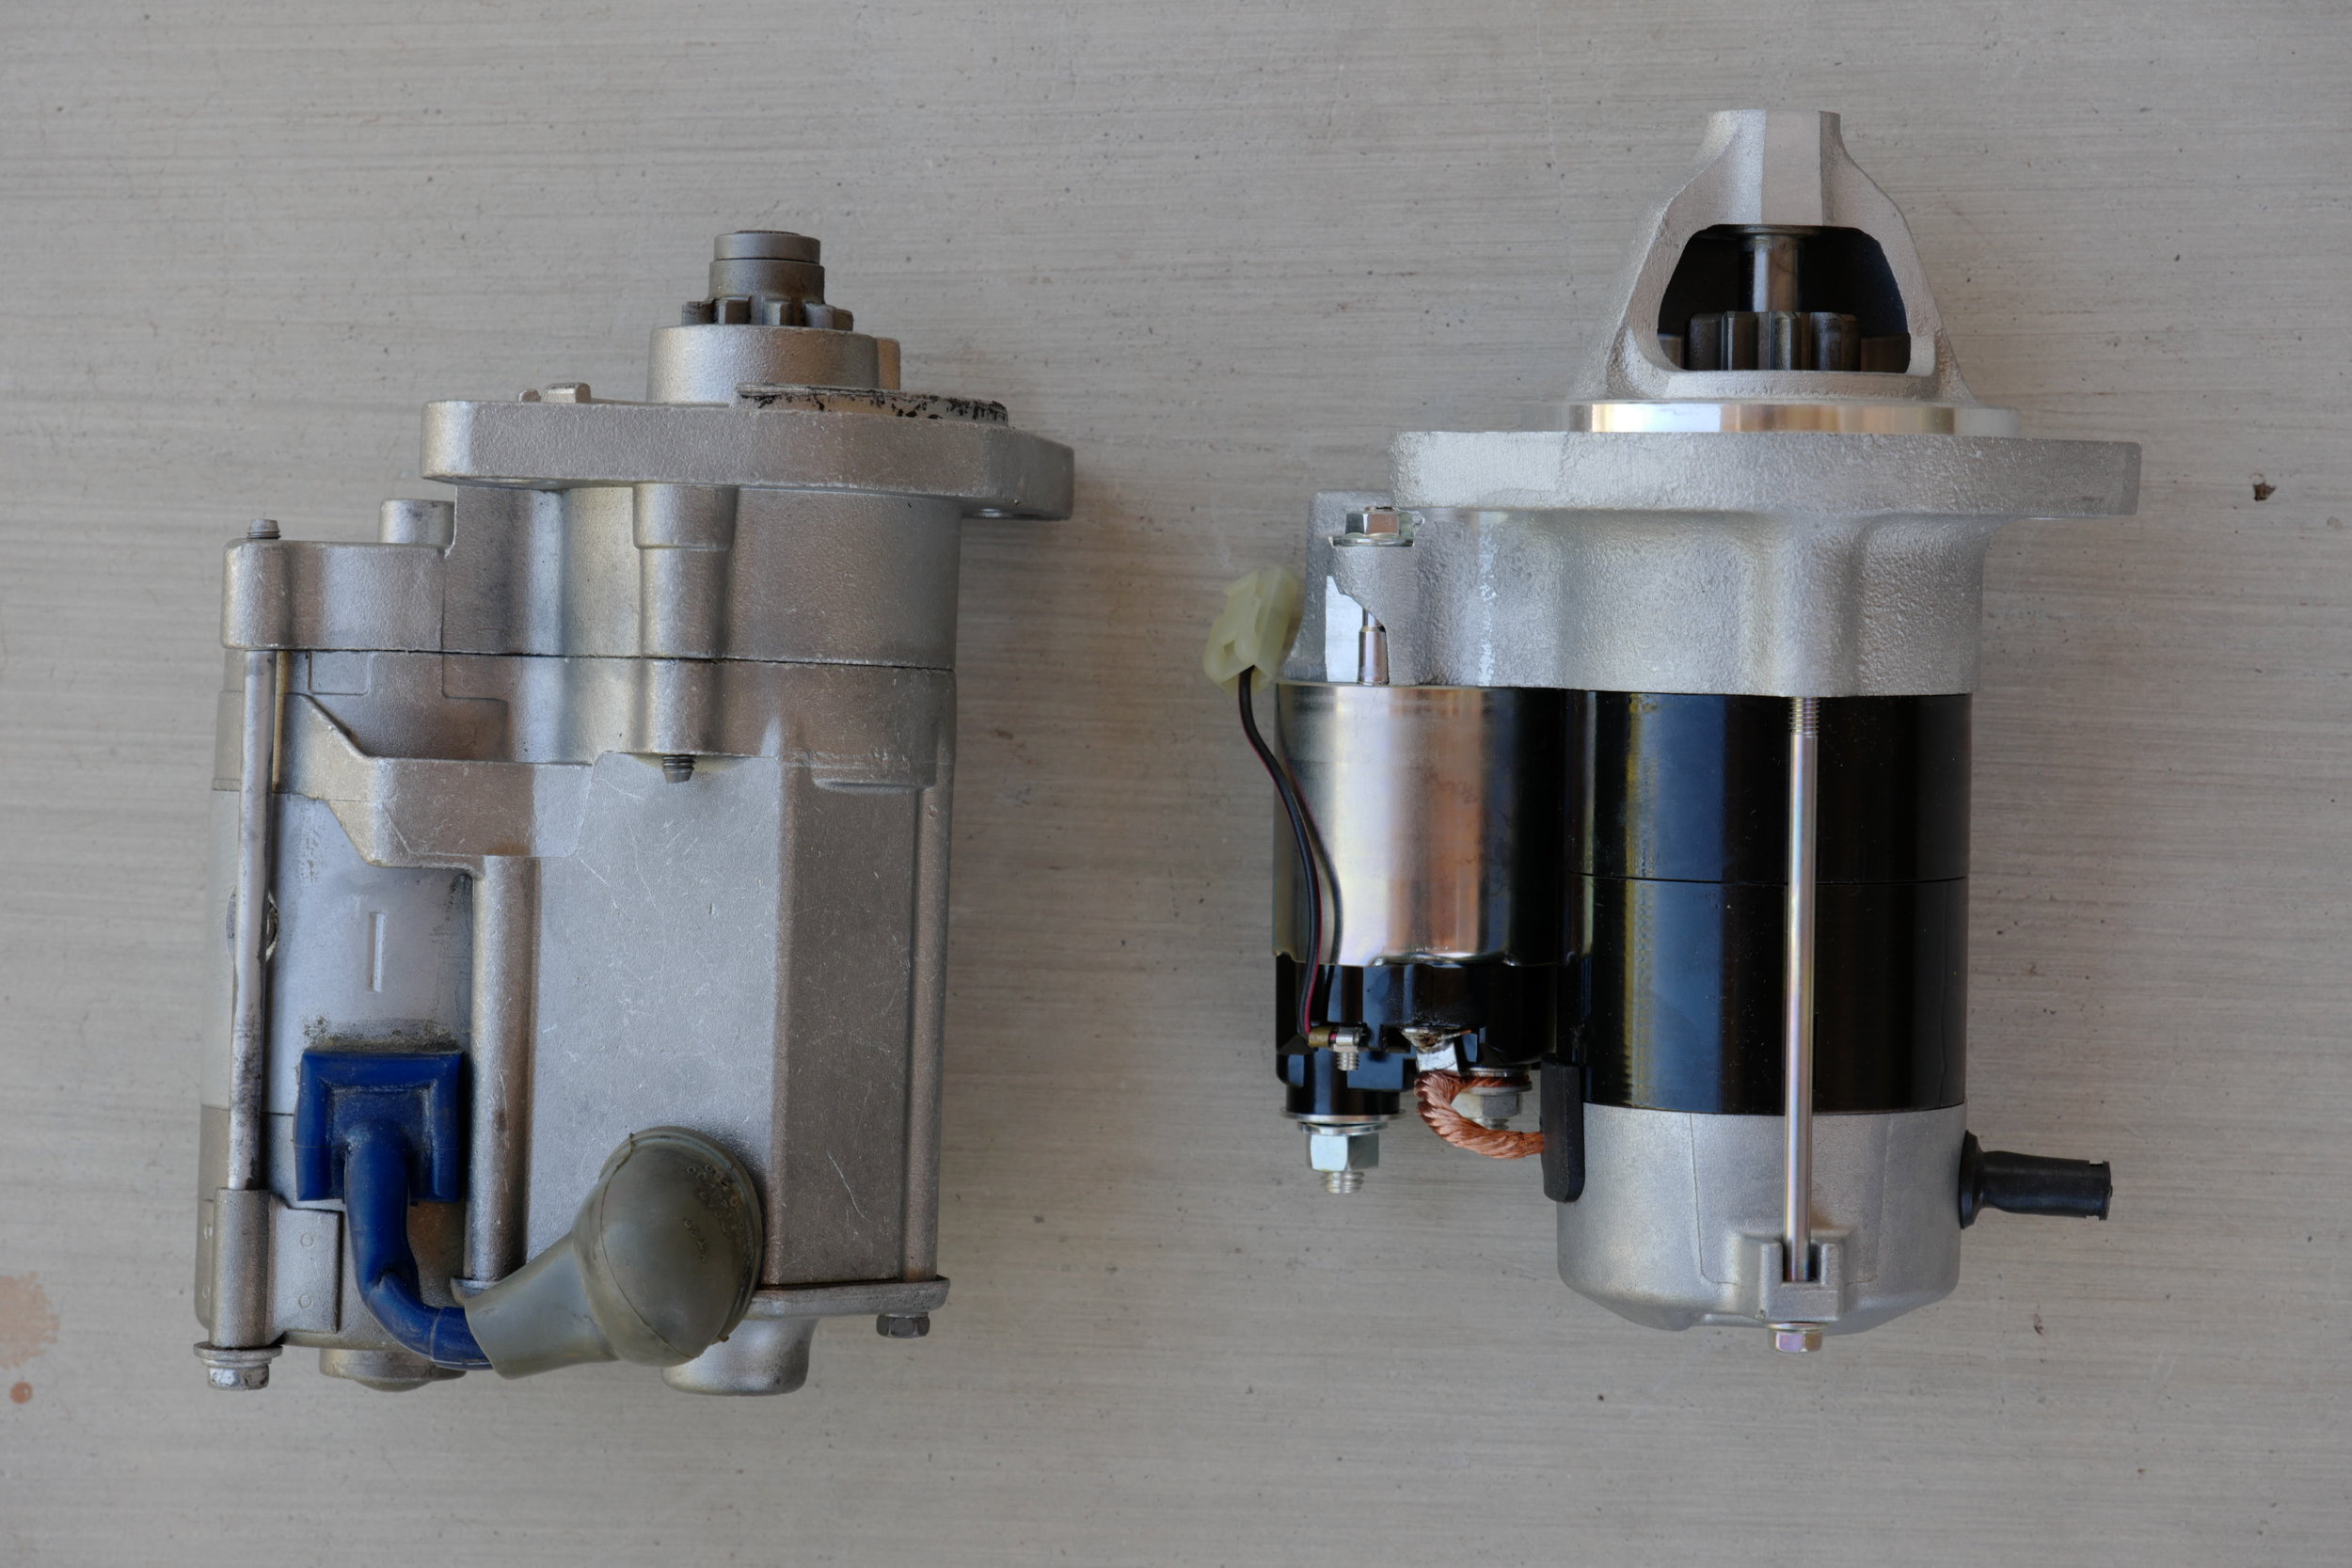
Aftermarket starter on the left; Toyota starter on the right
If you’ve ever turned over an engine by hand you know it’s no easy thing to do. You’re working against a lot of internal friction, plus the compression as each piston rises on the firing stroke. Your starter has to do the same job, except a lot faster. So it clearly needs to be built well.
Take a look at these two starters for a Land Cruiser F or 2F engine—an aftermarket unit on the left and a factory Toyota unit on the right. If you’re not familiar with how a starter works, notice the small gear visible at the top of each unit. When you turn the ignition key to start the engine, that gear slides forward and engages the flywheel behind the engine, and spins it rapidly to enable the ignition to catch and start the engine. Once it starts and you release the key, the gear slides back out of engagement.
It should be obvious that that gear is subjected to a great deal of stress—which is why the factory starter has a nose cone that supports the end of the shaft on which the gear slides, hugely increasing its stiffness (and also possibly helping keep random dirt and debris away from the shaft and gear).
Now look at the aftermarket starter. No nose cone, no support for the gear. Cheaper to make, for sure.
Which would you expect to last longer?
For want of an M8 x 30mm bolt . . .

It still amazes me how well I can prepare for a long, remote journey, yet still find myself unprepared.
Over the course of four trips to Australia in the Land Cruiser Troopy we bought there, I slowly accumulated a pretty decent selection of tools, highlighted by a superb Bahco S106 combination kit (see here), which includes full 1/4 and 1/2-inch socket sets, wrenches, plus numerous drive fittings. An additional set of 1/2-inch deep sockets, a screwdriver selection, an electrical tester, and various pliers rounds out the kit.
Our recent trip was without doubt the hardest on both our Troopy and that belonging to Graham Jackson and Connie Rodman, as we covered 2,600 kilometers of dirt tracks between Coober Pedy to Perth, some of them heavily corrugated. And as on earlier trips, substandard work done by a mechanic in Sydney (not the Expedition Centre which did all the camper conversions, but a repair shop nearby) began to manifest itself. A new radiator installed on Graham’s vehicle, bought long distance before we arrived—and guaranteed by the mechanic to be “as good as Toyota”—began leaking halfway through the journey. Radiator stop-leak controlled but did not completely plug it. Next, I found the transfer case lever in our vehicle would engage four wheel drive but flopped back and forth rather than engage low range. The nut on that section of linkage had fallen off. (The transmission had been removed to repair a leak before a previous trip.)
A bit farther on, Roseann and I started noticing a rattle that seemed to be coming from the exhaust, as if some gravel had become caught on top of a heat shield. But soon we could hear an obvious exhaust leak. Underneath the vehicle I inspected the “performance” exhaust system the mechanic had installed. A joint near the middle was completely loose. It had been connected with two bolts and nuts—no flat washers, no lock washers, no jam or nylock nut, no Loctite. One bolt and nut was completely gone; the other I easily removed with my fingers, to find most of the thread stripped.

And that was a problem, because while I had plenty of tools with which to install or remove virtually any nut or bolt on the truck, I had not gotten around to the item on my pre-trip list that read BUY SPARE BOLTS AND NUTS.
Sigh . . .
This time I got lucky. We had some leftover washers from a RAM mount, plus several bolts I had bought to secure it, and against all odds they just happened to be a suitable size and length. We were soon back on the road with a quiet exhaust (and Graham had found an extra M8 nut with which to fix the low-range linkage).
Needless to say, when we got to Perth I made my first task a trip to the local Bunnings to get a start on rectifying the situation before we loaded the Land Cruisers into a container for Africa.
One suggestion: I usually buy mostly high-tensile spare bolts (Grade 8 in SAE or 8.8 or 10.9 in metric), figuring that it won't hurt to replace a missing standard bolt with a high-tensile spare, and I can be assured of having the proper strength fastener for a critical component.

Will I ever learn?

A cockroach brain has barely a million cells, whereas a human brain has about 100 billion. Nevertheless, cockroaches are capable of learning and remembering things such as mazes.
I'm not sure about myself.
Last week I needed to install a new set of Baja Designs LED lamps on the FJ40—an S2 Sport reversing lamp, and a pair of XLR-Pro driving lamps up front. To incorporate the wiring harness of each into the existing reverse and driving lamp wiring harnesses, I wanted to properly solder the connections to ensure connectivity and longetivity. However, my good soldering gun was out at our desert cottage, 40 miles away, and we needed to stay in town for several commitments. So I thought, I’ll just buy a cheap soldering iron to have here, and ordered one from Amazon with next-day delivery. Just $19.99. You can already see where this is going, can’t you?
Indeed. The kit arrived, in a plastic box with a coil stand and some accessories. Next morning I got to work—and the iron proved utterly incapable of heating a connector sufficiently to melt flux-core solder on a 50-degree morning. Or, later, on a 65-degree day with a trace of a breeze.
Sigh . . .
So I drove to a hardware store and bought the identical 100/140-watt Weller soldering gun I have at Ravenrock ($36.95) and had the connections soldered in minutes.

Anyone need a heated coffee stirrer?
Buy good tools.

Hint: When using “Search,” if nothing comes up, reload the page, this usually works. Also, our “Comment” button is on strike thanks to Squarespace, which is proving to be difficult to use! Please email me with comments!
Overland Tech & Travel brings you in-depth overland equipment tests, reviews, news, travel tips, & stories from the best overlanding experts on the planet. Follow or subscribe (below) to keep up to date.
Have a question for Jonathan? Send him an email [click here].
SUBSCRIBE
CLICK HERE to subscribe to Jonathan’s email list; we send once or twice a month, usually Sunday morning for your weekend reading pleasure.


Overland Tech and Travel is curated by Jonathan Hanson, co-founder and former co-owner of the Overland Expo. Jonathan segued from a misspent youth almost directly into a misspent adulthood, cleverly sidestepping any chance of a normal career track or a secure retirement by becoming a freelance writer, working for Outside, National Geographic Adventure, and nearly two dozen other publications. He co-founded Overland Journal in 2007 and was its executive editor until 2011, when he left and sold his shares in the company. His travels encompass explorations on land and sea on six continents, by foot, bicycle, sea kayak, motorcycle, and four-wheel-drive vehicle. He has published a dozen books, several with his wife, Roseann Hanson, gaining several obscure non-cash awards along the way, and is the co-author of the fourth edition of Tom Sheppard's overlanding bible, the Vehicle-dependent Expedition Guide.