
Overland Tech and Travel
Advice from the world's
most experienced overlanders
tests, reviews, opinion, and more
The Cinch to Hang, or Why didn't I think of that?
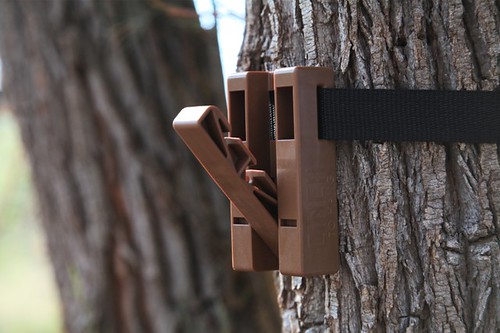
How many times have you been camping amongst trees and wanted to hang something on one of them—a kitchen utensil roll, a bathroom kit, a shaving mirror, a jacket or hat—and wished there were a nice stub of a branch right . . . there? Just hammering in a nail is considered impolite to the tree these days.
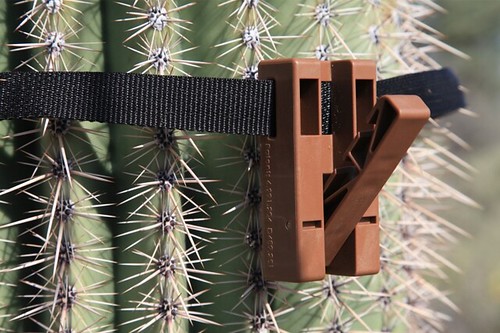
Charles Ay’s solution was clever enough to win two U.S. patents. The Cinch to Hang is a two-ounce plastic device that, when attached to any tree up to three feet in diameter with the included strap, can hold up to 50 pounds on its fold-out hook.
I subjected a sample to a comprehensive evaluation—which took about, oh, five minutes including installing it on the tree. Very simply, it works as advertised. There was no slippage at all with light loads, and the device only migrated down an inch or two even when I grabbed the hook and exerted significant downward force. Hanging something like a full day pack would be no problem. A pair on a pair of trees would comprise a perfect mount for a clothes line. One strapped to a slanting overhead limb would make an ideal lantern hanger.
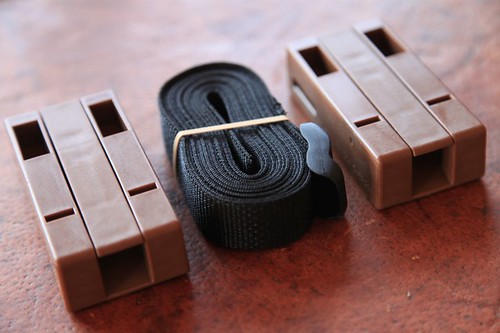
The standard Cinch to Hang kit ($24.95) comes with four hooks and a single strap, but the slot on the hook is one inch wide so it would take any equivalent strap if you want to hang them on different trees. The company’s website is a placeholder (with a photo of the wood prototype) for another week or so, but you can order by email. It’s one of those rare products you’ll truly wonder how you did without. Obviously the Patent Office thought so.
The one-case tool kit, part 1
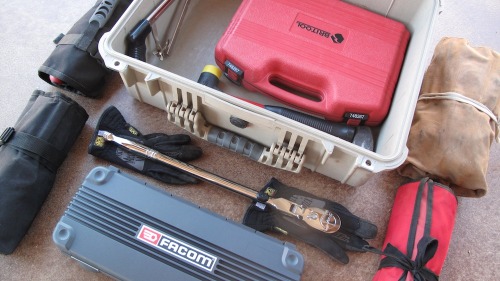
It would be pretty easy to bring along all the tools you’re likely to need on even an extended overlanding trip, covering virtually any repair not involving a new long block. What’s that? Oh—you also want room for, like, food? And maybe a tent and sleeping bags? Hmm . . . now that’s a problem.
The size of tool kit you carry (or should carry) is subject to a bunch of variables. The length of the trip and the remoteness of the route are two obvious considerations. The age of the vehicle is certainly a factor—even reliable vehicles need more attention as they get older. If you can just go out and write a check for a new Land Cruiser every time you leave on a major trip, your need for tools should be minimal. On the other hand there are people like, well, Roseann and me. A brief survey and some arithmetic established that the average age of all the four- and two-wheeled vehicles currently in our fleet—1970 Triumph Trophy, 1973 FJ40, 1974 Series III 88, 1981 BMW R80 G/S, 1982 Porsche 911SC, 1985 Mercedes 300D, and a practically spanking-new 1987 Honda NX250—is 33 years. All solid vehicles, but inevitably in need of attention now and then, especially the . . . (Ha! you were ready for a facile brand quip here, right? Not this time.)

You might think, if you’re utterly mechanically ignorant, that it makes no sense to waste money and space on tools you don’t know how to use anyway. Au contraire—if something goes wrong and you need the assistance of strangers, the least you can offer them is the tools to render that assistance. At a minimum, even on a brand-new Land Cruiser you should carry enough to make what I call generically “rubber repairs,” involving the replacement of pliable things such as fan and serpentine belts, and radiator and heater hoses. These are items that can fail or be damaged even on a new vehicle. A set of standard and Phillips-head screwdrivers, a socket and ratchet set, and a set of combination wrenches will suffice to start (note that for our purposes I consider tire-repair tools a separate subject). But if you want to cover more than first base, you'll need a few additional items.
Okay, so you’re going to buy some tools. You take a look around the web and find, for example, one set of metric combination open/box-end wrenches, from 10mm to 19mm, for $14.95, and another set of the exact same number and size wrenches, from a different manufacturer, for $298 (I am not making up these prices). You’d be forgiven if your brain texts to itself, WTF? We’re not talking about the difference in value between a Corvette and a Carrera here—this is more like Tata Nano versus Aston Martin Vantage. At least with the cars it’s easy to spot a few differences besides the fact that they’re both designed to go from point A to point B. The wrenches don’t even have any moving parts, and appear more or less identical. What gives?
Three factors contribute to the discrepancy: quality, reputation, and pure status.
Quality on even something as simple as a wrench can vary tremendously. Consider what goes into its manufacture:
- What is the alloy used in the steel—plain carbon? Chrome molybdenum? Chrome vanadium?
- How is the tool formed—is it machined, cast, or drop-forged? Drop-forging helps align the internal grain in the steel, increasing strength.
- How is it finished? If chromed to resist corrosion and dirt, what process was used?
- How precise are the tolerances? This is a critical factor in how well the wrench performs—sloppy tolerances increase the chances the wrench will strip a tight bolt or nut.
- Does the box end of the wrench employ the superior “Flank Drive” system pioneered by Snap-on and now copied everywhere? Look for rounded rather than sharp teeth; these bear on the stronger flats of the nut rather than the corners. (The Flank Drive Plus system on new Snap-on wrenches adds the same capability to the open end of the wrench via grooves on the flats. This has been copied by other makers as well.)
- What about ergonomics? Is the wrench long enough to provide adequate leverage (unless it's a shorty designed to fit in tight spaces)? Fully chromed and polished tools don't just look nice and resist corrosion; they're easier to keep clean as well.
- Finally, how socially responsible is the tool? Was environmental protection a factor in the mine-to-maker-to-consumer chain? Do workers in that chain earn a fair wage?
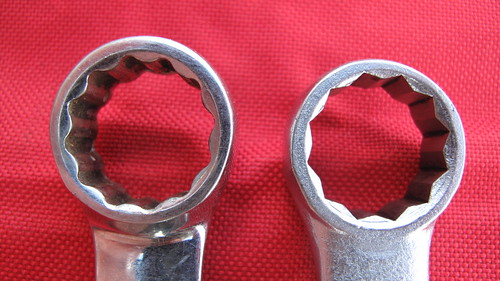 Flank Drive wrench head on the left, standard head on the right
It’s nearly impossible for a consumer to evaluate many of these parameters accurately. A tool marked “drop-forged” could be forged to low tolerances with poor-quality steel. One has to wonder if the wrenches in that $14.95 set were made by a laborer in his or her 60th hour of work that week, and if the smelter or factory do anything to reduce their emissions. It’s sheer common sense that for ten wrenches to be produced in Asia, shipped across the Pacific Ocean, trucked to a Harbor Freight store in Topeka, and sold at a profit for 15 bucks, something along the line had to give: quality, ethics, or both.
That’s where reputation figures into the equation. Although it’s not a guarantee, buying tools from manufacturers with solid reputations for quality at least makes it far more likely you’ll be getting a good product either produced in the U.S. or under decent conditions elsewhere. I’m referring here to such makers as Sears Craftsman, Kobalt, Proto, S-K, and Husky. A set of wrenches from those makers will cost more than $14.95, but it’s very probable the extra expense will be worth it on several levels.
Finally, there’s status. The “boutique” tool makers such as Snap-on (the producer of that $298 set of wrenches), and to a lesser extent Mac and Matco, have transcended reputation and moved on to the level of status symbol. There’s little doubt that that set of Snap-on wrenches (which are, just to be clear, certainly the best on the market) could be duplicated in every detail and sold for much less, but the Snap-on (or Mac or Matco) label adds a premium eagerly paid by both professional mechanics and well-to-do (or savvy, see below) amateurs. The reason is that, tool snobbery aside, these companies have stayed at the very forefront of tool development and quality. If you pay the premium prices for tools from these manufacturers, you can be absolutely certain you're getting the best tools with the most advanced features.
What to buy then? I’ll continue to repeat it for as long as it takes to make it into one of those 1001 Famous Quotes books: If you’ve brought out the tools, something has already gone wrong. Why risk compounding the situation by using cheap tools to try to fix it? I recently read an article on bush repairs in a respected Australian four-wheel-drive magazine, in which the writer opined, “Your tools don’t have to be good, just good enough.” And how, exactly, do you identify that fine line of “good enough” except when one breaks at the worst possible time and you’re left holding a handle and thinking, Hmm . . . not good enough.
So, fine—just go stop a Snap-on truck, hand the driver your AmEx card, and say, “Tool me.” Except that very few of us can afford that option. Instead, I suggest prioritizing.
The most critical component of an automotive tool kit is the ratchet and socket set. This is what you’ll be using for any serious repairs, and its various pieces are the most susceptible to poor quality control. The ratchet head encloses a lot of very small parts that can be put under enormous strain. It’s easy to make a strong ratchet head with a coarse (i.e. 24 or 36) tooth count, but such ratchets need to be turned many degrees to engage the next tooth—a real issue in tight spaces. The best ratchets these days have 72, 80, even 84-tooth heads, yet are immensely strong. The sockets themselves need to be as thin-walled as possible to fit over nuts in tight spots, yet stout enough not to split. That mandates the very best steel and the tightest tolerances.
If you’re putting together a complete tool kit, you’ll probably want one socket set in 3/8ths-inch drive, and another in 1/2-inch drive. The 3/8ths set is for general use; when something big needs fixing or replacing the 1/2-inch stuff will come out, so that’s the most critical in terms of quality.
Next are the wrenches, which do many of the same tasks as sockets but have the advantage of no moving parts. Nevertheless, quality is key—in many situations you’ll need a socket on one side of a fastener and a wrench on the other. I’ve only broken one wrench in my life, but I’ve used many that fit poorly.
So my advice is to spend until it hurts on your ratchet/socket sets, a bit less so on the wrenches. Next on my list would be a really good set of screwdrivers. After that, you can economize on many pieces with little risk of failure in the field.
A good place to compare quality in one spot is a Sears store. Take a look at ratchets. Their new, green-handled Evolv series (what’s with the cute missing “e” anyway?) represents the price-leader, and it shows. Pass. Move up to the standard Craftsman stuff—non-polished, coarse tooth count, but smoother. Now look at the fully-polished, thin-profile handles. Nicer and more comfortable, easier to keep clean, although the tooth count still feels fairly low. Finally, look at one of the Premium Grade products: Sealed head to keep out grime, industry-leading 84-tooth ratcheting mechanism that goes snicksnicksnick instead of click click click. My only complaints are the lack of a socket-release button, and the fact that the feel of several I tried seemed to vary slightly, as though manufacturing consistency wasn’t quite spot-on.
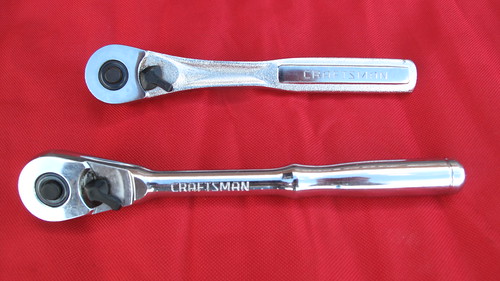 Standard Craftsman ratchet, top, fully polished, bottom. Both unfortunately have plastic selector levers, but are solid tools. The standard ratchet is now made in China.
For several decades I relied on Craftsman ratchets and wrenches, with only a scant few split sockets to their discredit during field repairs (replaced with no questions asked at Sears . . . after I got home of course). Recently I decided to up the ante. I started haunting eBay, looking at Snap-on socket and wrench sets. There were a few decent deals, but nothing spectacular—until I realized that the sets on offer that were missing a piece or two went for much less than the complete sets. Soon I snagged a lot of current-production 1/2-inch sockets, from 12mm all the way up to a giant 36mm, missing only a 19mm, which I quickly added on an individual auction. Same thing with a wrench set from 6mm to 30mm, missing the 14 and 17, again easily replaced.
My one retail splurge was the 1/2-inch ratchet handle. I consider this the single most critical tool in my kit. If I break out the 1/2-inch sockets, it’s usually because something significant has gone wrong with either my own vehicle or someone else’s. And if your ratchet handle breaks removing the 21mm bolts from a transmission bell housing, you can bet you won’t be getting them off with a pair of Vise-grips. So I went to the Snap-on website and plunked down $164.95 for part number SF80A: an 18-inch-long, flex-handle ratchet with a Swiss-watch-smooth 80-tooth mechanism—astonishing on a ratchet with a foot and a half of leverage, but Snap-on uses the same head on a 24-inch handle, so they obviously have confidence in it. The locking flex head gives this ratchet great flexibility, the length makes it an effective breaker bar for the tightest bolts, and the fine-toothed mechanism requires only 4.5 degrees of swing to engage the next tooth, a boon in restricted quarters. Every time I use it I’m impressed, and swear it makes me a better mechanic than I really am. It certainly makes me look like a better mechanic than I am.
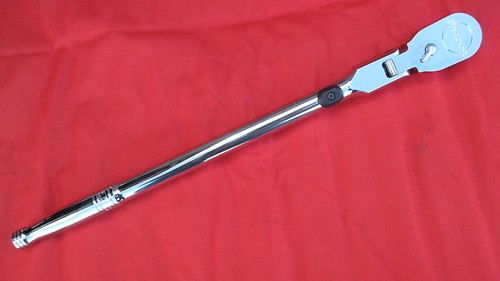 Worth every penny: The Snap-on SF80A 1/2-inch ratchet.
With these two fine sets in hand, I began contemplating my entire traveling tool kit. Specifically, I started musing on a question that had been at the back of my mind for some time: Would it be possible to assemble a high-quality tool kit that could handle virtually any field repair up to and including such things as clutch or differential replacement, suspension work, hub disassembly, or cylinder-head removal—in other words, the types of repairs one might expect on an extended overland trip in remote areas—yet still fit inside one manageable case?
Interesting idea. Time to look at some Pelican cases.
Next: a compact, high-quality 3/8ths-inch socket set. Read part 2 HERE.
Irreducible imperfection: The flimsy
At the beginning of the North Africa Campaign in WWII, the British faced a logistics problem on a scale they’d never imagined. In this, the first totally mechanized war, the need for fuel staggered existing supply lines—and existing supply containers. For several decades the British military had made do with a squarish four-gallon soldered-tin can known officially as a POW can—for Petrol, Oil, and Water—to move the bulk of its petrol supplies. The four-gallon size was light enough to be handled by one man (unlike the common 55-gallon drum), and small enough to be transported by light truck or even motorcycle.
But as General Wavell in Cairo mustered his tanks, trucks, and airplanes to counter the forces of the Italians and Germans massing in Tripolitania and Cyrenaica (now Libya), the deficiencies of the POW can quickly became all too clear. Stacked in pallets on cargo ships, the weight of the top layers simply crushed those below, resulting in fuel losses of up to 40 percent, and making unloading the intact containers extremely hazardous with thousands of gallons of petrol sloshing around in the bilges and the fumes powerful enough to render seamen unconscious, not to mention the danger of fire or explosion.
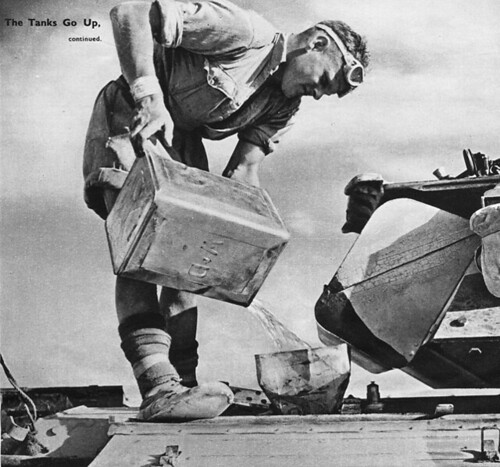 A British soldier refuels a Crusader tank from a flimsy. The funnel appears to have been made from another flimsy.
Even in smaller shipments the can proved absurdly fragile. Truck transport over 100 miles of desert track frequently left 20 to 30 percent of the contents cascading out the tailgate. In his book The Desert War, Alan Moorehead wrote, “The great bulk of the British Army was forced to stick to the old flimsy four gallon container, the majority were only used once. We could put a couple of petrol cans in the back of a truck, two hours of bumping over desert rocks usually produced a suspicious smell. Sure enough we would find both cans had leaked.”
That adjective, “flimsy,” quickly became a noun, and the POW can became universally known as the flimsy, reviled by troops and brass alike. To get an idea of the numbers used, consider that a single Wellington bomber flying a single nine-hour sortie needed 270 flimsies to fill its tanks. Piles of empty containers 30 feet high stood outside every airbase, and littered the Western Desert wherever British vehicles ranged.
Fortunately, an alternative presented itself when the retreating German Army began abandoning its own 20-liter containers. These were of embarrassingly brilliant design—perimeter-welded of stout steel for strength, with a three-handle configuration that allowed one man to carry two empty cans with one hand (or two full cans if he was strong), and which facilitated effortless hand-off of full cans down a line of men. The leak-proof cap was secured with a fast and foolproof lever, a breather allowed fast pouring, and a clever air trap at the top meant that a full can of petrol would float in water. The British scrounged all the “jerry cans” they could, and in England the design was unashamedly copied to the last detail—two million of them would be sent to North Africa before the end of the campaign. (The U.S. copied the design as well, but substituted cost-saving—and inferior—rolled seams and a screw top that was difficult to seal.)
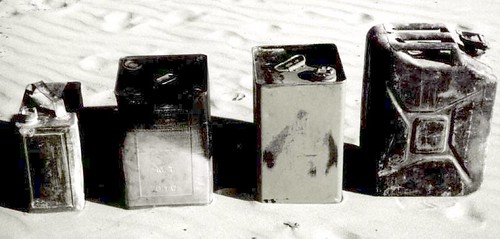 A British two-gallon container, early and later "improved" four-gallon flimsies, and the vastly superior German 20-liter fuel can. Note the thin and awkward handle of the flimsy.In the meantime, the flimsy proved happily more useful as a makeshift device than it did in its primary role. Filled with sand, it became an impromptu building block for gun emplacements and buildings. Cut in half and filled with petrol-soaked sand, it was used as a stove for boiling water (in another half-flimsy), and known as a Benghazi burner or Benghazi boiler (the latter term was subsequently applied to the Thermette, an early volcano kettle supplied to troops from New Zealand).
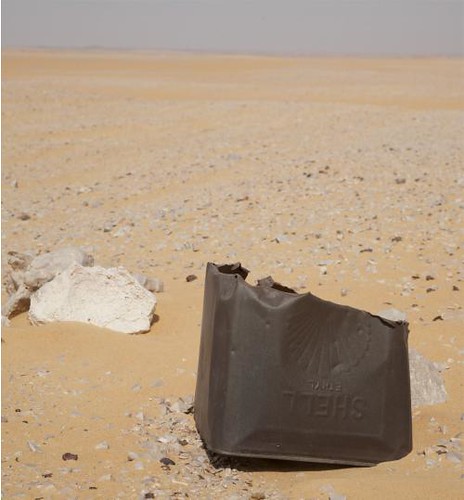
The Benghazi burner was also effective for illuminating rough landing strips at night—and that was quite possibly the role played by the crudely bisected Shell example we found in Egypt’s Western Desert this February (top photo). It speaks to the extreme aridity of this eastern edge of the Sahara that after 70 years even something as thin as a flimsy was still in recognizable shape.
The anti-tactical knife

It’s easy to become jaded viewing recent knife designs, 99 percent of which are chasing various black-ops/street-fighter/wilderness-survival fads. “Tactical” folders with assisted opening, black-oxidized blades, and tanto points? Yawn. (Ever tried to sharpen the corner on a tanto point?) Sheath knives with Kraton handles, half-serrated edges, and saw teeth on the back? Pass. Gerber’s Bear Grylls “Signature” knife includes a pocket survival guide and an emergency whistle on the lanyard cord. (“TWEEEET! Somebody help! I can’t get reception on the Discovery Channel!”)
I suppose one could ask just how much true original thinking we can expect in this oldest of all Mankind’s manufactured tools. You have a handle, and a blade. How much innovation is really possible? Also, to be fair, it’s beyond doubt that steel technology has progressed substantially the last couple of decades. Top-end modern blades now combine toughness, strength, and edge-holding in levels unimaginable just two decades ago. And in the end, the steel is really what a knife is all about.
Nevertheless, when I scan knifemakers’ booths at venues such as the Outdoor Retailer show, it takes something special to stop me in my tracks. Last Saturday, on a tip from Mario Donovan of Adventure Trailers, I strolled past the Baladéo booth—and stopped in my tracks.
On a plexiglass display stand stood an impossibly slender folding knife, a mere wisp of stainless steel accented by an even fainter wisp of black G10 scale material. The spine of the blade and the back of the handle comprised a single graceful curve. It was knife design reduced to, as the writer Thomas McGuane once described an elegant skiff, a “simple linear gesture.”

I expected it to be light, but I was unprepared for just how light. The model I held is called the 37G, for its weight in grams. That’s less than an ounce and a half, just hardly even there (and the company makes a smaller model called the 15G). For comparison, my Chris Reeve Sebenza (below), with titanium scales and a blade the same 3.75" length, weighs 130 grams. Despite this, the Baladéo's blade lockup felt good, and the knife is user serviceable via tiny Torx fasteners. The G10 mini-scale is one of several options (including a scaleless version at 34 grams). Also available is a limited edition (300 pieces) 37G in cooperation with climber Conrad Anker, the proceeds of which will go to support Anker’s Khumbu Climbing Center in Nepal, a school that trains local Sherpas in climbing techniques and safety.

Okay—let’s be clear. You won’t be using the 37G to saw your way out of the cockpit of your F/A 18 after being shot down behind enemy lines. You won’t be making a spear out of it with a stick and your unravelled paracord bracelet. In fact, you won’t be doing any of the things those “tactical” knifemakers assure you can be done with their products, which no one ever does anyway.
Even in the real world, this is a specialized implement. It would never work for field dressing large game, or making feather sticks for fire lighting. Opening shipping cartons? Well, sure, but slightly beneath contempt. That’s a job for a Swiss Army knife or a multitool. It certainly won’t take the place of a substantial piece such as the Sebenza.
Instead, here’s what I envision. You’re at an upscale restaurant with several acquaintances. The filet mignon you ordered has arrived, but the knife provided is either woefully inadequate or one of those coarsely oversized serrated saws. You produce the 37G from the inside pocket of your sport coat, open it with a deft twist, and slice away. Around you, conversation stops as everyone stares at the elegant blade, then demands to see it. Across the table, the guy who showed up in shorts, a T-shirt, and flip-flops, who was already squirming under your tolerant but dismissive glances, is instantly, totally emasculated, and says not another word about his new quad the entire night. In fact he skips dessert and leaves early.

You’ll think of other scenarios. Slicing cheddar and peeling oranges at a picnic? Nice. Gutting a freshly caught brook trout? Excellent. Opening Christmas presents? Perfect.
Criticisms are scant, accepting the design parameters and featherlight construction. The steel is utterly pedestrian 420 stainless—perfectly adequate for any task this knife will handle, and it keeps the price down to under $50. But it would be nice to see a premium option for us helpless steel snobs. Also, the blade has a chisel grind, bevelled on only one side (calling to mind my vintage Puma Trapper’s Companion). I find chisel grinds a bit more trouble to sharpen, and will unceremoniously convert this one to a standard grind the first time it needs work (the edge is completely protected when closed so this represents no hazard). Finally, if you grip the knife the wrong way it’s possible to accidentally release the Walker liner lock that keeps the blade open. The best grip is a squeeze between thumb and index finger on either side of the pivot bolt.

Those minor issues aside, this is one of those tools that will bring a smile to your face whenever you use it. I liked it enough to buy two—a G10 for me and a Conrad Anker model for Roseann.
However, in case you were wondering, the 37G does not come with an emergency whistle.
 Above: 37G with G10 scale. Below: Conrad Anker edition to benefit the Khumbu Climbing Center.Baladéo G Series knives
Outdoor Retailer, day 3—security
Securing our gear (or your wallet and passport) is always top on our mind, whether locking up to go on a hike at Grand Canyon or shopping for produce in Congo. Here are few security accessories we spotted at the show:
 P^cubed pants (pickpocket-proof) have multiple layers of security, from super tough fabric and thread to triple layer pocket openings. From Clothing Arts.
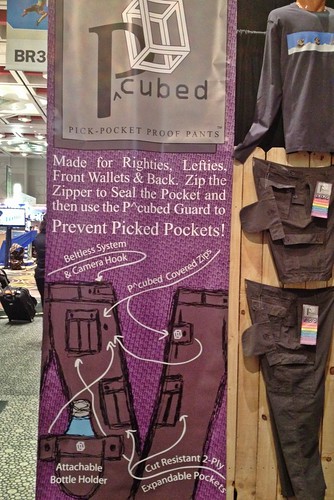 Banner at the Clothing Arts booth explaining the P^cubed pants.
 TravelOn's security purses look like a good alternative if you need to carry a shoulder bag. Each has a steel-wire net incorporated, and slash-proof strap. A cross-body carry is recommended to avoid snatch-and-run, obviously.
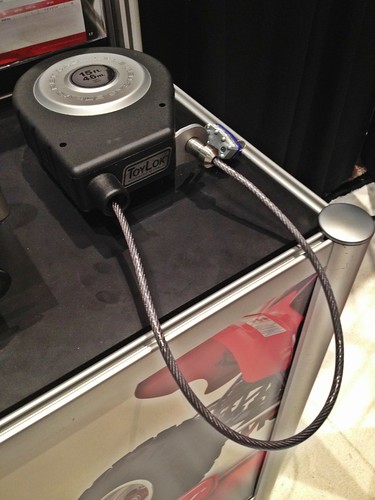 ToyLok's retractable-cable steel lock can be secured to your vehicle and easily deployed to lock bikes or boats. They are considering a smaller version for motorcycles.
Outdoor Retailer 2012, day 2 - ultralight tents
At last count I owned 14 tents, and I might have missed a couple tucked away somewhere or loaned out. Clearly there's a bit of an obsession there, and I'm finding enough to keep it stoked at the OR show. Most fascinating are the ultralightweight one and two-person tents employing high-strength canopy materials that look like they'd be blown apart by an errant sneeze. Don't be fooled - they're astonishingly rugged.
It's not new, but the incredible Terra Nova Laser Ultra 1 exemplifies the genre. The "1" refers to its weight - a staggering one pound, five ounces - with titanium stakes. Or are they toothpicks?
 Scott Christoffel of Terra Nova with the Laser Ultra 1The Laser is designed primarily for adventure racers, and it will sleep two of them, probably violating laws in at least 27 states. But other Terra Nova models only slightly less radical could serve bicyclists or anyone with a 600-pound GS1200 needing to save every last ounce elsewhere. And the company's budget Wild Country line, which employs polyester fabrics with polyurethane coatings rather than the premium silicone-impregnated fabrics used in most of the Terra Nova line, looks to represent a solid value.
Here's another ultralight model from Easton, two pounds nine ounces with carbon fiber poles:

And another from Sea to Summit, the Specialist Duo:

There was plenty to see in family-sized tents as well, including this Big Agnes Flying Diamond 8, with 112 square feet of floor space and six feet of headroom.

More tomorrow . . .
Outdoor Retailer, day 1
Overland Tech and Travel arrived at Outdoor Retailer in sunny Salt Lake City this afternoon. We managed to visit a couple dozen booths before the happy hours began. Over the next three days we will be reporting on new gear as well as just cool stuff. Follow our Flickr Outdoor Retailer set as well (http://www.flickr.com/photos/conserventures/sets/72157630877676310/with/7701752420/).
Here's a preview:
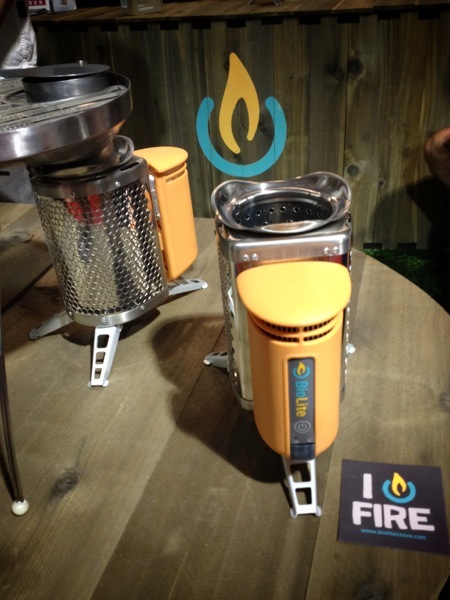
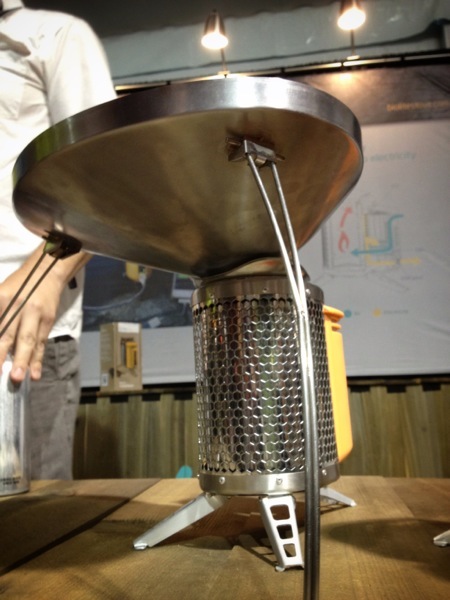
BioLite stove: burns wood (think Kelly kettle on steroids) and generates electricity for charging phones and laptops. Brilliant. A prototype heat-concentrating cooktop, below, was also on display. BioLite.com
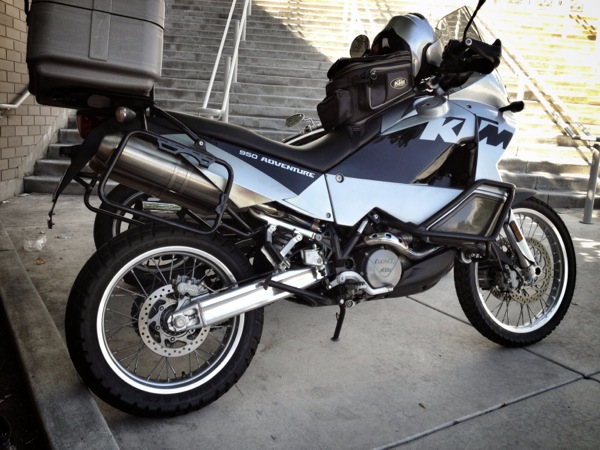
Stealth gray KTM 950 Adventure parked in the shade outside the south entrance.
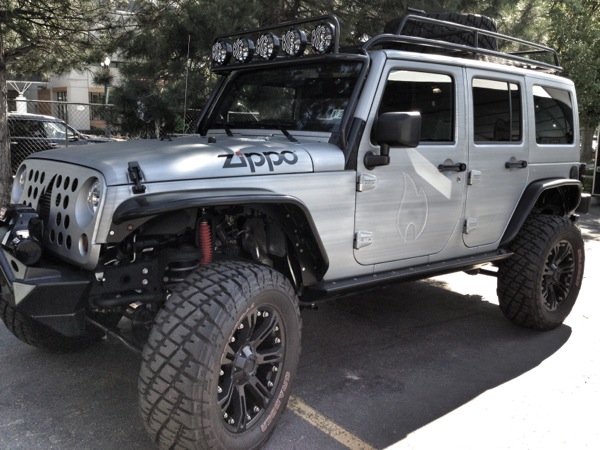
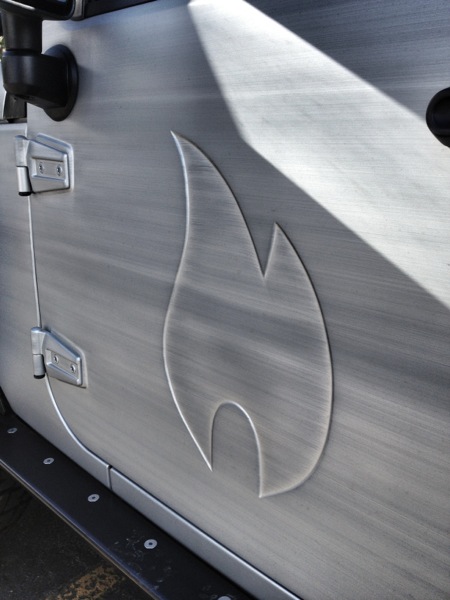
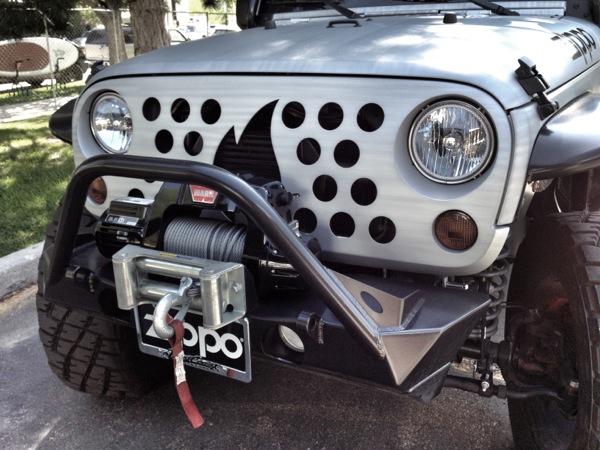
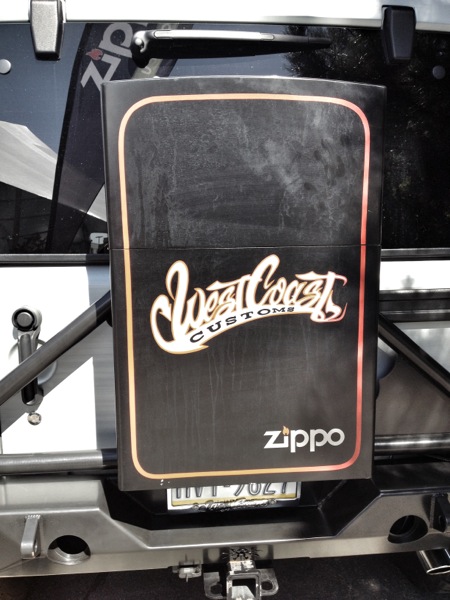
Zippo's beautifully crafted brushed "aluminum" Jeep JK Wrangler, with embossed doors, flame grille, and lighter rear rack box.
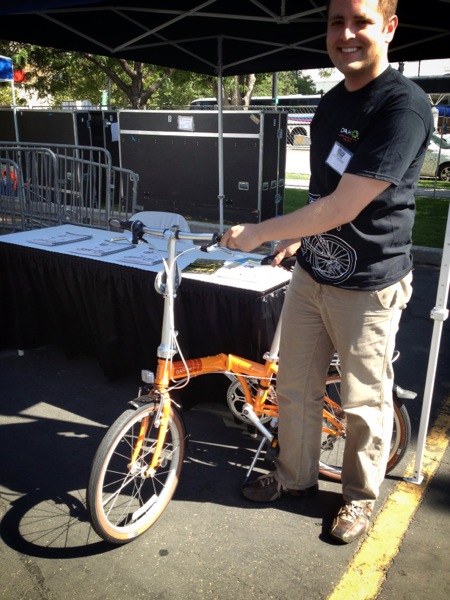
Dahon bicycles fold up into small packages, perfect for overlanding around the globe.
Lifeproof's incredibly slender iPhone case is nevertheless shock-resistant (two-meter drop), dustproof, and waterproof to a depth of six feet - which means your phone will now easily survive being dropped in the toilet.

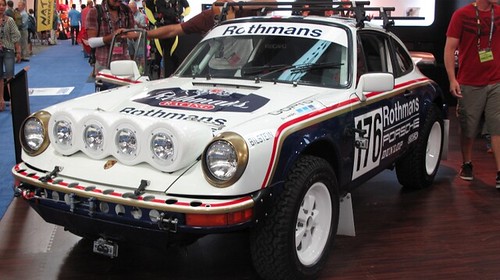
GoPro's display featured this spectacular replica of a legendary Rothmans Paris-Dakar Porsche 911 SC RS.
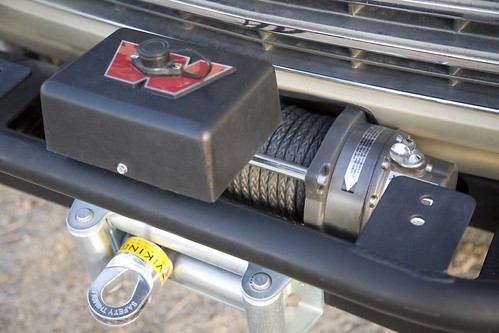
Warn M8000—ultimate overlanding winch!
I wrote that title deliberately. One of my eye-rolling pet peeves as a reader and editor is the ubiquity of magazine headlines and cover blurbs that begin with, “Ultimate”—followed by an utterly non-ultimate product—followed by a “!” Firearms periodicals seem especially obsessed with the term. I’ve forgotten how many times I’ve been breathlessly introduced to the “Ultimate Compact .45!” or the “Ultimate Tactical 9mm!” (And don’t get me started on the “tactical” lunacy.)
Of course there is very rarely such a thing as an “ultimate” anything (although Fuller’s 1845 might come close in the bottled beer category). There is only, at best, the ultimate compromise—and this applies universally to the equipment we add to our vehicles. High quality or low price? Strength or light weight? Multi-function operation or ease of use?
If you’re looking at winches for an overlanding vehicle, there’s an additional question to ponder: Do you really need one at all? I addressed this issue some time ago (click here to go to article), but now we’re going to assume you’ve decided that the advantages outweigh the disadvantages, and are planning to install one. (Either that, or you’ve simply succumbed helplessly to winch envy.) In either case, how do you minimize those disadvantages?
Aside from cost, the salient drawback to a winch is weight. Not just the weight of the winch and line and fairlead, but also a properly constructed bumper on which to mount it, and perhaps the dual battery system you’ll install to make sure you don’t run your only source dry during a long, maximum-amperage pull. And that weight is in the worst possible spot, way out in front of the vehicle where it applies leverage on the suspension. Aside from spending yet more money on suspension modifications, an obvious solution is a very light winch, but then we run into a compromise: light weight equals low power.
It’s axiomatic that a winch should be rated at around 1.5 times the loaded weight of the vehicle on which it is mounted. Why 1.5 times? Shouldn’t a 6,000-pound winch be perfectly adequate for a vehicle that weighs 6,000 pounds all up? Theoretically, yes, but several things complicate matters. First is the simple fudge factor inherent in the rating of many products. Second, and more universal, is the fact that all winches are rated with just a single layer of line on the drum. More layers equal less rotational leverage for the winch and less pulling power (roughly ten percent per layer)—and it’s not always possible or practical to arrange a winch recovery so that most of the line is pulled out first. Additionally, substrate makes a difference: For example, deep, sticky mud adds significantly to the effective weight of any stuck vehicle, and a large boulder in the middle of a steep uphill pull can spike the effective weight well past its actual mass. Finally, off-center pulls and other awkward situations add to the load on the winch. So the 1.5 factor is a wise generalization.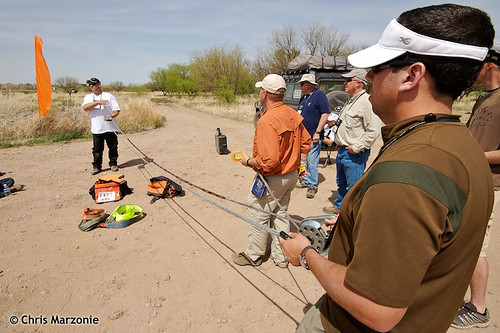 Rigging a winch line with a pulley block at Overland Expo 2010. Photo by Chris Marzonie
On the other hand, technique can optimize the power of a winch. First is making sure you have as much line out as possible, either by backing up the anchor vehicle or picking an anchor tree that’s farther away. You can also use a redirected pull to get more line out, for example by attaching a pulley block to a nearby tree, and running the line though that to another anchor tree back closer to you. You’ll lose a bit to pulley friction, but if you can get a couple of layers of line off the drum it will be worth it.
However, the best way to maximize a winch’s capability is to rig a double-line pull: from the winch of the stuck vehicle through a pulley block on a fixed anchor vehicle or tree, then back to the stuck vehicle (or, if you’re rescuing a stuck vehicle with your winch, to a pulley block attached to the rescuee and then back to your vehicle). This setup halves the line speed of the winch but doubles its power, in addition to getting out more line and reducing the layers on the drum. Obviously, relying on this technique also halves the reach of your winch, but, at least in my experience, in the vast majority of overlanding situations (with the glaring exception of tropical-rainy-season mud), 45 feet of usable line is enough to access a natural anchor or another vehicle—and if not, a winch line extension will give you the reach you need. You can gain even more power by adding another pulley block and rigging a triple-line pull, at the expense of even less reach. (Remember to always leave at least five full wraps of line on the drum if you get down to the first layer.) 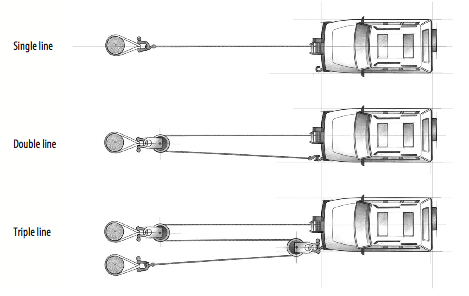
With the limitations of reach accepted, the 1.5 factor becomes somewhat flexible. Which brings us to the Warn M8000 (and its new brother, the M8000-s).
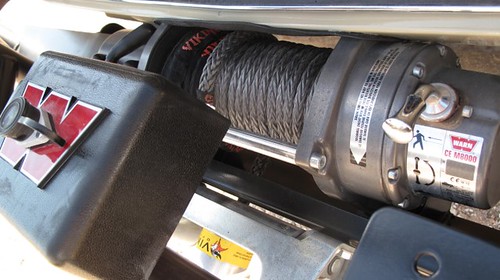
The M8000 is rated at—surprise—8,000 pounds, which, for example, is a bit under the 1.5 factor for our FJ60 when it’s fully loaded with gear, fuel, and two people. A lot of later full-size SUVs would blow past it before a single sleeping bag was tossed inside. On the other hand, it’s right in the ballpark for many compact pickups and small SUVs. And the M8000 is very light. I recently had ours off while the vehicle got a full repaint, and put each component on a scale. The bare winch, with no line or solenoid box, weighs only 35.6 pounds. The solenoid box and 1/0 cables to the battery total 7.2 pounds. The steel roller fairlead is 11 even, and 100 feet of Viking synthetic winch line adds a hardly-worth-measuring 2.8 pounds with a safety thimble (the standard steel cable is 13.2 pounds without a hook or thimble).
That’s a total of just 56.6 pounds—and we could reduce that to under 50 pounds with an aluminum hawse fairlead. Interestingly, the Warn M8000-s comes with synthetic line and an aluminum fairlead, and its advertised weight is 55 pounds. Mount it to an Aluminess bumper—which can be ordered without the bull bar so few of us really need—and you’ve got a complete system for around 125 pounds.
The M8000 might be light, but it’s also built to last. I’ve seen, either in person or in photos, disassembled examples of three “different” discount-brand winches (all of them most likely built in the same factory, the Ningbo Lift Winch Manufacture Company in Ningbo Mingzhou Industrial City, China). All appeared to be virtual clones of the M8000—until you looked inside, where compromises in motors, gear trains, and wiring were apparent.*
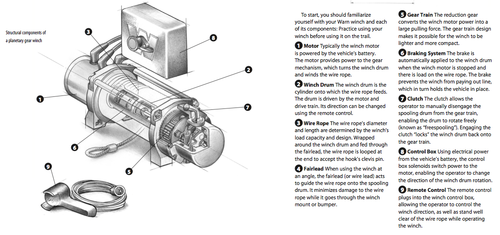
The motor is the heart of the winch, and it consists of two main components: a central set of wire coils wrapped around the shaft, called the rotor (or armature), and an outer assembly called the stator. When current is supplied to the rotor and stator it produces opposing magnetic fields, which cause the rotor and its attached shaft to turn via the attracting and repelling forces of the fields. The rotor is called an electromagnet because it only becomes magnetized when current passes through it. The stator can also comprise a wire coil magnetized by current, in which case the assembly is called a “series-wound” motor. Alternatively the stator can be constructed with standard metallic magnets that are thus always “on,” as it were. This is then known, logically, as a “permanent-magnet” motor.
Permanent-magnet motors are cheaper to make and use slightly less current (since none is needed to magnetize the stator). However, they overheat more easily than series-wound motors, and the magnets can lose their field strength over time (and temporarily in very cold weather). Permanent-magnet motors work very well in light-duty situations, but for high-stress applications series-wound motors—such as that found in the M8000—are superior. However, not all series-wound motors are the same. Hidden differences in wiring, bearings and bushings, and tolerances mean that in a winch (or any other electrical appliance) the standards demanded by the manufacturer still determine the final quality of the assembled product.
 Click on image to open in larger window.
The other major electrical component in a winch assembly is the switch gear that controls power to the motor, typically housed in a plastic box attached to the winch. Traditionally, these have been relays (commonly called solenoids). A relay in our application is essentially a mechanical on-off switch capable of handling large amounts of current, controlled by a smaller-capacity switch elsewhere—the winch’s remote in this case. A relay thus shortens the length of heavy-duty cable that would otherwise be necessary to insure adequate amperage to the winch (the same holds true for other high-draw devices, such as driving lights, that use a relay and a remote switch). Winches usually employ relays in multiples—one or two to handle power-in switching, one or two to handle power-out.
Since relays utilize moving mechanical contacts to transfer current, they are subject to wear and corrosion. Often the result will be that the relay simply stops working, but very rarely a worn relay will stick in the “on” position—with predictable ramifications if you’re operating a powerful electrical device which you need to be able to turn off right now.
In the last few years, solid-state devices known as contactors have begun to replace relays in many winches, including the M8000. A contactor employs a high-capacity semi-conductor to route current; thus there are no moving parts to wear out or corrode. Contactors can still fail, but it’s virtually impossible that they would do so in the “on” position.
The last link in the winch assembly is the gear train by which the motor turns the spool and pulls in (or lets out) the line. Since the motor turns at a high speed, its revolutions per minute must be reduced considerably, both to gain mechanical advantage and to keep the line speed to a manageable level. There are three main types of gear train: worm, spur, and planetary. The latter is the type found the M8000 and most consumer winches these days. Planetary gears are so called because the central gear, driven by the motor, is literally orbited by the secondary gears that drive the spool.
Planetary-gear systems are very compact, inexpensive to manufacture, and reasonably efficient. Their salient drawback is that they have no intrinsic braking capability when the winch is spooling out under power, so an internal brake is required, usually inside the spool. This brake will transfer heat to the drum, and subsequently the inner wraps of the line, if, for example, it’s necessary to lower a vehicle’s weight against the winch on a long downhill recovery. This can be an issue with synthetic winch line, which loses strength if it is heated too much. According to Thór Jónsson at Viking, current Dyneema winch line will begin to lose strength if it reaches 150ºF while under load, and will begin to melt in the high 300º range. While the latter point is unlikely during any normal single-vehicle recovery, the former isn’t. For this reason, planetary-gear winches should always be set to free-spool when you are pulling out line to rig the recovery, and should be powered out under load for no more than 20 seconds at a time, then allowed to cool. No such precaution is necessary when powering in, the normal mode for the vast majority of winch recoveries.
(An interesting characteristic of synthetic winch line is that, even if heated to over 150º, it will regain the strength it lost once it cools. At first glance, the bottom layers of synthetic line might appear to be melted after any load, but they’re really just compressed. However, if you exceed that critical 300º-plus point, you’ll be left with a chunk of melted plastic. Thór once had a customer complain after he melted the Viking line on his M8000. Questioning revealed that he’d been lowering all his friends’ trucks down a steep incline one after the other. Further questioning revealed that he’d also melted the winch’s motor.)
Four-wheel-drive overland travel is different than trail running. My early experiences with the latter involved a friend with a beat-up 1964 Land Cruiser FJ40 equipped with a Ramsey winch and an alarmingly frayed steel cable. We took that vehicle over some ridiculous trails, getting stuck numerous times a day and hooking the winch to whatever was nearby to pull it out. I’m still amazed we both survived with limbs intact, but that Ramsey did yeoman duty time after time.
However, on a long overland journey, it’s vital to minimize stress on the vehicle. The aim is to avoid becoming stuck, to take the easy route when possible. Challenging conditions are tackled only when there is no other way through. Thus, on most overland trips a winch is rarely needed, which leads some to argue, why not buy a cheap winch since you’ll hardly use it anyway? While it’s a valid question, my response is the same one I give people who argue for cheap hand tools: If you need the tools—or the winch—something has already gone wrong. Why risk compounding the situation by relying on substandard equipment? A knock-off winch built with inferior materials might well simply seize up after a long period of non-use. Before I get a raft of responses: I’ve known several people who bought new 8,000-pound Chinese winches for $350 or less and have had absolutely stellar service from them. And I know several others who bought similar winches and had them fail quickly or perform poorly. That crapshoot factor is the scary part, even if you’re unoffended by companies willing to reverse-engineer someone else’s work simply to cheapen it and sell it for less.
The final aspect of installing a winch, of course, is learning how to use it properly. You can take the trial-and-error approach my friend and I did, but a far better (and infinitely safer) way is to get professional instruction. Even a basic course such as that taught at the Overland Expo will increase your knowledge and confidence immensely; full classes can be taken from competent schools such as High Trails Expeditions or Overland Experts. Once you have the basic techniques in hand, it’s vital to practice them until every move is instinctive and firmly planted in your long-term memory.
That way, when your truck goes frame-deep in Tanzanian black cotton soil you’ll handle the situation with—dare I say this?—ultimate proficiency.
* * * * * * * * * *
Diagrams are from an excellent Warn manual, available online as a PDF; click here to download.
* Sadly and ironically, Warn now offers a line of cut-price winches, the VR series, built to lower specs than the M series, to compete with the brands that copied and undercut Warn in the first place. I’m not sure whether I’m more disappointed in Warn, for not simply redoubling their efforts to convince customers that better quality is worth the investment, or with consumers who are blinkered to everything but price. In their defense, I’ll note that Warn furnishes the same warranty with the VR series winches as they do with their high-end lines; nevertheless, my advice is, if you can’t afford a new M8000 or another top-quality winch, buy a used one—you’ll still be better off than compromising on internal quality.
Hint: When using “Search,” if nothing comes up, reload the page, this usually works. Also, our “Comment” button is on strike thanks to Squarespace, which is proving to be difficult to use! Please email me with comments!
Overland Tech & Travel brings you in-depth overland equipment tests, reviews, news, travel tips, & stories from the best overlanding experts on the planet. Follow or subscribe (below) to keep up to date.
Have a question for Jonathan? Send him an email [click here].
SUBSCRIBE
CLICK HERE to subscribe to Jonathan’s email list; we send once or twice a month, usually Sunday morning for your weekend reading pleasure.


Overland Tech and Travel is curated by Jonathan Hanson, co-founder and former co-owner of the Overland Expo. Jonathan segued from a misspent youth almost directly into a misspent adulthood, cleverly sidestepping any chance of a normal career track or a secure retirement by becoming a freelance writer, working for Outside, National Geographic Adventure, and nearly two dozen other publications. He co-founded Overland Journal in 2007 and was its executive editor until 2011, when he left and sold his shares in the company. His travels encompass explorations on land and sea on six continents, by foot, bicycle, sea kayak, motorcycle, and four-wheel-drive vehicle. He has published a dozen books, several with his wife, Roseann Hanson, gaining several obscure non-cash awards along the way, and is the co-author of the fourth edition of Tom Sheppard's overlanding bible, the Vehicle-dependent Expedition Guide.